 Because of the Unified Communications Managed API (UCMA) 4.0 requirement on Exchange 2013 for the integrated UM role, both platforms have a similar set of prerequisite requirement. That was half the battle in 2010, because if you didn’t have the correct version of the patches, or didn’t install them in the right order, things would fail.
Along with OWA integration, Lync now supports a Unified Contact Store (UCS), which was somewhat hinted to in 2010 but didn’t come to fruition until 2013. This means that you don’t have to maintain a separate set of contact from Exchange, which was somewhat frustrating and cumbersome. This will be any admin’s friend in pushing out set groups of contacts ![]()
OK so enough blabbering, let’s dig in:
First, the foundation of communication between Exchange and Lync 2013 is based on the new Office Web App “OAuth” calls for server-to-server communication. As part of the installation of Lync 2013 you had to install SSL certificates to start the services, however for Exchange you’ll want to make sure you’re not using the self-signed certificates. An internal CA is fine (we’re using this in our test environment), third party is even better, but the self-signed will not be able to communicate because it’s missing the necessary subject names.
First let’s get the autodiscover service URI:
get-clientaccessserver | fl fqdn, autodiscoverserviceinternaluri

Fqdn                           : VL-EXG-01.company.local
AutoDiscoverServiceInternalUri : https://autodiscover.company.local/Autodiscover/Autodiscover.xml
Also lets take on the Lync side and get the pool FQDN:
PS C:\Users\administrator.COMPANY> Get-Cspool | where-object {$_.services –like “*UserServer*”} | fl site, fqdn

Site : Site:ConnectUC
Fqdn : lyncpool.company.local
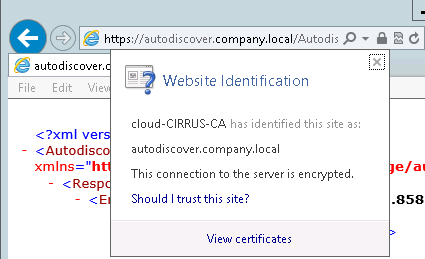
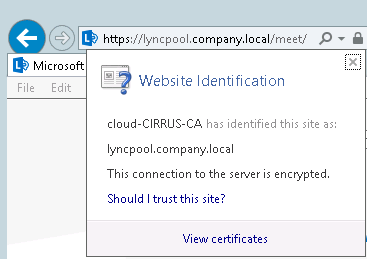
Since we’re using internally signed certificates, we’ll want to try accessing these URLs from both the Lync and Exchange servers, and ensure we can open them via IE without any certificate warnings.
 On the Exchange 2013 environment, we link up to Lync:
cd $exscripts
.\Configure-EnterprisePartnerApplication.ps1 –AuthMetadataUrl “https://lyncpool.company.local/metadata/json/1” -ApplicationType Lync

iisreset
Now let’s update Exchange to enable IM!
The process isn’t that different from Exchange 2010, except I’ve noticed that Exchange 2013 holds on to an internal self-signed certificate so we can’t blindly use a wildcard like we did before. We need to determine which thumbprint to use by looking at the Subject name and Issuer:
Get-ExchangeCertificate | where-object {$_.services -like “*iis*” } | fl subject, issuer, services, thumbprint
Subject    : CN=mailtest.connectuc.com, OU=Connect UC, O=IT, L=Minneapolis, S=MN, C=US
Issuer     : CN=cloud-CIRRUS-CA, DC=cloud, DC=local
Services   : IMAP, POP, IIS, SMTP
Thumbprint : 5FB91CB7AB7677EF45B5C809CF8CB9CFDB31D0A1

Subject    : CN=VL-EXG-01
Issuer     : CN=VL-EXG-01
Services   : IIS, SMTP
Thumbprint : 86F218D2E3AF6D98422F18E1217C101BBC0F000B
Now that we have the thumbprint, and we know our Lync pool FQDN, let’s plug it in.
7/28/2013 Update – In my scenario I have a single CAS for Exchange 2013 and do not have separate front end/back end services. When we enable Lync IM for Exchange, we only want to target the FRONT END servers. Thanks to Varol for pointing out that Microsoft tells us that IM is “NOT” enabled on the BACK END servers.
Get-OwaVirtualDirectory -ShowBackEndVirtualDirectories -server vl-exg-01.company.local | Set-OwaVirtualDirectory -InstantMessagingEnabled $true -InstantMessagingType OCS -InstantMessagingCertificateThumbprint 5FB91CB7AB7677EF45B5C809CF8CB9CFDB31D0A1 –InstantMessagingServerName lyncpool.company.local

Get-OwaMailboxPolicy | Set-OwaMailboxPolicy -InstantMessagingEnabled $true –InstantMessagingType OCS
Next, let’s change the OWA web.config information. Use Notepad to open the
Notepad “C:\Program Files\Microsoft\Exchange Server\V15\ClientAccess\Owa\web.config”
Under <appSettings> add 2 lines, substituting your Exchange certificate thumbprint (which we already obtained) and the Lync pool name:
<add key=”IMCertificateThumbprint” value=”5FB91CB7AB7677EF45B5C809CF8CB9CFDB31D0A1” />
<add key=”IMServerName” value=”lyncpool.company.local” />
 Then recycle the related IIS pool:
C:\Windows\System32\Inetsrv\Appcmd.exe recycle apppool /apppool.name:”MSExchangeOWAAppPool”
Then over on the Lync side, we have a few commands to run in order to integrate with Exchange.
First, we create a Partner Application:
New-CsPartnerApplication -identity Exchange -ApplicationTrustLevel Full -MetadataUrl https://autodiscover.company.local/autodiscover/metadata/json/1
Next we create our trusted application pool/application. We’ll need to plug in our Exchange server name (or our NLB DNS name) and the Lync Site name we obtained earlier.
New-CsTrustedApplicationPool -Identity vl-exg-01.company.local -Registrar lyncpool.company.local -Site ConnectUC -RequiresReplication $False

New-CsTrustedApplication -ApplicationId OutlookWebAccess -TrustedApplicationPoolFqdn vl-exg-01.company.local -Port 5199
Then finally we publish our changes to the topology.
Enable-CSToplogy
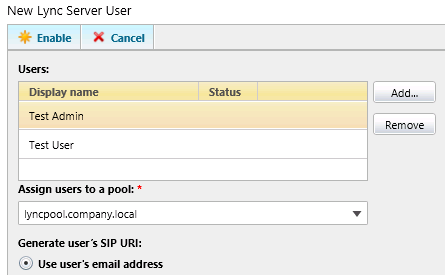
Next, we can enable our User accounts in Lync
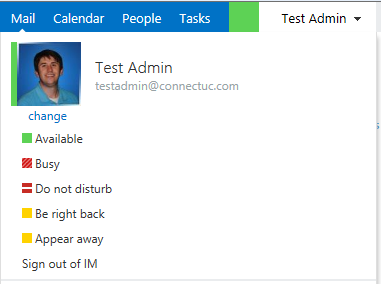
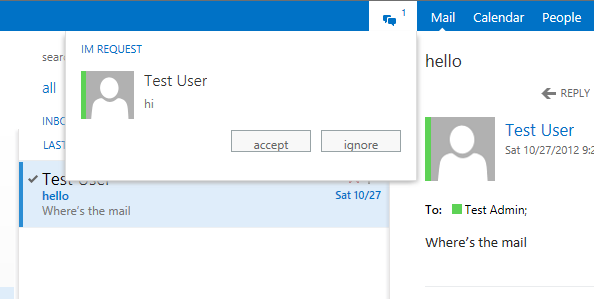
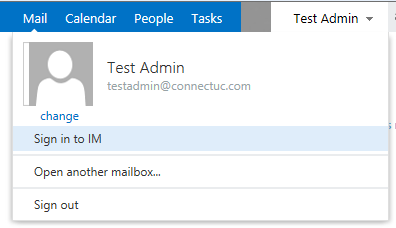
 If all went successfully, let’s log into OWA and click to Sign in to IM
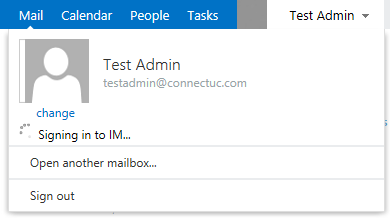 And success!