Enabling Debian 6.0 LTS Security Support

This announcement is for Debian 6.0 (AKA Squeeze / TurnKey 12) users who have not yet upgraded to Debian 7.0 (AKA Wheezy / TurnKey 13):

~# cat /etc/issue.netDebian GNU/Linux 6.0

Support for security updates to Debian 6.0 officially ended on Saturday May 31 2014.

As you may have heard, for the first time Debian is experimenting with a five year Long Term Support (LTS) program that will extend support until Feb 2016:

https://www.debian.org/security/2014/dsa-2938

Good news for procrastinators. The catch is that if you’re still using Debian 6.0 you have to manually enable your system to receive LTS updates.

If you don’t do that then the next time there is a remotely exploitable security vulnerability your system could get compromised.

For example, the previous version of TurnKey (TurnKey 12.X ) based on Debian 6.0 no longer receives automatic security updates. Those of you that still have systems running Debian 6.0 have three options:

  1. Manually enable LTS updates on your Debian 6.0 system:
~# apt-get install debian-keyring debian-archive-keyring

~# cat>>/etc/apt/sources.list.d/security.sources.list<<'EOF'

deb http://http.debian.net/debian/ squeeze-lts main contrib non-free

deb-src http://http.debian.net/debian/ squeeze-lts main contrib non-free

EOF

~# apt-get update10.~# apt-get upgrade

Check which packages on your system are not supported:

~# apt-get install debian-security-support

~# check-support-status

Use TurnKey’s backup and migration system (TKLBAM) to migrate your data and configurations from a TurnKey 12 based system to an equivalent TurnKey 13 based system, which is based on Debian 7.0.

The advantages:

  • If anything breaks you don’t have to fix it in place and you still have the original system up and running. Less pressure.
  • Forces you to test your backups.

TKLBAM is built into all TurnKey systems. If you’re using plain old Debian you can install TKLBAM with this one liner:

wget -O - -q https://raw.github.com/turnkeylinux/tklbam/master/contrib/ez-apt-install.sh \| PACKAGE=tklbam /bin/bash
  1. Upgrade Debian 6.0 in place to Debian 7.0:

https://wiki.debian.org/DebianUpgrade

You can upgrade TurnKey 12 based systems to Debian 7.0 the same way you would upgrade any other Debian system. Remember that under the hood TurnKey is just a preconfigured, customized version of Debian with a few extra packages (e.g., like TKLBAM).

Viber izložen hakerskim napadima

Američki stručnjaci za računalnu forenziku sa Sveučilišta u New Havenu (UNHcFREG) upozoravaju da Viber, popularna aplikacija za razmjenu poruka, izlaže svoje korisnike hakerskim napadima. Pošto aplikacija ne šifrira podatke prilikom komuniciranja sa svojim Amazon poslužiteljem, svatko može prikupiti korisničke podatke s nekim od alata za snimanje mrežnog prometa. Viber je obaviješten o ovom sigurnosnom propustu te mu je preporučeno da ispravno zaštiti podatke.

24.04.2014 Izvor: The Register

Upgraded AD Sync Server to Server 2012 R2 – No Longer Syncing

So I upgraded my Azure Active Directory Sync server to Windoes Server 2012 R2 and now my sync isn’t working anymore.  I downloaded the latest version from the link in the Technet article on setting up directory sync, since I have no idea where to get it from the new admin portal.  When I try to run the upgrade it extracts the files, then I immediately receive a generic failure:

See the end of this message for details on invoking
just-in-time (JIT) debugging instead of this dialog box.

************** Exception Text **************
System.Management.ManagementException: Generic failure
at System.Management.ManagementException.ThrowWithExtendedInfo(ManagementStatus errorCode)
at System.Management.ManagementObjectCollection.ManagementObjectEnumerator.MoveNext()
at Microsoft.Online.DirSync.Common.MiisAction.GetTargetMA()
at Microsoft.Online.DirSync.Common.MiisAction.IsSyncInProgress()
at Microsoft.Online.DirSync.Common.PrerequisiteChecks.ThrowIfSyncInProgress()
at Microsoft.Online.DirSync.UI.IntroductionWizardPage.PreChecks()
at Microsoft.Online.DirSync.UI.IntroductionWizardPage.PrerequisiteValidation()
at Microsoft.Online.DirSync.UI.IntroductionWizardPage.OnLoad(EventArgs e)
at System.Windows.Forms.Control.CreateControl(Boolean fIgnoreVisible)
at System.Windows.Forms.Control.CreateControl()
at System.Windows.Forms.Control.WmShowWindow(Message& m)
at System.Windows.Forms.Control.WndProc(Message& m)
at System.Windows.Forms.Control.ControlNativeWindow.WndProc(Message& m)
at System.Windows.Forms.NativeWindow.Callback(IntPtr hWnd, Int32 msg, IntPtr wparam, IntPtr lparam)

************** Loaded Assemblies **************
mscorlib
Assembly Version: 2.0.0.0
Win32 Version: 2.0.50727.7905 (win9rel.050727-7900)
CodeBase: file:///C:/Windows/Microsoft.NET/Framework64/v2.0.50727/mscorlib.dll
----------------------------------------
Setup
Assembly Version: 1.0.0.0
Win32 Version: 1.0.6475.7
CodeBase: file:///C:/Users/ADMINI~1.VHQ/AppData/Local/Temp/1/%7BBDA1E3A7-0A22-4C54-A5F9-E2A31AF8217C%7D/SETUP.EXE
----------------------------------------
Microsoft.Online.DirSync.Common
Assembly Version: 1.0.0.0
Win32 Version: 1.0.6475.7
CodeBase: file:///C:/Users/ADMINI~1.VHQ/AppData/Local/Temp/1/%7BBDA1E3A7-0A22-4C54-A5F9-E2A31AF8217C%7D/Microsoft.Online.DirSync.Common.DLL
----------------------------------------
System.Windows.Forms
Assembly Version: 2.0.0.0
Win32 Version: 2.0.50727.7905 (win9rel.050727-7900)
CodeBase: file:///C:/Windows/assembly/GAC_MSIL/System.Windows.Forms/2.0.0.0__b77a5c561934e089/System.Windows.Forms.dll
----------------------------------------
System
Assembly Version: 2.0.0.0
Win32 Version: 2.0.50727.7905 (win9rel.050727-7900)
CodeBase: file:///C:/Windows/assembly/GAC_MSIL/System/2.0.0.0__b77a5c561934e089/System.dll
----------------------------------------
System.Drawing
Assembly Version: 2.0.0.0
Win32 Version: 2.0.50727.7905 (win9rel.050727-7900)
CodeBase: file:///C:/Windows/assembly/GAC_MSIL/System.Drawing/2.0.0.0__b03f5f7f11d50a3a/System.Drawing.dll
----------------------------------------
Microsoft.Online.DirSync.Resources
Assembly Version: 1.0.0.0
Win32 Version: 1.0.6475.7
CodeBase: file:///C:/Users/ADMINI~1.VHQ/AppData/Local/Temp/1/%7BBDA1E3A7-0A22-4C54-A5F9-E2A31AF8217C%7D/Microsoft.Online.DirSync.Resources.DLL
----------------------------------------
System.Configuration
Assembly Version: 2.0.0.0
Win32 Version: 2.0.50727.7905 (win9rel.050727-7900)
CodeBase: file:///C:/Windows/assembly/GAC_MSIL/System.Configuration/2.0.0.0__b03f5f7f11d50a3a/System.Configuration.dll
----------------------------------------
System.Xml
Assembly Version: 2.0.0.0
Win32 Version: 2.0.50727.7905 (win9rel.050727-7900)
CodeBase: file:///C:/Windows/assembly/GAC_MSIL/System.Xml/2.0.0.0__b77a5c561934e089/System.Xml.dll
----------------------------------------
System.ServiceProcess
Assembly Version: 2.0.0.0
Win32 Version: 2.0.50727.7905 (win9rel.050727-7900)
CodeBase: file:///C:/Windows/assembly/GAC_MSIL/System.ServiceProcess/2.0.0.0__b03f5f7f11d50a3a/System.ServiceProcess.dll
----------------------------------------
System.Management
Assembly Version: 2.0.0.0
Win32 Version: 2.0.50727.7905 (win9rel.050727-7900)
CodeBase: file:///C:/Windows/assembly/GAC_MSIL/System.Management/2.0.0.0__b03f5f7f11d50a3a/System.Management.dll
----------------------------------------

************** JIT Debugging **************
To enable just-in-time (JIT) debugging, the .config file for this
application or computer (machine.config) must have the
jitDebugging value set in the system.windows.forms section.
The application must also be compiled with debugging
enabled.

For example:

<configuration>
<system.windows.forms jitDebugging=”true” />
</configuration>

When JIT debugging is enabled, any unhandled exception
will be sent to the JIT debugger registered on the computer
rather than be handled by this dialog box.
If I try to uninstall the current version I just get a popup that says Generic failure with no additional text.

*************************************************************************************

This is exactly what I did to get it to work:

1. Restart

2. Open your Windows Azure Active Directory Sync folder

3. Run SynchronizationService.msi

4. Remove Forefront Identity Manager synchronization Service

5. Run UnInstallDirectorySync.exe

6. Restart

7. Install the latest version

Deploying Work Folders

This topic discusses the steps needed to implement Work Folders. It assumes that you’ve already read Designing a Work Folders Implementation.

To deploy Work Folders, a process that can involve multiple servers and technologies, use the following steps.

TipTip
The simplest Work Folders deployment is a single file server (often called a sync server) without support for syncing over the Internet, which can be a useful deployment for a test lab or as a sync solution for domain-joined client computers. To create a simple deployment, these are minimum steps to follow: 

Step 1: Obtain SSL certificates

To allow users to sync across the Internet, the URL published by Work Folders must be protected by an SSL certificate. The requirements for SSL certificates used by Work Folders are as follows:

The certificate must be issued by a trusted certification authority. For most Work Folders implementations, a publicly trusted CA is recommended, since certificates will be used by non-domain-joined, Internet-based devices.

The certificate must be valid.

The private key of the certificate must be exportable (as you will need to install the certificate on multiple servers).

The subject name of the certificate must contain the public Work Folders URL used for discovering the Work Folders service from across the Internet – this must be in the format of workfolders.<domain_name>.

Subject alternative names (SANs) must be present on the certificate listing the server name for each sync server in use.

Step 2: Create DNS records

To allow users to sync across the Internet, you must create a Host (A) record in public DNS to allow Internet clients to resolve your Work Folders URL. This DNS record should resolve to the external interface of the reverse proxy server.

On your internal network, you should create a DNS alias record for the Work Folders URL that resolves to the server names of all sync servers on the network.

Step 3: Install Work Folders on file servers

You can install Work Folders on a domain-joined server by using Server Manager or by using Windows PowerShell, locally or remotely across a network. This is useful if you are configuring multiple sync servers across your network.

To deploy the role in Server Manager, do the following:

  1. Start the Add Roles and Features Wizard.
  2. On the Select installation type page, choose Role-based or feature-based deployment.
  3. On the Select destination server page, select the server on which you want to install Work Folders.
  4. On the Select server roles page, expand File and Storage Services, expand File and iSCSI Services, and then select Work Folders.
  5. When asked if you want to install IIS Hostable Web Core, click Ok to install the minimal version of Internet Information Services (IIS) required by Work Folders.
  6. Click Next until you have completed the wizard.

To deploy the role by using Windows PowerShell, use the following cmdlet:


Add-WindowsFeature FS-SyncShareService


Step 4: Binding the SSL certificate on the sync servers

Work Folders installs the IIS Hostable Web Core, which is an IIS component designed to enable web services without requiring a full installation of IIS. After installing the IIS Hostable Web Core, you should bind the SSL certificate for the server to the Default Web Site on the file server. However, the IIS Hostable Web Core does not install the IIS Management console.

There are two options for binding the certificate to the Default Web Interface. To use either option you must have installed the private key for the certificate into the computer’s personal store.

  • Utilize the IIS management console on a server that has it installed. From within the console, connect to the file server you want to manage, and then select the Default Web Site for that server. The Default Web Site will appear disabled, but you can still edit the bindings for the site and select the certificate to bind it to that web site.
  • Use the netsh command to bind the certificate to the Default Web Site https interface. The command is as follows:


netsh http add sslcert ipport=<IP address>:443 certhash=<Cert thumbprint> appid={CE66697B-3AA0-49D1-BDBD-A25C8359FD5D} certstorename=MY

Step 5: Create security groups for Work Folders

Before creating sync shares, a member of the Domain Admins or Enterprise Admins groups needs to create some security groups in Active Directory Domain Services (AD DS) for Work Folders (they might also want to delegate some control as described in Step 6). Here are the groups you need:

  • One group per sync share to specify which users are allowed to sync with the sync share
  • One group for all Work Folders administrators so that they can edit an attribute on each user object that links the user to the correct sync server (if you’re going to use multiple sync servers)

Groups should follow a standard naming convention and should be used only for Work Folders to avoid potential conflicts with other security requirements.

To create the appropriate security groups, use the following procedure multiple times – once for each sync share, and once to optionally create a group for file server administrators.

  1. Open Server Manager on a Windows Server 2012 R2 or Windows Server 2012 computer with Active Directory Administration Center installed.
  2. On the Tools menu, click Active Directory Administration Center. Active Directory Administration Center appears.
  3. Right-click the container where you want to create the new group (for example, the Users container of the appropriate domain or OU), click New, and then click Group.
  4. In the Create Group window, in the Group section, specify the following settings:
    • In Group name, type the name of the security group, for example: HR Sync Share Users, or Work Folders Administrators.
    • In Group scope, click Security, and then click Global.
  5. In the Members section, click Add. The Select Users, Contacts, Computers, Service Accounts or Groups dialog box appears.
  6. Type the names of the users or groups to which you grant access to a particular sync share (if you’re creating a group to control access to a sync share), or type the names of the Work Folders administrators (if you’re going to configure user accounts to automatically discover the appropriate sync server), click OK, and then click OK again.

To create a security group by using Windows PowerShell, use the following cmdlets:

$GroupName = "Work Folders Administrators"
$DC = "DC1.contoso.com"
$ADGroupPath = "CN=Users,DC=contoso,DC=com"
$Members = "CN=Maya Bender,CN=Users,DC=contoso,DC=com","CN=Irwin Hume,CN=Users,DC=contoso,DC=com"

New-ADGroup -GroupCategory:"Security" -GroupScope:"Global" -Name:$GroupName -Path:$ADGroupPath -SamAccountName:$GroupName -Server:$DC
Set-ADGroup -Add:@{'Member'=$Members} -Identity:$GroupName -Server:$DC

Step 6: Optionally delegate user attribute control to Work Folders administrators

If you are deploying multiple sync servers and want to automatically direct users to the correct sync server, you’ll need to update an attribute on each user account in AD DS. However, this normally requires getting a member of the Domain Admins or Enterprise Admins groups to update the attributes, which can quickly become tiresome if you need to frequently add users or move them between sync servers.

For this reason, a member of the Domain Admins or Enterprise Admins groups might want to delegate the ability to modify the msDS-SyncServerURL property of user objects to the Work Folders Administrators group you created in Step 5, as described in the following procedure.

  1. Open Server Manager on a Windows Server 2012 R2 or Windows Server 2012 computer with Active Directory Users and Computers installed.
  2. On the Tools menu, click Active Directory Users and Computers. Active Directory Users and Computers appears.
  3. Right-click the OU under which all user objects exist for Work Folders (if users are stored in multiple OUs or domains, right-click the container that is common to all of the users), and then click Delegate Control…. The Delegation of Control Wizard appears.
  4. On the Users or Groups page, click Add… and then specify the group you created for Work Folders administrators (for example, Work Folders Administrators).
  5. On the Tasks to Delegate page, click Create a custom task to delegate.
  6. On the Active Directory Object Type page, click Only the following objects in the folder, and then select the User objects checkbox.
  7. On the Permissions page, clear the General checkbox, select the Property-specific checkbox, and then select the Read msDS-SyncServerUrl, and Write msDS-SyncServerUrl checkboxes.
To delegate the ability to edit the msDS-SyncServerURL property on user objects by using Windows PowerShell, use the following example script that makes use of the DsAcls command.
$GroupName = "Contoso\Work Folders Administrators"
$ADGroupPath = "CN=Users,dc=contoso,dc=com"

DsAcls $ADGroupPath /I:S /G ""$GroupName":RPWP;msDS-SyncServerUrl;user"

noteNote: The delegation operation might take a while to run in domains with a large number of users.

Step 7: Create sync shares for user data

At this point, you’re ready to designate a folder on the sync server to store your user’s files. This folder is called a sync share, and you can use the following procedure to create one.

  1. If you don’t already have an NTFS volume with free space for the sync share and the user files it will contain, create a new volume and format it with the NTFS file system.
  2. In Server Manager, click File and Storage Services, and then click Work Folders.
  3. A list of any existing sync shares is visible at the top of the details pane. To create a new sync share, from the Tasks menu choose New Sync Share…. The New Sync Share Wizard appears.
  4. On the Select the server and path page, specify where to store the sync share. If you already have a file share created for this user data, you can choose that share. Alternatively you can create a new folder.
    noteNote
    By default, sync shares aren’t directly accessible via a file share (unless you pick an existing file share). If you want to make a sync share accessible via a file share, use the Shares tile of Server Manager or the New-SmbShare cmdlet to create a file share, preferably with access-based enumeration enabled.
  5. On the Specify the structure for user folders page, choose a naming convention for user folders within the sync share. There are two options available:
    • User alias creates user folders that don’t include a domain name. If you are using a file share that is already in use with Folder Redirection or another user data solution, select this naming convention. You can optionally select the Sync only the following subfolder checkbox to sync only a specific subfolder, such as the Documents folder.
    • User alias@domain creates user folders that include a domain name. If you aren’t using a file share already in use with Folder Redirection or another user data solution, select this naming convention to eliminate folder naming conflicts when multiple users of the share have identical aliases (which can happen if the users belong to different domains).
  6. On the Enter the sync share name page, specify a name and a description for the sync share. This is not advertised on the network but is visible in Server Manager and Windows Powershell to help distinguish sync shares from each other.
  7. On the Grant sync access to groups page, specify the group that you created that lists the users allowed to use this sync share.
    ImportantImportant
    To improve performance and security, grant access to groups instead of individual users and be as specific as possible, avoiding generic groups such as Authenticated Users and Domain Users. Granting access to groups with large numbers of users increases the time it takes Work Folders to query AD DS. If you have a large number of users, create multiple sync shares to help disperse the load.
  8. On the Specify device policies page, specify whether to request any security restrictions on client PCs and devices. There are two device policies that can be individually selected:
    • Encrypt Work Folders Requests that Work Folders be encrypted on client PCs and devices
    • Automatically lock screen, and require a password Requests that client PCs and devices automatically lock their screens after 15 minutes, require a six-character or longer password to unlock the screen, and activate a device lockout mode after 10 failed retries
      securitySecurity Note
      To apply Work Folders password policies that are more restrictive than policies currently in place, users must belong to the Administrators group on their computers. While users usually are administrators of their personal devices and computers, they aren’t always administrators on domain-joined computers. To enforce password policies for non-administrators on domain-joined computers, you should instead use Group Policy password policies for the user and/or computer domains and exclude these domains from the Work Folders password policies. You can exclude domains by using the Set-Syncshare -PasswordAutoExcludeDomain cmdlet after creating the sync share.
  9. Review your selections and complete the wizard to create the sync share.

You can create sync shares using Windows PowerShell by using the New-SyncShare cmdlet. Below is an example of this method:

New-SyncShare "HR Sync Share" K:\Share-1 –User "HR Sync Share Users"

The example above creates a new sync share named Share01 with the path K:\Share-1, and access granted to the group named HR Sync Share Users

TipTip
After you create sync shares you can use File Server Resource Manager functionality to manage the data in the shares. For example, you can use the Quota tile inside the Work Folders page in Server Manager to set quotas on the user folders. You can also use File Screening Management to control the types of files that Work Folders will sync, or you can use the scenarios described in Dynamic Access Control: Scenario Overview for more sophisticated file classification tasks.

Step 8: Optionally specify a tech support email address and Active Directory Federation Services authentication

After installing Work Folders on a file server, you probably want to specify an administrative contact email address for the server, and you might want to enable Active Directory Federation Services (AD FS) authentication. To do either of these tasks, use the following procedure:

  1. In Server Manager, click File and Storage Services, and then click Servers.
  2. Right-click the sync server, and then click Work Folders Settings. The Work Folders Settings window appears.
  3. On the Authentication page, optionally choose Active Directory Federation Services and specify a Federation Service URL. For more information about AD FS, see Active Directory Federation Services Overview.
    noteNote
    If the sync server isn’t in the same Active Directory site as the AD FS server and the network traffic must go through a proxy server, you need to configure the sync server to use the correct proxy configuration. For more information, see the following topic: How to configure a proxy server for the Work Folders service.


  4. In the navigation pane, click Support Email and then type the email address or addresses that users should use when emailing for help with Work Folders. Click OK when you’re finished.Work Folders users can click a link in the Work Folders Control Panel item that sends an email containing diagnostic information about the client PC to the address(es) you specify here.

Step 9: Optionally set up server automatic discovery

If you are hosting multiple sync servers in your environment, you should configure server automatic discovery by populating the msDS-SyncServerURL property on user accounts in AD DS.

Before you can do so, you must install a Windows Server 2012 R2 domain controller or update the forest and domain schemas by using the Adprep /forestprep and Adprep /domainprep commands. For information on how to safely run these commands, see Running Adprep.

You probably also want to create a security group for file server administrators and give them delegated permissions to modify this particular user attribute, as described in Step 5 and Step 6. Without these steps you would need to get a member of the Domain Admins or Enterprise Admins group to configure automatic discovery for each user.

  1. Open Server Manager on a computer with Active Directory Administration Tools installed.
  2. On the Tools menu, click Active Directory Administration Center. Active Directory Administration Center appears.
  3. Navigate to the Users container in the appropriate domain, right-click the user you want to assign to a sync share, and then click Properties.
  4. In the Navigation pane, click Extensions.
  5. Click the Attribute Editor tab, select msDS-SyncServerUrl and then click Edit. The Multi-valued String Editor dialog box appears.
  6. In the Value to add box, type the URL of the sync server with which you want this user to sync, click Add, click OK, and then click OK again.
    noteNote
    The sync server URL is simply https:// or http:// (depending on whether you want to require a secure connection) followed by the fully qualified domain name of the sync server. For example, https://sync1.contoso.com.


To populate the attribute for multiple users, use Active Directory PowerShell. Below is an example that populates the attribute for all members of the HR Sync Share Users group, discussed in Step 5.

$SyncServerURL = "https://sync1.contoso.com"
$GroupName = "HR Sync Share Users"

Get-ADGroupMember -Identity $GroupName |
Set-ADUser –Add @{"msDS-SyncServerURL"=$SyncServerURL}

Step 10: Configure Web Application Proxy or another reverse proxy

To enable users to sync their Work Folders across the Internet, you need to publish Work Folders through a reverse proxy, making Work Folders available externally on the Internet. You can use Web Application Proxy, which is included in Active Directory Federation Services (AD FS), to publish Work Folders on the Internet, or you can use another reverse proxy solution.

For background information about Web Application Proxy, see Web Application Proxy Overview. For details on publishing applications such as Work Folders on the Internet using Web Application Proxy, see Overview: Connect to Applications and Services from Anywhere with Web Application Proxy.

Step 11: Optionally use Group Policy to configure domain-joined PCs

If you have a large number of domain-joined PCs to which you want to deploy Work Folders, you can use Group Policy to do the following client PC configuration tasks:

  • Specify which sync server users should sync with
  • Force Work Folders to be set up automatically, using default settings (review the Group Policy discussion in Designing a Work Folders Implementation before doing this)

To control these settings, create a new Group Policy object (GPO) for Work Folders and then configure the following Group Policy settings as appropriate:

  • “Specify Work Folders settings” policy setting in User Configuration\Policies\Administrative Templates\Windows Components\WorkFolders
  • “Force automatic setup for all users” policy setting in Computer Configuration\Policies\Administrative Templates\Windows Components\WorkFolders
noteNote
These policy settings are available only when editing Group Policy from a computer running Group Policy Management on Windows 8.1 or Windows Server 2012 R2. Versions of Group Policy Management from earlier operating systems do not have this setting available.

The Heartbleed Bug

heartbleed

The Heartbleed Bug is a serious vulnerability in the popular OpenSSL cryptographic software library. This weakness allows stealing the information protected, under normal conditions, by the SSL/TLS encryption used to secure the Internet. SSL/TLS provides communication security and privacy over the Internet for applications such as web, email, instant messaging (IM) and some virtual private networks (VPNs).

The Heartbleed bug allows anyone on the Internet to read the memory of the systems protected by the vulnerable versions of the OpenSSL software. This compromises the secret keys used to identify the service providers and to encrypt the traffic, the names and passwords of the users and the actual content. This allows attackers to eavesdrop on communications, steal data directly from the services and users and to impersonate services and users.

What leaks in practice?

We have tested some of our own services from attacker’s perspective. We attacked ourselves from outside, without leaving a trace. Without using any privileged information or credentials we were able steal from ourselves the secret keys used for our X.509 certificates, user names and passwords, instant messages, emails and business critical documents and communication.

How to stop the leak?

As long as the vulnerable version of OpenSSL is in use it can be abused. Fixed OpenSSL has been released and now it has to be deployed. Operating system vendors and distribution, appliance vendors, independent software vendors have to adopt the fix and notify their users. Service providers and users have to install the fix as it becomes available for the operating systems, networked appliances and software they use.


Q&A

What is the CVE-2014-0160?

CVE-2014-0160 is the official reference to this bug. CVE (Common Vulnerabilities and Exposures) is the Standard for Information Security Vulnerability Names maintained by MITRE. Due to co-incident discovery a duplicate CVE, CVE-2014-0346, which was assigned to us, should not be used, since others independently went public with the CVE-2014-0160 identifier.

Why it is called the Heartbleed Bug?

Bug is in the OpenSSL’s implementation of the TLS/DTLS (transport layer security protocols) heartbeat extension (RFC6520). When it is exploited it leads to the leak of memory contents from the server to the client and from the client to the server.

What makes the Heartbleed Bug unique?

Bugs in single software or library come and go and are fixed by new versions. However this bug has left large amount of private keys and other secrets exposed to the Internet. Considering the long exposure, ease of exploitation and attacks leaving no trace this exposure should be taken seriously.

Is this a design flaw in SSL/TLS protocol specification?

No. This is implementation problem, i.e. programming mistake in popular OpenSSL library that provides cryptographic services such as SSL/TLS to the applications and services.

What is being leaked?

Encryption is used to protect secrets that may harm your privacy or security if they leak. In order to coordinate recovery from this bug we have classified the compromised secrets to four categories: 1) primary key material, 2) secondary key material and 3) protected content and 4) collateral.

What is leaked primary key material and how to recover?

These are the crown jewels, the encryption keys themselves. Leaked secret keys allows the attacker to decrypt any past and future traffic to the protected services and to impersonate the service at will. Any protection given by the encryption and the signatures in the X.509 certificates can be bypassed. Recovery from this leak requires patching the vulnerability, revocation of the compromised keys and reissuing and redistributing new keys. Even doing all this will still leave any traffic intercepted by the attacker in the past still vulnerable to decryption. All this has to be done by the owners of the services.

What is leaked secondary key material and how to recover?

These are for example the user credentials (user names and passwords) used in the vulnerable services. Recovery from this leaks requires owners of the service first to restore trust to the service according to steps described above. After this users can start changing their passwords and possible encryption keys according to the instructions from the owners of the services that have been compromised. All session keys and session cookies should be invalidated and considered compromised.

What is leaked protected content and how to recover?

This is the actual content handled by the vulnerable services. It may be personal or financial details, private communication such as emails or instant messages, documents or anything seen worth protecting by encryption. Only owners of the services will be able to estimate the likelihood what has been leaked and they should notify their users accordingly. Most important thing is to restore trust to the primary and secondary key material as described above. Only this enables safe use of the compromised services in the future.

What is leaked collateral and how to recover?

Leaked collateral are other details that have been exposed to the attacker in the leaked memory content. These may contain technical details such as memory addresses and security measures such as canaries used to protect against overflow attacks. These have only contemporary value and will lose their value to the attacker when OpenSSL has been upgraded to a fixed version.

Recovery sounds laborious, is there a short cut?

After seeing what we saw by “attacking” ourselves, with ease, we decided to take this very seriously. We have gone laboriously through patching our own critical services and are dealing with possible compromise of our primary and secondary key material. All this just in case we were not first ones to discover this and this could have been exploited in the wild already.

How revocation and reissuing of certificates works in practice?

If you are a service provider you have signed your certificates with a Certificate Authority (CA). You need to check your CA how compromised keys can be revoked and new certificate reissued for the new keys. Some CAs do this for free, some may take a fee.

Am I affected by the bug?

You are likely to be affected either directly or indirectly. OpenSSL is the most popular open source cryptographic library and TLS (transport layer security) implementation used to encrypt traffic on the Internet. Your popular social site, your company’s site, commerce site, hobby site, site you install software from or even sites run by your government might be using vulnerable OpenSSL. Many of online services use TLS to both to identify themselves to you and to protect your privacy and transactions. You might have networked appliances with logins secured by this buggy implementation of the TLS. Furthermore you might have client side software on your computer that could expose the data from your computer if you connect to compromised services.

How widespread is this?

Most notable software using OpenSSL are the open source web servers like Apache and nginx. The combined market share of just those two out of the active sites on the Internet was over 66% according to Netcraft’s April 2014 Web Server Survey. Furthermore OpenSSL is used to protect for example email servers (SMTP, POP and IMAP protocols), chat servers (XMPP protocol), virtual private networks (SSL VPNs), network appliances and wide variety of client side software. Fortunately many large consumer sites are saved by their conservative choice of SSL/TLS termination equipment and software. Ironically smaller and more progressive services or those who have upgraded to latest and best encryption will be affected most. Furthermore OpenSSL is very popular in client software and somewhat popular in networked appliances which have most inertia in getting updates.

What versions of the OpenSSL are affected?

Status of different versions:

  • OpenSSL 1.0.1 through 1.0.1f (inclusive) are vulnerable
  • OpenSSL 1.0.1g is NOT vulnerable
  • OpenSSL 1.0.0 branch is NOT vulnerable
  • OpenSSL 0.9.8 branch is NOT vulnerable

Bug was introduced to OpenSSL in December 2011 and has been out in the wild since OpenSSL release 1.0.1 on 14th of March 2012. OpenSSL 1.0.1g released on 7th of April 2014 fixes the bug.

How common are the vulnerable OpenSSL versions?

The vulnerable versions have been out there for over two years now and they have been rapidly adopted by modern operating systems. A major contributing factor has been that TLS versions 1.1 and 1.2 came available with the first vulnerable OpenSSL version (1.0.1) and security community has been pushing the TLS 1.2 due to earlier attacks against TLS (such as the BEAST).

How about operating systems?

Some operating system distributions that have shipped with potentially vulnerable OpenSSL version:

  • Debian Wheezy (stable), OpenSSL 1.0.1e-2+deb7u4
  • Ubuntu 12.04.4 LTS, OpenSSL 1.0.1-4ubuntu5.11
  • CentOS 6.5, OpenSSL 1.0.1e-15
  • Fedora 18, OpenSSL 1.0.1e-4
  • OpenBSD 5.3 (OpenSSL 1.0.1c 10 May 2012) and 5.4 (OpenSSL 1.0.1c 10 May 2012)
  • FreeBSD 10.0 – OpenSSL 1.0.1e 11 Feb 2013
  • NetBSD 5.0.2 (OpenSSL 1.0.1e)
  • OpenSUSE 12.2 (OpenSSL 1.0.1c)

Operating system distribution with versions that are not vulnerable:

  • Debian Squeeze (oldstable), OpenSSL 0.9.8o-4squeeze14
  • SUSE Linux Enterprise Server
  • FreeBSD 8.4 – OpenSSL 0.9.8y 5 Feb 2013
  • FreeBSD 9.2 – OpenSSL 0.9.8y 5 Feb 2013
  • FreeBSD 10.0p1 – OpenSSL 1.0.1g (At 8 Apr 18:27:46 2014 UTC)
  • FreeBSD Ports – OpenSSL 1.0.1g (At 7 Apr 21:46:40 2014 UTC)

How can OpenSSL be fixed?

Even though the actual code fix may appear trivial, OpenSSL team is the expert in fixing it properly so fixed version 1.0.1g or newer should be used. If this is not possible software developers can recompile OpenSSL with the handshake removed from the code by compile time option -DOPENSSL_NO_HEARTBEATS.

Should heartbeat be removed to aid in detection of vulnerable services?

Recovery from this bug might have benefitted if the new version of the OpenSSL would both have fixed the bug and disabled heartbeat temporarily until some future version. Majority, if not almost all, of TLS implementations that responded to the heartbeat request at the time of discovery were vulnerable versions of OpenSSL. If only vulnerable versions of OpenSSL would have continued to respond to the heartbeat for next few months then large scale coordinated response to reach owners of vulnerable services would become more feasible. However, swift response by the Internet community in developing online and standalone detection tools quickly surpassed the need for removing heartbeat altogether.

Can I detect if someone has exploited this against me?

Exploitation of this bug leaves no traces of anything abnormal happening to the logs.

Can IDS/IPS detect or block this attack?

Although the heartbeat can appear in different phases of the connection setup, intrusion detection and prevention systems (IDS/IPS) rules to detect heartbeat have been developed. Due to encryption differentiating between legitimate use and attack can not be based on the content of the request, but the attack may be detected by comparing the size of the request against the size of the reply. This implies that IDS/IPS can be programmed to detect the attack but not to block it unless heartbeat requests are blocked altogether.

Has this been abused in the wild?

We don’t know. Security community should deploy TLS/DTLS honeypots that entrap attackers and to alert about exploitation attempts.

Can attacker access only 64k of the memory?

There is no total of 64 kilobytes limitation to the attack, that limit applies only to a single heartbeat. Attacker can either keep reconnecting or during an active TLS connection keep requesting arbitrary number of 64 kilobyte chunks of memory content until enough secrets are revealed.

Is this a MITM bug like Apple’s goto fail bug was?

No this doesn’t require a man in the middle attack (MITM). Attacker can directly contact the vulnerable service or attack any user connecting to a malicious service. However in addition to direct threat the theft of the key material allows man in the middle attackers to impersonate compromised services.

Does TLS client certificate authentication mitigate this?

No, heartbeat request can be sent and is replied to during the handshake phase of the protocol. This occurs prior to client certificate authentication.

Does OpenSSL’s FIPS mode mitigate this?

No, OpenSSL Federal Information Processing Standard (FIPS) mode has no effect on the vulnerable heartbeat functionality.

Does Perfect Forward Secrecy (PFS) mitigate this?

Use of Perfect Forward Secrecy (PFS), which is unfortunately rare but powerful, should protect past communications from retrospective decryption. Please see https://twitter.com/ivanristic/status/453280081897467905 how leaked tickets may affect this.

Can heartbeat extension be disabled during the TLS handshake?

No, vulnerable heartbeat extension code is activated regardless of the results of the handshake phase negotiations. Only way to protect yourself is to upgrade to fixed version of OpenSSL or to recompile OpenSSL with the handshake removed from the code.

Who found the Heartbleed Bug?

This bug was independently discovered by a team of security engineers (Riku, Antti and Matti) at Codenomicon and Neel Mehta of Google Security, who first reported it to the OpenSSL team. Codenomicon team found heartbleed bug while improving the SafeGuard feature in Codenomicon’s Defensics security testing tools and reported this bug to the NCSC-FI for vulnerability coordination and reporting to OpenSSL team.

What is the Defensics SafeGuard?

The SafeGuard feature of the Codenomicon’s Defensics security testtools automatically tests the target system for weaknesses that compromise the integrity, privacy or safety. The SafeGuard is systematic solution to expose failed cryptographic certificate checks, privacy leaks or authentication bypass weaknesses that have exposed the Internet users to man in the middle attacks and eavesdropping. In addition to the Heartbleed bug the new Defensics TLS Safeguard feature can detect for instance the exploitable security flaw in widely used GnuTLS open source software implementing SSL/TLS functionality and the “goto fail;” bug in Apple’s TLS/SSL implementation that was patched in February 2014.

Who coordinates response to this vulnerability?

Immediately after our discovery of the bug on 3rd of April 2014, NCSC-FI took up the task of verifying it, analyzing it further and reaching out to the authors of OpenSSL, software, operating system and appliance vendors, which were potentially affected. However, this vulnerability had been found and details released independently by others before this work was completed. Vendors should be notifying their users and service providers. Internet service providers should be notifying their end users where and when potential action is required.

Is there a bright side to all this?

For those service providers who are affected this is a good opportunity to upgrade security strength of the secret keys used. A lot of software gets updates which otherwise would have not been urgent. Although this is painful for the security community, we can rest assured that infrastructure of the cyber criminals and their secrets have been exposed as well.

What can be done to prevent this from happening in future?

The security community, we included, must learn to find these inevitable human mistakes sooner. Please support the development effort of software you trust your privacy to. Donate money to the OpenSSL project.

Where to find more information?

This Q&A was published as a follow-up to the OpenSSL advisory, since this vulnerability became public on 7th of April 2014. The OpenSSL project has made a statement at https://www.openssl.org/news/secadv_20140407.txt. NCSC-FI published an advisory at https://www.cert.fi/en/reports/2014/vulnerability788210.html. Individual vendors of operating system distributions, affected owners of Internet services, software packages and appliance vendors may issue their own advisories.

References

Ozbiljna ranjivost u OpenSSL-u (“Heartbleed Bug”)

VAŽNO! Početkom tjedna otkrivena je ozbiljna ranjivost (CVE-2014-0160) preljeva spremnika prilikom čitanja memorije u OpenSSL-u, a omogućuje krađu informacija zaštićenih SSL/TLS enkripcijom. Slanjem posebno oblikovanog upita poslužitelju (eng. heartbeat) moguće je izvući 64KB podataka, a ovisno o sustavu, najčešće ne ostaju nikakvi tragovi. Ranjivost je otkrivena tek nakon dvije godine u kodu biblioteke za baratanje šifriranjem. Ranjivost nekog poslužitelja može se testirati ovdje http://filippo.io/Heartbleed/. Većina operacijskih sustava izdala je već sigurnosnu zakrpu za ovu ranjivost, a na web stranici Nacionalnog CERT-a http://www.cert.hr/preporuke također su nedavno i objavljene sigurnosne preporuke za ranjivi paket. Korisnike se upućuje na žurnu primjenu izdane nadogradnje.

11.04.2014

“FreeRDP” – Linux OS program za RDP sa podrškom za pristup Windows-u 8.0, 8.1, 2012, 2012 R2

Već duže vrijeme muku mučim kako bih pronašao dobar Linux RDP program, zašto? Svi znamo da ih postoji mnogo i da su se razni klijenti koristili. Jedan od najpoznatijih koji je svojim vremenom dolazio instaliran s Ubuntu OS-om je “rdesktop”. Rdesktop se super pokazao za korištenje prilikom spajanja na sustave starijih generacija kao što su:

Windows 2000, XP, Server 2003, 2003 R2, 2008, 2008 R2

Ako želite znati više o RDesktop programu možete informacije pronaći ovdje – RDesktop Website. Problem se kod nas bivših korisnika Linux OS-a pojavio prilikom izlaska Windows 8 i Server 2012 OS-a koji su donijeli novu verziju “Remote Desktop Protocol-a”, a to je RDP 8.0. Nova verzija RDP-a nam donosi mnogo novih mogućnosti i novosti kao što su:

  •     Prilagodljiva grafika brzini veze
  •     Automatski odabir TCP ili UDP prijenosa
  •     Podršku za ekrane na dodir s više dodirnih točaka
  •     Direct 11 podršku za vGPU, te još mnogo toga….

Ako želite detaljnije informacije možete ih pronaći na URL – RDP v4.0-8.1.

Zbog navedenih novosti u samom radu protokola, novim dodacima i većoj sigurnosti više se nije moguće spojiti na Windows 8.0 i 2012 ili noviji sa standardno poznatih RDC klijenata.

Za potrebe spajanja sam pronašao i testirao klijent koji se zove FreeRDP. Na stranici možete pronaći upute za instalaciju i pokretanje. Pošto jako puno koristim RDC klijente i SSH klijente kao administrator sustava u svojoj tvrtki sam izradio jednu skriptu koja može pomoći pri spajanju na željene poslužitelje. Skripta je pisana u BASH-u te se može pokrenuti na svakom Linux OS-u. Skriptu mi je pomogao napisati moj dragi kolega i prijatelj pod nadimkom Fly.

Skripta izgleda ovako:

#!/bin/bash

# function to invoke RDS connections
conrds()
{
	RUSER="rdp_username"
	RPASS="rdp_password"

	if [ -z "$1" ]; then
		return 1;
	fi

	screen -A -m -d -S Ime_Servera05 xfreerdp /f /u:$RUSER /p:$RPASS /v:$1
	return 0;
}

# function to invoke ssh connections [accepts 3 params $1:server, [$2:username, [$3:port]]
conssh()
{
	if [ -z "$1" ]; then
		return 1;
	fi

	if [ -z "$2" ]; then
		2="SSH_Username"
	fi

	if [ -z "$3" ]; then
		3="SSH_Port"
	fi

	ssh $2@$1 -p $3

	return $?
}

if [ "$1" == "" ]; then
	echo "Odaberite server:"
	prompt="Unesite broj servera [ENTER]:"
	options=( "Server01" "Server02" "Server03" "Server04" "Server05" "Server06" "Server07" )
	PS3="$prompt "
	select opt in "${options[@]}" "Izlaz"; do
		COUNT=$(( ${#options[@]}+1 ))
		if [ $REPLY -le $COUNT ]; then
			if [ $REPLY -eq $COUNT ]; then
				exit 0
			else
				CSERV=$REPLY
				break
			fi
		else
			echo -e "Neispravan unos"
			exit 1
		fi
	done
else
	CSERV=$1
fi

case $CSERV in
	"1" |  "Server01")
		conrds "Server01 FQDN or IP"
		exit $?
		;;
	"2" |  "Server02")
		conrds "Server02 FQDN or IP"
		exit $?
		;;
	"3" |  "Server03")
		conrds "Server03 FQDN or IP"
		exit $?
		;;
	"4" |  "Server04")
		conrds "Server04 FQDN or IP"
		exit $?
		;;
	"5" |  "Server05")
		conrds "Server05 FQDN or IP"
		exit $?
		;;
	"6" |  "Server06")
		conrds "Server06 FQDN or IP"
		exit $?
		;;
	"7" |  "Server07")
		conssh "Server07 FQDN or IP" "SSH_Username" "SSH_Port"
		exit $?
		;;
	*)
		echo -e "Neispravan unos"
		exit 2
		;;
esac

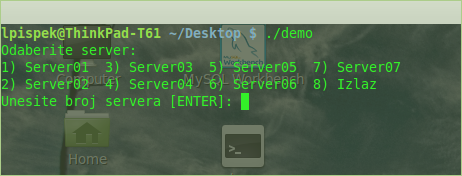
Nakon pokretanja skripte dobijemo sljedeći prozor koji očekuje da odaberemo željeni server za spajanje.

Screenshot from 2014-03-24 20:54:11

U skripti gdje se spominje FQDN ili IP potrebno je unijeti DNS ime ili IP adresu servera na koji se želimo spojiti.

Kako bi skripta uspješno radila na Linux OS-u trebate imati instaliranu aplikaciju “screen”.

Na Ubuntu/Debian distribucijama ako ju nemate možete to instalirati pokretanjem komande iz terminala:

sudo apt-get install screen

ili

aptitude install screen

Nadam se da je barem nekome poslužilo. Ako trebate pomoć slobodno pošaljite email na adresu.


Dnevni E-mail izvještej s Hyper-V hosta

Pretpostavljam da ste se svi ponekad zapitali kako je moguće pratiti prosječne statistike iskorištenosti sustava na kojem Vam se vrte hyper-v virtualne mašine. Jedan moj dragi kolega je stavio zanimljivi link Facebook o jednom gospodinu koji piše razne skripte za provjeru statusa sustava. Te Vam u nastavku iznosim jednu od skripti.

Skripta je preuzeta s Ben Armstrong blog-a i prerađena za vlastite potrebe. Kako bi skripta uspješno radilo prvo je potrebno na Vašem Hyper-v hostu upaliti određene servise za svaku pojedinu virtualnu mašinu.

Kako biste upalili mjerenje potrošnje resursa za pojedinu virtualnu mašinu potrebno je iz PowerShell-a pokrenuti:

Get-VM <virtual machine name> |  Enable-VMResourceMetering

ili za sve virtualne mašine na jednom hostu:

Get-VM |  Enable-VMResourceMetering

Poželjno je podesiti vremenski interval za uzimanje uzoraka. Sto stavite kraci vremenski interval to će performanse stroja biti manje. Poželjno je staviti interval svakih 1 sat, a u slučaju većeg opterećenja cak i svaka 2 sata. Podešavanje se izvodi PowerShell komandom:

Set-VMHost –ComputerName <host server name>  -ResourceMeteringSaveInterval <HH:MM:SS>

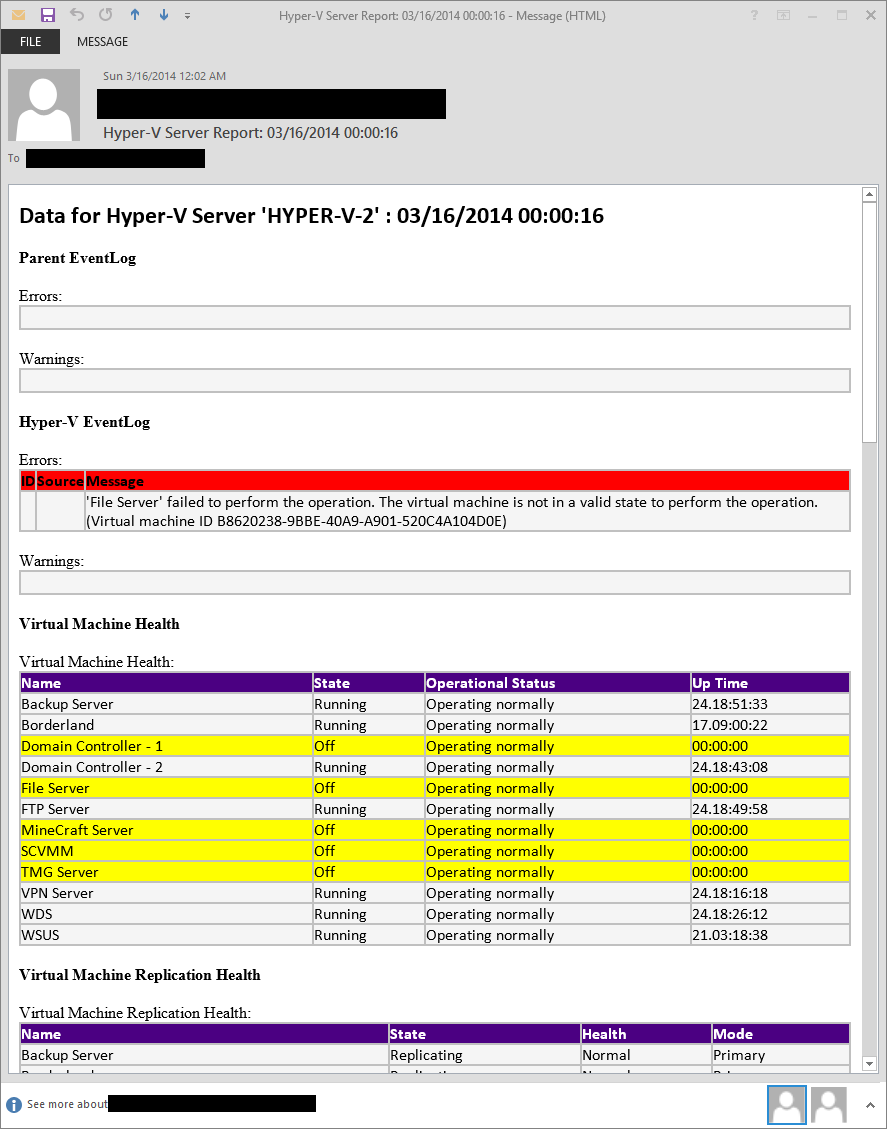
Prikaz koji će se generirati nakon pokretanja skripte izgledati će kao u nastavku, a šalje se svaki dan mailom u određeno vrijeme putem windows task schedulara.

8726.image_38C464E1Primjer skripte koja izgleda ovako:

# Variables
$filedate = get-date
$computer = gc env:computername
$metricsData = get-vm | measure-vm
$tableColor = "WhiteSmoke"
$errorColor = "Red"
$warningColor = "Yellow"
$FromEmail = "email@email.org"
$ToEmail = "email@email.org"

# Establish Connection to SMTP server
$smtpServer = "smtp.yourISP.com"
#$smtpCreds = new-object Net.NetworkCredential("yourUsername", "YourPassword") #SMTP Authentication if not using Exchange
$smtp = new-object Net.Mail.SmtpClient($smtpServer, 25) #Exchange FQDN
$smtp.UseDefaultCredentials = $false
#$smtp.Credentials = $smtpCreds

# HTML Style Definition
$message = "<!DOCTYPE html  PUBLIC`"-//W3C//DTD XHTML 1.0 Strict//EN`"  `"http://www.w3.org/TR/xhtml1/DTD/xhtml1-strict.dtd`">"
$message = "<html xmlns=`"http://www.w3.org/1999/xhtml`"><body>"
$message = "<style>"
$message = $message + "TABLE{border-width:2px;border-style: solid;border-color: #C0C0C0 ;border-collapse: collapse;width: 100%}"
$message = $message + "TH{border-width: 2px;padding: 0px;border-style: solid;border-color: #C0C0C0 ;text-align: left}"
$message = $message + "TD{border-width: 2px;padding: 0px;border-style: solid;border-color: #C0C0C0 ;text-align: left}"
$message = $message + "H1{font-family:Calibri;}"
$message = $message + "H2{font-family:Calibri;}"
$message = $message + "Body{font-family:Calibri;}"
$message = $message + "</style>"

# Title
$message = $message + "<h2>Data for Hyper-V Server '$($computer)' : $($filedate)</h2>"

# EventLog
$message = $message + "<style>TH{background-color:$($errorColor)}TR{background-color:$($tableColor)}</style>"
$message = $message + "<B>Parent EventLog</B> <br> <br>"
$message = $message + "Errors: <br>" + ((Get-EventLog system -after (get-date).AddHours(-24) -entryType Error) | `
                                                           Select-Object @{Expression={$_.InstanceID};Label="ID"},  `
                                                                         @{Expression={$_.Source};Label="Source"}, `
                                                                         @{Expression={$_.Message};Label="Message"} `
                                                                         | ConvertTo-HTML -Fragment) `
                                                                         + " <br>"

$message = $message + "<style>TH{background-color:$($warningColor)}TR{background-color:$($tableColor)}</style>"
$message = $message + "Warnings: <br>" + ((Get-EventLog system -after (get-date).AddHours(-24) -entryType Warning) | `
                                                           Select-Object @{Expression={$_.InstanceID};Label="ID"},  `
                                                                         @{Expression={$_.Source};Label="Source"}, `
                                                                         @{Expression={$_.Message};Label="Message"} `
                                                                         | ConvertTo-HTML -Fragment) `
                                                                         + " <br>"

# Hyper-V EventLog
$message = $message + "<style>TH{background-color:$($errorColor)}TR{background-color:$($tableColor)}</style>"
$message = $message + "<B>Hyper-V EventLog</B> <br> <br>"
$message = $message + "Errors: <br>" + ((Get-WinEvent -FilterHashTable @{LogName ="Microsoft-Windows-Hyper-V*"; StartTime = (Get-Date).AddDays(-1); Level = 2}) | `
                                                           Select-Object @{Expression={$_.InstanceID};Label="ID"},  `
                                                                         @{Expression={$_.Source};Label="Source"}, `
                                                                         @{Expression={$_.Message};Label="Message"} `
                                                                         | ConvertTo-HTML -Fragment) `
                                                                         + " <br>"

$message = $message + "<style>TH{background-color:$($warningColor)}TR{background-color:$($tableColor)}</style>"
$message = $message + "Warnings: <br>" + ((Get-WinEvent -FilterHashTable @{LogName ="Microsoft-Windows-Hyper-V*"; StartTime = (Get-Date).AddDays(-1); Level = 3}) | `
                                                           Select-Object @{Expression={$_.InstanceID};Label="ID"},  `
                                                                         @{Expression={$_.Source};Label="Source"}, `
                                                                         @{Expression={$_.Message};Label="Message"} `
                                                                         | ConvertTo-HTML -Fragment) `
                                                                         + " <br>"

# VM Health
$message = $message + "<style>TH{background-color:Indigo}TR{background-color:$($errorColor)}</style>"
$message = $message + "<B>Virtual Machine Health</B> <br> <br>"
$message = $message + "Virtual Machine Health: <br>" + ((Get-VM | `
                                                          Select-Object @{Expression={$_.Name};Label="Name"}, `
                                                                        @{Expression={$_.State};Label="State"}, `
                                                                        @{Expression={$_.Status};Label="Operational Status"}, `
                                                                        @{Expression={$_.UpTime};Label="Up Time"} `
                                                                        | ConvertTo-HTML -Fragment) `
                                                                        | %{if($_.Contains("<td>Operating normally</td>")){$_.Replace("<tr><td>", "<tr style=`"background-color:$($warningColor)`"><td>")}else{$_}} `
                                                                        | %{if($_.Contains("<td>Running</td><td>Operating normally</td>")){$_.Replace("<tr style=`"background-color:$($warningColor)`"><td>", "<tr style=`"background-color:$($tableColor)`"><td>")}else{$_}}) `
                                                                        + " <br>"
# VM Replication Health
$message = $message + "<style>TH{background-color:Indigo}TR{background-color:$($errorColor)}</style>"
$message = $message + "<B>Virtual Machine Replication Health</B> <br> <br>"
$message = $message + "Virtual Machine Replication Health: <br>" + ((Get-VM | `
                                                          Select-Object @{Expression={$_.Name};Label="Name"}, `
                                                                        @{Expression={$_.ReplicationState};Label="State"}, `
                                                                        @{Expression={$_.ReplicationHealth};Label="Health"}, `
                                                                        @{Expression={$_.ReplicationMode};Label="Mode"} `
                                                                        | ConvertTo-HTML -Fragment) `
                                                                        | %{if($_.Contains("<td>Replicating</td><td>Normal</td>")){$_.Replace("<tr><td>", "<tr style=`"background-color:$($tableColor)`"><td>")}else{$_}}) `
                                                                        + " <br>"

# Storage Health
$message = $message + "<style>TH{background-color:DarkGreen}TR{background-color:$($errorColor)}</style>"
$message = $message + "<B>Storage Health</B> <br> <br>"
$message = $message + "Physical Disk Health: <br>" + ((Get-PhysicalDisk | `
                                                           Select-Object @{Expression={$_.FriendlyName};Label="Physical Disk Name"},  `
                                                                         @{Expression={$_.DeviceID};Label="Device ID"}, `
                                                                         @{Expression={$_.OperationalStatus};Label="Operational Status"}, `
                                                                         @{Expression={$_.HealthStatus};Label="Health Status"}, `
                                                                         @{Expression={"{0:N2}" -f ($_.Size / 1073741824)};Label="Size (GB)"} `
                                                                         | ConvertTo-HTML -Fragment) `
                                                                         | %{if($_.Contains("<td>OK</td><td>Healthy</td>")){$_.Replace("<tr><td>", "<tr style=`"background-color:$($tableColor)`"><td>")}else{$_}}) `
                                                                         + " <br>"
$message = $message + "Storage Pool Health: <br>" + ((Get-StoragePool | `
                                                      where-object {($_.FriendlyName -ne "Primordial")} | `
                                                          Select-Object @{Expression={$_.FriendlyName};Label="Storage Pool Name"}, `
                                                                        @{Expression={$_.OperationalStatus};Label="Operational Status"}, `
                                                                        @{Expression={$_.HealthStatus};Label="Health Status"} `
                                                                        | ConvertTo-HTML -Fragment) `
                                                                        | %{if($_.Contains("<td>OK</td><td>Healthy</td>")){$_.Replace("<tr><td>", "<tr style=`"background-color:$($tableColor)`"><td>")}else{$_}}) `
                                                                        + " <br>"
$message = $message + "Virtual Disk Health: <br>" + ((Get-VirtualDisk | `
                                                          Select-Object @{Expression={$_.FriendlyName};Label="Virtual Disk Name"}, `
                                                                        @{Expression={$_.OperationalStatus};Label="Operational Status"}, `
                                                                        @{Expression={$_.HealthStatus};Label="Health Status"} `
                                                                        | ConvertTo-HTML -Fragment) `
                                                                        | %{if($_.Contains("<td>OK</td><td>Healthy</td>")){$_.Replace("<tr><td>", "<tr style=`"background-color:$($tableColor)`"><td>")}else{$_}}) `
                                                                        + " <br>"

# VM Metrics
$message = $message + "<style>TH{background-color:blue}TR{background-color:$($tableColor)}</style>"
$message = $message + "<B>Virtual Machine Utilization Report</B> <br> <br> "

$message = $message +  "CPU utilization data: <br>" + ($metricsData | `
                                                           select-object @{Expression={$_.VMName};Label="Virtual Machine"}, `
                                                                         @{Expression={$_.AvgCPU};Label="Average CPU Utilization (MHz)"} `
                                                                         | ConvertTo-HTML -Fragment) `
                                                                         +" <br>"
$message = $message + "Memory utilization data: <br>" + ($metricsData | `
                                                             select-object @{Expression={$_.VMName};Label="Virtual Machine"}, `
                                                                           @{Expression={$_.AvgRAM};Label="Average Memory (MB)"}, `
                                                                           @{Expression={$_.MinRAM};Label="Minimum Memory (MB)"}, `
                                                                           @{Expression={$_.MaxRAM};Label="Maximum Memory (MB)"} `
                                                                           | ConvertTo-HTML -Fragment) `
                                                                           +" <br>"
$message = $message + "Network utilization data: <br>" + ($metricsData | `
                                                             select-object @{Expression={$_.VMName};Label="Virtual Machine"}, `
                                                                           @{Expression={"{0:N2}" -f (($_.NetworkMeteredTrafficReport | where-object {($_.Direction -eq "Inbound")}`
                                                                              | measure-object TotalTraffic -sum).sum / 1024)};Label="Inbound Network Traffic (GB)"}, `
                                                                           @{Expression={"{0:N2}" -f (($_.NetworkMeteredTrafficReport | where-object {($_.Direction -eq "Outbound")} `
                                                                              | measure-object TotalTraffic -sum).sum / 1024)};Label="Outbound Network Traffic (GB)"} `
                                                                           | ConvertTo-HTML -Fragment) `
                                                                           +" <br>"
$message = $message + "Disk utilization data: <br>" + ($metricsData | `
                                                           select-object @{Expression={$_.VMName};Label="Virtual Machine"}, `
                                                                         @{Expression={"{0:N2}" -f ($_.TotalDisk / 1024)};Label="Disk Space Used (GB)"} `
                                                                         | ConvertTo-HTML -Fragment) `
                                                                         +" <br>"
$message = $message + "Metering Duration data: <br>" + ($metricsData | `
                                                            select-object @{Expression={$_.VMName};Label="Virtual Machine"}, `
                                                                          @{Expression={$_.MeteringDuration};Label="Metering data duration"} `
                                                                          | ConvertTo-HTML -Fragment) `
                                                                          +" <br>"

# Reset metrics
get-vm | Reset-VMResourceMetering
get-vm | Enable-VMResourceMetering

$message = $message + "</body></html>"

$email = new-object Net.Mail.MailMessage
$email.Subject = "Hyper-V Server Report: $($filedate)"
$email.From = new-object Net.Mail.MailAddress($FromEmail)
$email.IsBodyHtml = $true
$email.Body =  $message
$email.To.Add($ToEmail)

# Send Email
$smtp.Send($email)

U prilogu se nalazi skripta ako ju želite preuzeti u .ps1 formatu.

Attachment: DailyStatsReport

Using Exchange 2013 high-resolution photos from SharePoint Server 2013

In this post I described how Lync 2013 Preview can use high-resolution photos available in Exchange 2013 Preview mailboxes. SharePoint Server 2013 is also able to use the same high-resolution photos. The SharePoint-Exchange photo sync feature implements this.

How it works

SharePoint Server 2013 maintains a library of User Photos, just like in SharePoint Server 2010. When SharePoint-Exchange photo sync is enabled, SharePoint’s local photo store becomes a cache, and SharePoint Server 2013 treats Exchange 2013 as the master photo store. SharePoint-Exchange photo sync is not a regular sync job that runs on a recurring cycle. Instead, SharePoint Server 2013 requests photos from Exchange 2013 automatically when a user performs an operation that causes a request for their own photo (for example, browsing to their own user profile page). That means that the user needs to have requested his/her own photo, before other users will be able to see it.

When a user with a valid Exchange 2013 mailbox attempts to change their profile photo, SharePoint Server 2013 will launch the Outlook 2013 Web App photo upload dialog.

Two variables (which can be set per web-application) help govern the syncing behavior:

  • UserPhotoExpiration (in hours) specifies the minimum time that must elapse before SharePoint Server 2013 will check for a given user’s photo again.
  • UserPhotoErrorExpiration (in hours) specifies the minimum time that must elapse before SharePoint Server 2013 will check for a given user’s photo when it received an error on the previous attempt.

SharePoint Server 2013 is using the Exchange Web Services Managed API V2.0 and Server to Server authentication (S2SOAuth) to be able to read data from Exchange 2013.

Configuration

Let me show how to configure the integration. I will use the following sample environment to illustrate the configuration:

  • One Exchange 2013 Client Access server with FQDN e15fe.contoso.com
  • One Exchange 2013 Mailbox server with FQDN e15be.contoso.com.
    • The test users have Exchange 2013 mailbox with the primary SMTP address test1@contoso.com and test2@contoso.com
    • High resolution photos have been uploaded to the mailboxes
  • One SharePoint Server 2013 server with FQDN sps15.contoso.com
  • A DNS record for autodiscover.contoso.com points to e15fe.contoso.com

In the sample environment the programs have been installed on the C: drive.

Step 1: Exchange 2013 Autodiscover Service

Configure the Exchange 2013 Autodiscover service to be available on the FQDN autodiscover.contoso.com. Use the following Exchange Management Shell command on e15fe.contoso.com.

Get-ClientAccessServer | Set-ClientAccessServer -AutoDiscoverServiceInternalUri https://autodiscover.contoso.com/autodiscover/autodiscover.xml

Step 2: External Url’s set

SharePoint Server 2013 use the external Url variants for EWS and ECP when accessing the photos on Exchange 2013. In the sample environment I’ll use the internal FQDN’s also for external use. Use the following Exchange Management Shell command on e15fe.contoso.com.

Get-WebServicesVirtualDirectory | Set-WebServicesVirtualDirectory –InternalUrl https://e15fe.contoso.com/ews/exchange.asmx –ExternalUrl https://e15fe.contoso.com/ews/exchange.asmx

Get-EcpVirtualDirectory | Set-EcpVirtualDirectory –InternalUrl https://e15fe.contoso.com/ecp –ExternalUrl https://e15fe.contoso.com/ecp

Step 3: Exchange Web Services Managed API V2.0

Install the EWS Managed API from the link above on sps15.contoso.com. Make sure that the Microsoft.Exchange.WebServices.dll is loaded into the GAC by using GacUtil. Make sure to use the .NET 4 version of GacUtil (C:\Program Files\Microsoft SDKs\Windows\v7.1\Bin\NETFX 4.0 Tools after you have installed .NET 4.0 SDK)

GacUtil /i C:\Program Files\Microsoft\Exchange\Web Services\2.0\Microsoft.Exchange.WebServices.dll

Step 4 SharePoint S2SOAuth configuration with Exchange

Now it is time to configure SharePoint to do S2SOAuth with Exchange.  Use the following SharePoint 2013 Management Shell commands:

New-SPTrustedSecurityTokenIssuer -name "Exchange" -MetadataEndPoint "https://autodiscover.contoso.com/autodiscover/metadata/json/1"
$sts=Get-SPSecurityTokenServiceConfig
$sts.HybridStsSelectionEnabled = $true
$sts.AllowMetadataOverHttp = $false
$sts.AllowOAuthOverHttp = $false
$sts.Update()
$exchange=Get-SPTrustedSecurityTokenIssuer "Exchange"
$app=Get-SPAppPrincipal -Site http://sps15 -NameIdentifier $exchange.NameId
$site=Get-SPSite http://sps15
Set-SPAppPrincipalPermission -AppPrincipal $app -Site $site.RootWeb -Scope sitesubscription -Right fullcontrol -EnableAppOnlyPolicy

Step 5 Exchange S2SOAuth configuration with SharePoint

We now need to configure the Exchange 2013 side of things. Use the following Exchange Management Shell commands:

cd \Program Files\Microsoft\Exchange Server\V15\Scripts>
.\Configure-EnterprisePartnerApplication.ps1 -AuthMetadataUrl https://sps15/_layouts/15/metadata/json/1 -ApplicationType sharepoint

Make sure to restart IIS on both front-end and back-end by issuing the following commands in a command window:

iisreset e15fe
iisreset e15be

Step 6 Configure SharePoint 2013 Exchange photo sync

Use the following SharePoint 2013 Management Shell commands:

    $wa = Get-SPWebApplication http://sps15
    $wa.Properties["ExchangeAutodiscoverDomain"] = "autodiscover.contoso.com"
    $wa.UserPhotoImportEnabled = $true
    $wa.UserPhotoErrorExpiration = 1.0
    $wa.UserPhotoExpiration = 6.0
    $wa.Update()

How to try it out?

Sign in to Windows as test1 and use IE to access his My site at http://sps15/my. You should now see the high-resolution photo being shown as the profile photo.

If some reason, the photo is not showing you might be able to diagnose the issue by examining the ULS logs available at C:\Program Files\Common Files\Microsoft Shared\Web Server Extensions\15\LOGS.

How to Highlight a Row in Excel Using Conditional Formatting

image61

Conditional formatting is an Excel feature you can use when you want to format cells based on their content. For example, you can have a cell turn red when it contains a number lower than 100. But how do you highlight an entire row?

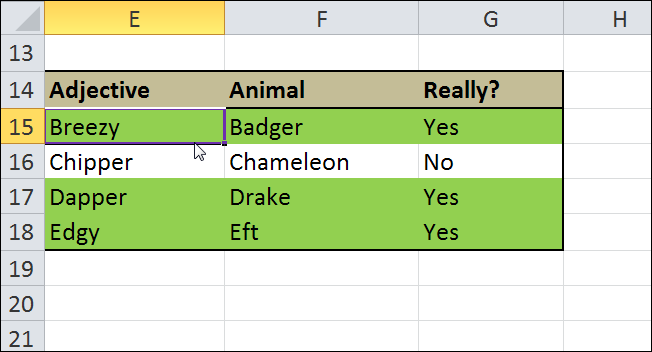
But what if you wanted to highlight other cells based on a cell’s value? The screenshot above shows some codenames used for Ubuntu distributions. One of these is made up; when I entered “No” in the “Really” column, the entire row got different background and font colors. To see how this was done, read on.

Creating Your Table

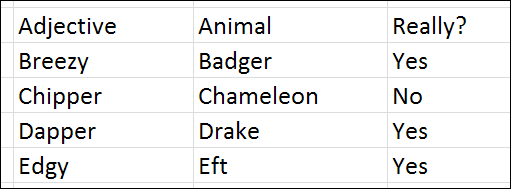
The first thing you will need is a simple table containing the data you’d like to format. The data doesn’t have to be text-only; you can use formulas freely. At this point, your table has no formatting at all:

image310

Setting The Look-and-Feel

Now it’s time to format your table using Excel’s “simple” formatting tools. Format only those parts that won’t be affected by conditional formatting. In our case, we can safely set a border for the table, as well as format the header line. I’m going to assume you know how to do this part. You should end up with a table looking like this (or maybe a bit prettier):

image121

Creating The Conditional Formatting Rules

And now we come to the meat and potatoes. As we said at the outset, if you’ve never used conditional formatting before, this might be a tad too much to begin with.

Select the first cell in the first row you’d like to format, click Conditional Formatting (in the Home tab) and select Manage Rules.

image191

In the Conditional Formatting Rules Manager click New Rule.

image221In the New Formatting Rule dialog, click the last option – Use a formula to determine which cells to format. This is the trickiest part: Your formula must evaluate to “True” for the rule to apply, and must be flexible enough so you could use it across your entire table later on. Let’s analyze my sample formula:

=$G15 – this part is a cell’s address. G is the column which I want to format by (“Really?”). 15 is my current row. Note the dollar sign before the G – if I don’t have this symbol, when I apply my conditional formatting to the next cell, it would expect  H15 to say “Yes”. So in this case, I need to have a “fixed” column ($G) but a “flexible” row (15), because I will be applying this formula across multiple rows.

=”Yes” – this part is the condition that has to be met. In this case we’re going for the simplest condition possible – it just has to say “Yes”. You can get very fancy with this part.

So in English, our formula is true whenever cell G in the current row has the word Yes in it.

image251Next, let’s define the formatting. Click the Format button. In the Format Cells dialog, go through the tabs and tweak the settings until you get the look you want.  Here we’ll just be changing the fill to a different color.

image281Once you’re got the desired look, click OK. You can now see a preview of your cell in the New Formatting Rule dialog.

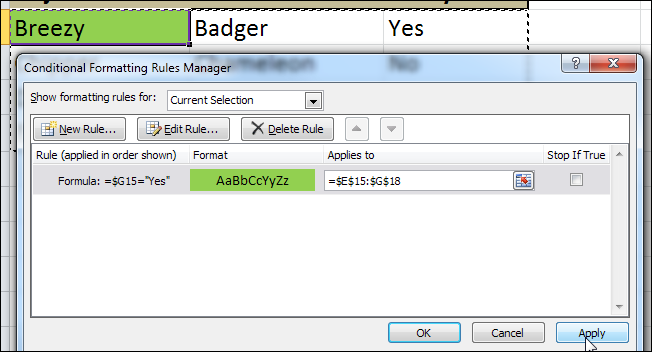
image311Click OK again to get back to the Conditional Formatting Rules Manager and click Apply. If the cell you selected changes formatting, that means your formula was correct. If the formatting doesn’t change, you need to go a few steps back and tweak your formula until it does work.

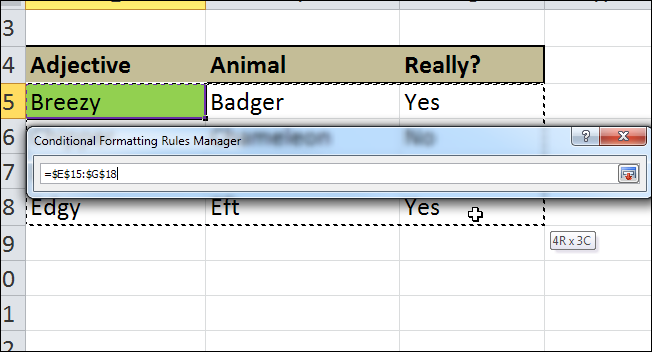
image341Now that we have a working formula, let’s apply it across our entire table. As you can see above, the formatting applies only to the cell we started off with. Click the button next to the Applies to field and drag the selection across your entire table.

image371Once done, click the button next to the address field to get back to the full dialog. You should still see a marquee around your entire table, and now the Applies to field contains a range of cells and not just a single address. Click Apply.

image401

Every row in your table should now be formatted according to the new rule:

image431That’s it! Now all you have to do is create another rule to format rows that say “No”.