How to change default SAN disk status from offline to online

Do you know what the SAN policy of your disks is now?

If you run


DISKPART> SAN


it will return the current policy. Can you post the result here?


I think it will be something like


SAN Policy : Offline Shared


In this case, I believe you’re looking for a way to put it as OnlineAll. You can do


SAN POLICY=OnlineAll


But please beware:


SAN policy has been introduced in Windows Server 2008 to protect shared disks accessed by multiple servers. The first time the server sees the disk, it’ll be offline, but after being brought online once, should be online even after reboot.


You can use POLICY=OnlineAll setting to get around this, but it must be very clear that if the disks are shared among servers, this can lead to data corruption. Users are encouraged to use the proper SAN policy to protect data.


Hope it helps!

Migrate a Domain-based Namespace to Windows Server 2008 Mode

The Windows Server 2008 mode for domain-based namespaces includes support for access-based enumeration and increased scalability.

To migrate a domain-based namespace from Windows 2000 Server mode to Windows Server 2008 mode, you must export the namespace to a file, delete the namespace, recreate it in Windows Server 2008 mode, and then import the namespace settings. To do so, use the following procedure.

To migrate a domain-based namespace to Windows Server 2008 mode

  1. Open a Command Prompt window and type the following command to export the namespace to a file, where \\ domain \ namespace is the name of the appropriate domain and namespace and path\filename is the path and file name of the export file:
    Dfsutil root export 
        \\domain\namespace path\filename
      .xml
  2. Write down the path (\\ server \ share ) for each namespace server. You must manually add namespace servers to the recreated namespace because Dfsutil cannot import namespace servers.
  3. In DFS Management, right-click the namespace and then click Delete , or type the following command at a command prompt, where \\ domain \ namespace is the name of the appropriate domain and namespace:
    Dfsutil root remove 
        \\domain\namespace
  4. In DFS Management, recreate the namespace with the same name, but use the Windows Server 2008 mode, or type the following command at a command prompt, where \\ server \ namespace is the name of the appropriate server and share for the namespace root:
    Dfsutil root adddom 
        \\server\namespace 
      v2
  5. To import the namespace from the export file, type the following command at a command prompt, where \\ domain \ namespace is the name of the appropriate domain and namespace and path\filename is the path and file name of the file to import:
    Dfsutil root import merge 
        path\filename
      .xml
         \\domain\namespace
    noteNote
    To minimize the time that is required to import a large namespace, run the Dfsutil root import command locally on a namespace server.


  6. Add any remaining namespace servers to the recreated namespace by right-clicking the namespace in DFS Management and then clicking Add Namespace Server , or by typing the following command at a command prompt, where \\ server \ share is the name of the appropriate server and share for the namespace root:
    Dfsutil target add 
        \\server\share
    noteNote
    You can add namespace servers before importing the namespace, but doing so causes the namespace servers to incrementally download the metadata for the namespace instead of immediately downloading the entire namespace after being added as a namespace server.

How to Remove an Exchange 2010 Public Folder Database

Before you can uninstall Exchange Server 2010 from a server you must remove all databases, including public folder databases.

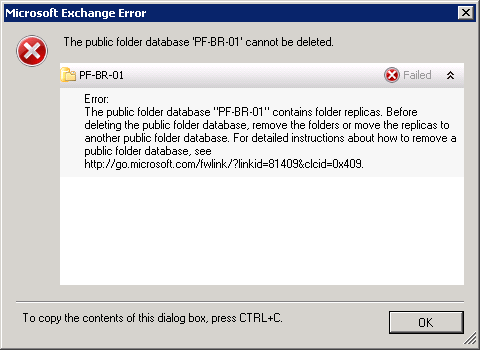
A public folder database can’t be removed until it no longer hosts any public folder replicas.  If you try to remove it while it still hosts replicas you’ll receive an error message.

exchange-2010-remove-public-folder-database-01

——————————————————–
Microsoft Exchange Error
——————————————————–
The public folder database ‘PF-BR-01′ cannot be deleted.

PF-BR-01
Failed
Error:
The public folder database “PF-BR-01″ contains folder replicas. Before deleting the public folder database, remove the folders or move the replicas to another public folder database. For detailed instructions about how to remove a public folder database, see http://go.microsoft.com/fwlink/?linkid=81409&clcid=0×409.

——————————————————–
OK
——————————————————–

Microsoft has provided some PowerShell scripts with Exchange Server 2010 for public folder management. They are located in the \Scripts folder of the location that Exchange is installed.

Launch the Exchange Management Shell and run the following command to navigate to the \Scripts folder.

[PS] C:\>cd $env:exchangeinstallpath\scripts

Now inspect the public folder replicas to see whether the public folder database you’re trying to remove is the only replica, or if there are other replicas as well.

Get-PublicFolder \ -Recurse | ft name,parentpath,replicas

Name                ParentPath     Replicas
----                ----------     --------
IPM_SUBTREE                        {}
All Staff           \              {PF-HO-01, PF-BR-01}
CEO                 \All Staff     {PF-HO-01, PF-BR-01}
Social Club         \All Staff     {PF-HO-01, PF-BR-01}
Branch Office       \              {PF-BR-01}
Admin               \Branch Office {PF-BR-01}
Sales               \Branch Office {PF-BR-01}
Head Office         \              {PF-HO-01}
Admin               \Head Office   {PF-HO-01}
Finance             \Head Office   {PF-HO-01}
Sales               \Head Office   {PF-HO-01}
Service             \Head Office   {PF-HO-01}
Internet Newsgroups \              {PF-BR-01}

As you can see above the PF-BR-01 public folder database is the only replica for a few of the public folders. If the folders are no longer needed they can simply be deleted. Otherwise we need to move those replicas to another public folder database if we want to keep those folders. The MoveAllReplicas.ps1 script is provided for this task.

.\MoveAllReplicas.ps1 -Server esp-br-ex2010 -NewServer esp-ho-ex2010a

You may need to wait a while for this change to take effect depending on how many replicas you’re trying to move.

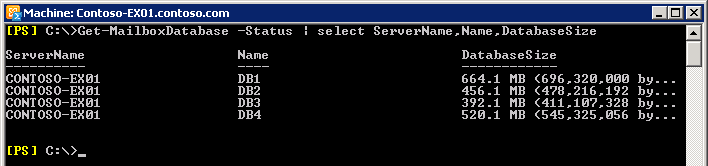
You also need to ensure that no mailbox databases are configured to use that public folder database. You can check this quickly using the following command.

[PS] C:\>Get-MailboxDatabase | ft name,publicfolderdatabase

Name       PublicFolderDatabase
----       --------------------
MB-HO-01   PF-HO-01
MB-HO-02   PF-HO-01

If the public folder database doesn’t appear in the list then no mailbox databases are using it.

You’ll also need to make sure that the server is not the OAB generation server for any Offline Address Books that are also being published to public folders.

exchange-2010-remove-public-folder-database-02

[PS] C:\>Move-OfflineAddressBook "Default Offline Address List" -Server ESP-HO-EX2010B

You can also disable public folder distribution of the OAB if you no longer have Outlook 2003 clients on the network.

Finally, if you have multiple public folder servers in your environment check whether there are custom public referral lists configured on any of them. If you remove a public folder database that is in another server’s custom referral list it can cause an error that the public folder store is in an inconsistent state.

Get-PublicFolderDatabase | where {$_.customreferralserverlist -like "*esp-br-ex2010*"}

Once all of these conditions have been met you should be able to remove the public folder database.

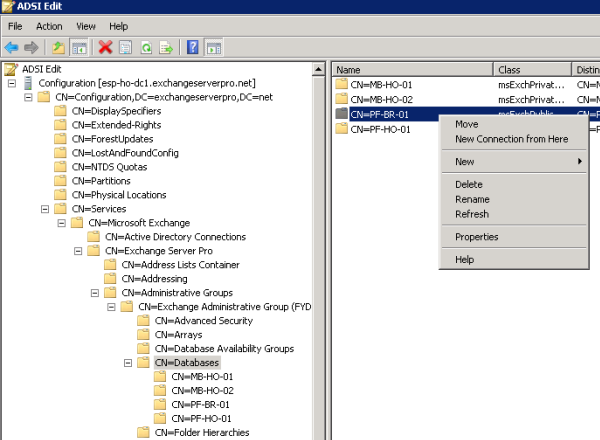
If you still can’t remove it and you’re sure the public folder database contains no more replicas you can use ADSIEdit to remove the public folder database from the organization.

exchange-2010-remove-public-folder-database-03

Original post is on ExchangeServerPro.

Microsoft Exchange Server Build Numbers

Problem

To find out what service pack and rollups have been applied to Microsoft Exchange you need to locate its “Build Number”.

2000/2003

00001s2007

00002s2010

00003s2013

00004s

Solution

Exchange Server

Product name

Build number

Date

Microsoft Exchange Server 2003 6.5.6944 6/30/2003
Microsoft Exchange Server 2003 SP1 6.5.7226 5/25/2004
Microsoft Exchange Server 2003 SP2 6.5.7638 10/19/2005
Microsoft Exchange Server 2007 8.0.685.24 12/9/2006
Microsoft Exchange Server 2007 8.0.685.25 12/9/2006
Microsoft Exchange Server 2007 SP1 8.1.240.6 11/29/2007
Microsoft Exchange Server 2007 SP2 8.2.176.2 8/24/2009
Microsoft Exchange Server 2007 SP3 8.3.083.6 6/20/2010
Microsoft Exchange Server 2010 14.0.639.21 11/9/2009
Microsoft Exchange Server 2010 SP1 14.1.218.15 8/24/2010

 Exchange Server 2007 Service Pack 1

Product name

Build number

Date

KB

Microsoft Exchange Server Exchange 2007 SP1 8.1.240.6 11/29/2007  
Update Rollup 1 for Exchange Server 2007 Service Pack 1 8.1.263.1 2/28/2008 KB945684
Update Rollup 2 for Exchange Server 2007 Service Pack 1 8.1.278.2 5/8/2008 KB948016
Update Rollup 3 for Exchange Server 2007 Service Pack 1 8.1.291.2 7/8/2008 KB949870
Update Rollup 4 for Exchange Server 2007 Service Pack 1 8.1.311.3 10/7/2008 KB952580
Update Rollup 5 for Exchange Server 2007 Service Pack 1 8.1.336.1 11/20/2008 KB953467
Update Rollup 6 for Exchange Server 2007 Service Pack 1 8.1.340.1 2/10/2009 KB959241
Update Rollup 7 for Exchange Server 2007 Service Pack 1 8.1.359.2 3/18/2009 KB960384
Update Rollup 8 for Exchange Server 2007 Service Pack 1 8.1.375.2 5/19/2009 KB968012
Update Rollup 9 for Exchange Server 2007 Service Pack 1 8.1.393.1 7/17/2009 KB970162
Update Rollup 10 for Exchange Server 2007 Service Pack 1 8.1.436.0 4/9/2010 KB981407

Exchange Server 2007 Service Pack 2

Product name

Build number

Date

KB

Microsoft Exchange Server 2007 SP2 8.2.176.2 8/24/2009  
Update Rollup 1 for Exchange Server 2007 Service Pack 2 8.2.217.3 11/19/2009 KB971534
Update Rollup 2 for Exchange Server 2007 Service Pack 2 8.2.234.1 1/22/2010 KB972076
Update Rollup 3 for Exchange Server 2007 Service Pack 2 8.2.247.2 3/17/2010 KB979784
Update Rollup 4 for Exchange Server 2007 Service Pack 2 8.2.254.0 4/9/2010 KB981383

Exchange Server 2007 Service Pack 3

Product name

Build number

Date

KB

Microsoft Exchange Server 2007 SP3 8.3.083.6

6/20/2010

 
Update Rollup 1 for Exchange Server 2007 Service Pack 3 8.3.106.2

9/9/2010

KB2279665
Update Rollup 2 for Exchange Server 2007 Service Pack 3  8.3.137.3
 12/10/2010
KB2407025
 Update Rollup 3 for Exchange Server 2007 Service Pack 3  8.3.159.0
 3/2/2011
KB2530488
Update Rollup 3-v2 for Exchange Server 2007 Service Pack 3  8.3.159.2
 3/30/2011
KB2530488
Update Rollup 4 for Exchange Server 2007 Service Pack 3  8.3.192.1
 7/7/2011
KB2509911
Update Rollup 5 for Exchange Server 2007 Service Pack 3  8.3.213.1
 9/21/2011
KB2602324
Update Rollup 6 for Exchange Server 2007 Service Pack 3  8.3.245.2
 1/25/2012
KB2608656

Exchange Server 2010

Product name

Build number

Date

KB

Microsoft Exchange Server 2010 RTM 14.0.639.21 11/9/2009  
Update Rollup 1 for Exchange Server 2010 14.0.682.1 12/9/2009 KB976573
Update Rollup 2 for Exchange Server 2010 14.0.689.0 3/4/2010 KB979611
Update Rollup 3 for Exchange Server 2010 14.0.694.0 4/9/2010 KB981401
Update Rollup 4 for Exchange Server 2010 14.0.702.1 6/17/2010 KB982639
Update Rollup 5 for Exchange Server 2010 14.0.726.0 12/13/2010 KB982639

Exchange Server 2010 Service Pack 1

Product name

Build number

Date

KB

Microsoft Exchange Server 2010 SP1  14.1.218.15 8/24/2010  
Update Rollup 1 for Exchange Server 2010 SP1 14.1.255.2 10/4/2010 KB2407028
Update Rollup 2 for Exchange Server 2010 SP1 14.1.270.1 12/9/2010 KB2425179
Update Rollup 3 for Exchange Server 2010 SP1 14.1.289.3 3/7/2011 KB2529939
Update Rollup 4 for Exchange Server 2010 SP1  14.1.323.1 6/22/2011 KB2509910
Update Rollup 4-v2 for Exchange Server 2010 SP1  14.1.323.6 7/27/2011 KB2579150
Update Rollup 5 for Exchange Server 2010 SP1  14.1.339.1 8/23/2011 KB2582113
Update Rollup 6 for Exchange Server 2010 SP1  14.1.355.2 10/27/2011 KB2608646

Exchange Server 2010 Service Pack 2

Product name

Build number

Date

KB

Microsoft Exchange Server 2010 SP2  14.2.247.5 12/4/2011
Update Rollup 1 for Exchange Server 2010 SP2  14.2.283.3 2/13/2012 KB2645995
Update Rollup 2 for Exchange Server 2010 SP2  14.2.298.4 4/16/2012 KB2661854 
Update Rollup 3 for Exchange Server 2010 SP2  14.2.309.2 5/29/2012 KB2685289 
Update Rollup 4 for Exchange Server 2010 SP2  14.2.318.2 8/13/2012 KB2706690  
Update Rollup 4-v2 for Exchange Server 2010 SP2  14.2.318.4 10/9/2012 KB2756485 
Exchange Server 2010 Service Pack 3

Product name

Build number

Date

KB

Microsoft Exchange Server 2010 SP3  14.3.123.4  2/12/2013 KB2808208
Exchange Server 2013

Product name

Build number

Date

KB

Microsoft Exchange Server 2013 Preview 15.0.466.13 7/16/2012
Microsoft Exchange Server 2013 RTM 15.0.516.32 10/11/2012


Exchange 2010 Service Pack 3 Error – ‘The IIS 6 WMI Compatibility component is required’

Problem

If you attempt to install Exchange Service Pack 3 on an Exchange server that is currently running Service Pack 1 you will see this error.

00001s

Error:
The ‘IIS 6 WMI Compatibility’ component is required. Install the component via Server Manager.

Solution

Note: This was a prerequisite for SP2, so if you do not see this error your Exchange was deployed with SP2 slipstreamed into it, or the problem was dealt with when SP2 was installed.

00002sMicrosoft Exchange Server Build Numbers

1. Launch the Exchange Management Shell

2. Execute the following two commands;

Import-Module servermanager
Add-WindowsFeature Web-WMI

00003s
3. Try again to install SP3.

Hyper-V did not find virtual machines to import from location “*”… migration from 2K8R2 to WS2012R2

As I said a few times so far, I have been writing blog posts to be my reminder and help to other blog readers :) . Two days ago I migrate one of virtual machines from Windows Server 2008 R2 Hyper-V host to Windows Server 2012 R2 Hyper-V host. As many times until now I did Export then copy to the new storage and then Import, but… I forgot that I already did that a few months ago and what first need to do :) . I got error like in the picture below ;)

1_thumb

This isn’t something new. I rewrite Rhoderick’s and Taylor’s articles. Thank you guys.

VM’s that are exported from Windows Server 2008 or 2008 R2 utilized the version 1 WMI namespace which resulted in a .exp file to represent the exported virtual machine. In Windows Server 2012 we introduced a new WMI namespace (version 2 or root\virtualization\v2) which implemented a much better import/export model – allowing you to effectively just copy the virtual machine folder (with the VM’s XML configuration file inside it) as well as the VM’s VHDs and then import that directly. For Windows Server 2012 we maintained the version 1 WMI namespace which allowed for importing of Windows Server 2008/R2 VM’s on 2012.

In Windows Server 2012 R2 we have removed the old version 1 namespace which means we can’t import virtual machines that where exported from Windows Server 2008/R2. However we can import them if you copy the virtual machine xml file and VHD’s – to do this you need to stop the vmms on the 2008/R2 server – copy all of the virtual machine files/vhds to the Windows Server 2012 R2 server and then import them.

What to do? We have two solutions!

The first is as follows:

Shut down all Hyper-V virtual machines on the WS2008R2 host then stop the Hyper-V Virtual Machine Management service.

1_thumb1

net stop "Hyper-V Virtual Machine Management"

1_thumb2Copy all virtual machines what you want to migrate to WS2012R2 Hyper-V host then Import Virtual Machine… That’s easy way, but…
1_thumb3

What if we already did Export and we don’t have WS2008R2 Hyper-V host?

The second resolution is as follows:

Exported Hyper-V virtual machines copy on the Windows Server 2012 and import them, then simple copy to a Windows Server 2012 R2. That server is only used to perform the import thus allowing the VM to be copied to Windows Server 2012 R2.

Now we can do whatever we want to do :)


Original port from: RMlinar Blog


How To Check Exchange Database Size with PowerShell

Checking your Exchange database size in PowerShell is key in several scripting scenarios, such as creating mailboxes in the smallest database, or generating basic database reports. The problem in Exchange 2007 was that this was a lot harder than it sounded. The Get-MailboxDatabase cmdlet did not return the size of the database. If you needed to determine the database size, you had to write some fairly lengthy code to get what you think would be be easily accessible information.

Exchange 2007

There are a couple methods you can use to get this information in Exchange 2007. Here is a great example posted by Gary Siepser; it’s a one-liner that retrieves the database size using WMI, allowing you to run it against clustered mailbox servers:

Get-MailboxDatabase | foreach-object {add-member -inputobject $_ -membertype noteproperty -name mailboxdbsizeinGB -value ([math]::Round(([int64](get-wmiobject cim_datafile -computername $_.server -filter (‘name=”’ + $_.edbfilepath.pathname.replace(“\”,”\\”) + ””)).filesize / 1GB),2)) -passthru} | Sort-Object mailboxdbsizeinGB -Descending | format-table identity,mailboxdbsizeinGB

Exchange 2010

Fortunately, the Get-MailboxDatabase cmdlet in Exchange 2010 provides this information for us out of the box. All you need to do is use the Status parameter and you can access the information using the DatabaseSize property. Here is an example:

Get-MailboxDatabase -Status | select ServerName,Name,DatabaseSize
exchange_database_size

Exchange 2013

You can use same procedure like in Exchange 2010.

How to Move an Exchange Server 2013 Database to a New Location

When you install a new Exchange Server 2013 Mailbox server a database is automatically created on the server as well.

The database is located in the \Mailbox folder of the Exchange installation path, which by default is the C:\ drive therefore a mailbox database will be placed in a path such as:

C:\Program Files\Microsoft\Exchange Server\V15\Mailbox\Mailbox Database 1

Usually this default location is not suitable, so you have two choices:

  • Remove the database and create a new one in the desired path
  • Move the existing database to the desired path

To move a database to a new location use the Move-DatabasePath cmdlet in the Exchange Management Shell.

Before you proceed please be aware that:

  • the command must be run while logged on to the mailbox server hosting the database
  • this process requires that the database be dismounted while the move takes place, making it unavailable for mailbox users
  • this process should not be followed for databases that are replicated within a Database Availability Group
  • this process cannot be run at the same time as a backup is in progress

Also consider that for non-replicated databases the best practice is still to separate the database file and transaction logs onto separate disks.

To move an Exchange 2013 database named “Mailbox Database 1″ to a new EDB file location of E:\Mailbox Database 1 and a new logs folder of F:\Mailbox Database 1 the following command is used.

mobe-dbpath

To check whether the database is mounted and accessible again you can run the following commands.

get-mailbox

Exchange 2013 ECP Redirects to old Exchange 2010 OWA

I recently setup an Exchange 2013 Server in an Exchange 2010 Environment.

All worked fine, but logging in to https://exchange2013/ecp redirected me to the old Exchange 2010 Interface.

Exchange2013ECP01Exchange2013ECP02If you have this problem, you can add the Exchange Version to the URL using “?ExchClientVer=15″.

So https://exchange2013/ecp?ExchClientVer=15 will redirect you to the correct Management Interface.

Exchange2013ECP03If the Mailbox of the Administrator account resides on the new Exchange 2013 Server this will be obsolete.

Virtual disks under Storage Spaces won’t stay attached after reboot!

Few days ago friend of mine asked me if I know how to fix this issue and I succeeded. Now I want to share with all of you.
The scenario is as follows…

Windows Server 2012 R2, one Storage Pool, few virtual disks. The behavior starts to happen after Windows Server 2012 R2 re-installation. Everything was fine until restart. Virtual Disks are present and attached but after restart the server they are detached.

Before restart.

10_thumbAfter restart.

10_thumb1If you are looking under virtual disk Properties/Details/Property (look picture below) you will notice that IsManualAttach – Value is True. In other words, if you want virtual disk be attached you must do manually attach.

10_thumb2

Resolution

Open PowerShell as administrator, type as follows and press Enter

Set-virtualdisk -FriendlyName <VirtualDiskName> -IsManualAttach $false

10_thumb3Refresh Server Manager Console and you Virtual Disks will be attached. After you restart your server Virtual Disks still be attached ;).

10_thumb4 10_thumb5