Migracija s PostgreSQL 9.1 na PostgreSQL 9.2

Migracija navedene baze se izvrsavala na operativnom sustavu CentOS 6.3 (Final). Prvo je potrebno napraviti nadogradnju PostgreSQL 9.2 baze na zadnju reviziju putem naredbe:

yum update postgresql91.x86_64

Nakon uspjesne nadogradnje potrebno je odraditi instalaciju PostgreSQL 9.2 repozitorija i baze:

cd /tmp/
wget http://yum.postgresql.org/9.2/redhat/rhel-6-x86_64/pgdg-centos92-9.2-6.noarch.rpm
rpm -i pgdg-centos92-9.2-6.noarch.rpm
 

Nakon uspajesne instalacije PostgreSQL 9.2 baze potrebno je napraviti inicijalizaciju iste:

/etc/init.d/postgresql-9.2 initdb

Windows Server 2012 R2 Preview – boot from VHDX

In one of my latest posts I wrote how to install Hyper-V role inside virtual machine. Very often I need that scenario for demos. Disadvantage of that scenario is what can’t run virtual machine inside virtual machine. So, now I can’t avoid that and need “server on metal”! I decided to install Windows Server 2012 R2 Preview on my laptop but I wanted to do boot from VHDX. What is the advantages when we have boot from VHDX? You can run it on every hardware whenever you want. You don’t need to do installation from the beginning, easy migration etc.

Let’s back to the point!

Open Disk Management and Create VHD(X)

1a_thumb2a_thumb3a_thumbPrepare bootable media with WS2012 R2 Preview. You can use DVD or USB. I have chosen USB created with WINDOWS 7 USB/DVD DOWNLOAD TOOL. Boot laptop/PC from bootable media. When the Windows screen appears choose Language, Time format and keyboard input method then press Next.

2_thumb1Keep in mind that we are not ready to install WS2012R2 Preview yet, you must first access your VHDX. When next window appear (Picture below) press Shift+F10 to open Administrator Command Prompt

3_thumbType the commands: diskpart press Enter
select vdisk part=d:\WS2012R2Preview\WS2012Preview.vhdx press Enter
attach vdisk press Enter

WP_20130819_004_thumbClick Install now and on the next screen click Custom: Install Windows only (advanced)

WP_20130819_006_thumbInstall Windows Server 2012 R2 Preview as usual! After that, in boot process you can choose which OS you want use.

WP_20130819_007_thumb

Original post at URL a Romeo Mlinar Blog: Windows Server 2012 R2 Preview – boot from VHDX

Deploy Office Web Apps Server

To prepare a server that runs Windows Server 2008 R2

  1. Install the following software:
  2. Next, open the Windows PowerShell prompt as an administrator and run the following command examples to install the required roles and services.

    For Windows Server 2008 R2

    Import-Module ServerManager

    And then run the follow command examples:

    Add-WindowsFeature Web-Server,Web-WebServer,Web-Common-Http,Web-Static-Content,Web-App-Dev,Web-Asp-Net,Web-Net-Ext,Web-ISAPI-Ext,Web-ISAPI-Filter,Web-Includes,Web-Security,Web-Windows-Auth,Web-Filtering,Web-Stat-Compression,Web-Dyn-Compression,Web-Mgmt-Console,Ink-Handwriting,IH-Ink-Support

    If you are prompted, restart the server when the command finishes.

To prepare a server that runs Windows Server 2012

  1. Open the Windows PowerShell prompt as an administrator and run the following command examples to install the required roles and services.

    For Windows Server 2012

    Add-WindowsFeature Web-Server,Web-Mgmt-Tools,Web-Mgmt-Console,Web-WebServer,Web-Common-Http,Web-Default-Doc,Web-Static-Content,Web-Performance,Web-Stat-Compression,Web-Dyn-Compression,Web-Security,Web-Filtering,Web-Windows-Auth,Web-App-Dev,Web-Net-Ext45,Web-Asp-Net45,Web-ISAPI-Ext,Web-ISAPI-Filter,Web-Includes,InkandHandwritingServices

    If you are prompted, restart the server when the command finishes.

Step 2: Install Office Web Apps Server

Complete the following steps on all servers that will run Office Web Apps Server.

To install Office Web Apps Server

  1. Download Office Web Apps Server from the Microsoft Download Center.
  2. Take one of the following actions:
    • For Windows Server 2012, open the .img file directly and run Setup.exe (double-click it).
    • For Windows Server 2008 R2 SP1, use a program that can mount or extract .img files. Then run Setup.exe (double-click it).
  3. In the Office Web Apps Server 2013 Wizard, on the Read the Microsoft Software License Terms page, select I accept the terms of this agreement and then select Continue.
  4. On the Choose a file location page, select the folder where you want the Office Web Apps Server files to be installed (for example, C:\Program Files\Microsoft Office Web Apps), and then select Install Now. Note that, if this folder does not exist, Setup will create it for you.
  5. When Setup finishes installing Office Web Apps Server, choose Close.
  6. Download and install the Office Web Apps Server update KB2810007.
    Check for the most current Office Web Apps Server updates by reviewing the 2013 list on the TechNet Update center for Office, Office servers, and related products.

Step 3: Install language packs for Office Web Apps Server

Office Web Apps Server 2013 Language Packs enable users to view web-based Office files in multiple languages from SharePoint 2013 document libraries, Outlook Web Access (as attachment previews), and Lync 2013 (as PowerPoint broadcasts). If you want to learn more about how the language packs work, see Planning language packs for Office Web Apps Server.

To install the language packs, follow these steps.

To install language packs for Office Web Apps Server

  1. Download the Office Web Apps Server Language Packs from the Microsoft Download Center.
  2. Run WebAppsServerLP_en-us_x64.exe (double-click it).
  3. In the Office Web Apps Server Language Pack 2013 Wizard, on the Read the Microsoft Software License Terms page, select I accept the terms of this agreement and then select Continue.
  4. When Setup finishes installing Office Web Apps Server, choose Close.
Important Important:
  • To install language packs after the Office Web Apps Server farm is created, you must remove a server from the farm, install the language pack on it, and then add the server back to the farm.
  • All servers in the farm must have the language pack installed.


Deploy a single-server Office Web Apps Server farm in a test environment

The information here will help you install a single-server Office Web Apps Server farm that uses HTTP in a test environment. You don’t need a certificate or load balancer, but you do need a dedicated physical server or virtual machine instance that is not running any other server application. You can use this Office Web Apps Server farm to provide Office Web Apps functionality to SharePoint 2013 and Exchange Server 2013, but be aware of the following limitations:

  • The environment can be accessed only by internal users. No external URL is configured.
  • The environment can’t be used with Lync Server 2013, which requires HTTPS.

Step 1: Create the Office Web Apps Server farm

The code in the following example creates a new Office Web Apps Server farm that consists of a single server. The URL you specify for –InternalURL is the name of the server that runs Office Web Apps Server, such as http://servername. The –AllowHttp parameter configures the farm to use HTTP, and the –EditingEnabled parameter enables editing in Office Web Apps when it is used together with SharePoint 2013. The –EditingEnabled parameter is not used by Lync Server 2013 or Exchange Server 2013 because those hosts don’t support editing.

New-OfficeWebAppsFarm –InternalURL "http://servername" –AllowHttp -EditingEnabled

Additional parameters that configure translation services, proxy servers, clipart support, and Online Viewers are described in New-OfficeWebAppsFarm. You can find additional information about how to obtain licenses that allow users to edit files by using Office Web Apps Server in Plan Office Web Apps (Used with SharePoint 2013). To learn about how these licenses are used in SharePoint Server 2013, see Configure licensing in SharePoint Server 2013.

noteNote:
If components of the .NET Framework 3.5 were installed and then removed, you might see “500 Web Service Exceptions” or “500.21 – Internal Server Error” messages when you run OfficeWebApps cmdlets. To fix this, run the following sample commands from an elevated command prompt to clean up settings that could prevent Office Web Apps Server from functioning correctly:

For Windows Server 2008 R2

%systemroot%\Microsoft.NET\Framework64\v4.0.30319\aspnet_regiis.exe -iru
iisreset /restart /noforce

For Windows Server 2012

dism /online /enable-feature /featurename:IIS-ASPNET45

Step 2: Verify that the Office Web Apps Server farm was created successfully

After the farm is created, details about the farm are displayed in the Windows PowerShell prompt. To verify that Office Web Apps Server is installed and configured correctly, use a web browser to access the Office Web Apps Server discovery URL, as shown in the following example. The discovery URL is composed of the value that you assigned to the InternalUrl parameter when you configured your Office Web Apps Server farm, and it is followed by /hosting/discovery.

http://servername/hosting/discovery

If Office Web Apps Server works as expected, you should see a Web app Open Platform Interface (WOPI)-discovery XML file in your web browser. The first few lines of that file should resemble the following example:

<?xml version="1.0" encoding="utf-8" ?> 
- <wopi-discovery>
- <net-zone name="internal-http">
- <app name="Excel" favIconUrl="http://servername/x/_layouts/images/FavIcon_Excel.ico" checkLicense="true">
<action name="view" ext="ods" default="true" urlsrc="http://servername/x/_layouts/xlviewerinternal.aspx?<ui=UI_LLCC&><rs=DC_LLCC&>" /> 
<action name="view" ext="xls" default="true" urlsrc="http://servername/x/_layouts/xlviewerinternal.aspx?<ui=UI_LLCC&><rs=DC_LLCC&>" /> 
<action name="view" ext="xlsb" default="true" urlsrc="http://servername/x/_layouts/xlviewerinternal.aspx?<ui=UI_LLCC&><rs=DC_LLCC&>" /> 
<action name="view" ext="xlsm" default="true" urlsrc="http://servername/x/_layouts/xlviewerinternal.aspx?<ui=UI_LLCC&><rs=DC_LLCC&>" />

Step 3: Configure the host

The farm is now ready to provide Office Web Apps functionality to hosts over HTTP. Visit the following articles for more information about how to configure hosts.

Deploy a single-server Office Web Apps Server farm that uses HTTPS

The information here will help you install a single-server Office Web Apps Server farm that uses HTTPS. You must have a certificate installed on the server as described in Securing Office Web Apps Server communications by using HTTPS . You can use this Office Web Apps Server farm to provide Office Web Apps functionality to SharePoint 2013, Lync Server 2013, and Exchange Server 2013.

Step 1: Create the Office Web Apps Server farm

The code in the following example creates a new Office Web Apps Server farm that consists of a single server. The URL that you specify for –InternalURL is the FQDN name of the server that runs Office Web Apps Server, such as http://servername.contoso.com. The URL that you specify for –ExternalURL is the FQDN name that can be accessed on the Internet. You must specify the friendly name of the certificate by using the –CertificateName parameter. The –EditingEnabled parameter is optional and enables editing in Office Web Apps when it is used together with SharePoint 2013. The –EditingEnabled parameter is not used by Lync Server 2013 or Exchange Server 2013 because those hosts do not support editing.

New-OfficeWebAppsFarm -InternalUrl "https://server.contoso.com" -ExternalUrl "https://wacweb01.contoso.com" -CertificateName "OfficeWebApps Certificate" -EditingEnabled

Additional parameters that configure translation services, proxy servers, clipart support, and Online Viewers are described in New-OfficeWebAppsFarm. You can find additional information about how to obtain licenses that allow users to edit files by using Office Web Apps Server in Plan Office Web Apps (Used with SharePoint 2013). To learn about how these licenses are used in SharePoint Server 2013, see Configure licensing in SharePoint Server 2013.

noteNote:
If components of the .NET Framework 3.5 were installed and then removed, you might see “500 Web Service Exceptions” or “500.21 – Internal Server Error” messages when you run OfficeWebApps cmdlets. To fix this, run the following sample commands from an elevated command prompt to clean up settings that could prevent Office Web Apps Server from functioning correctly:

For Windows Server 2008 R2

%systemroot%\Microsoft.NET\Framework64\v4.0.30319\aspnet_regiis.exe -iru
iisreset /restart /noforce

For Windows Server 2012

dism /online /enable-feature /featurename:IIS-ASPNET45

Step 2: Verify that the Office Web Apps Server farm was created successfully

After the farm is created, details about the farm are displayed in the Windows PowerShell prompt. To verify that Office Web Apps Server is installed and configured correctly, use a web browser to access the Office Web Apps Server discovery URL, as shown in the following example. The discovery URL is composed of the value that you assigned to the InternalUrl parameter when you configured your Office Web Apps Server farm, and it is followed by /hosting/discovery.

https://server.contoso.com/hosting/discovery

If Office Web Apps Server works as expected, you should see a Web app Open Platform Interface (WOPI)-discovery XML file in your web browser. The first few lines of that file should resemble the following example:

<?xml version="1.0" encoding="UTF-8"?>
<wopi-discovery><net-zone 
name="internal-https"><app name="Excel" checkLicense="true" 
favIconUrl="https://wac.contoso.com/x/_layouts/images/FavIcon_Excel.ico"><action 
name="view" 
urlsrc="https://wac.contoso.com/x/_layouts/xlviewerinternal.aspx?<ui=UI_LLCC&><rs=DC_LLCC&>" 
default="true" ext="ods"/><action name="view" 
urlsrc="https://wac.contoso.com/x/_layouts/xlviewerinternal.aspx?<ui=UI_LLCC&><rs=DC_LLCC&>" 
default="true" ext="xls"/><action name="view"
noteNote:
Depending on the security settings of your web browser, you might see a message that prompts you to select Show all content before the contents of the discovery XML file are displayed..

Step 3: Configure the host

The farm is now ready to provide Office Web Apps functionality to hosts over HTTPS. Visit the following articles for more information about how to configure hosts.

Deploy a multi-server, load-balanced Office Web Apps Server farm that uses HTTPS

The information here will help you install a multi-server Office Web Apps Server farm that uses a load balancer and HTTPS. Before you begin these steps, you must have your load balancer configured as described in Load balancer requirements for Office Web Apps Server, and you must have a certificate installed on the load balancer as described in Securing Office Web Apps Server communications by using HTTPS . You can use this Office Web Apps Server farm to provide Office Web Apps functionality to SharePoint 2013, Lync Server 2013, and Exchange Server 2013.

Step 1: Create the Office Web Apps Server farm on the first server

The code in the following example creates a new Office Web Apps Server farm on the first server. The URL that you specify for –InternalURL is the FQDN name of the server that runs Office Web Apps Server, such as http://servername.contoso.com. The URL that you specify for –ExternalURL is the FQDN name that can be accessed on the Internet. The SSLOffloaded parameter enables offloading SSL termination to the load balancer. The –EditingEnabled parameter is optional and enables editing in Office Web Apps when it is used together with SharePoint 2013. The –EditingEnabled parameter is not used by Lync Server 2013 or Exchange Server 2013 because those hosts don’t support editing.

New-OfficeWebAppsFarm -InternalUrl "https://server.contoso.com" -ExternalUrl "https://wacweb01.contoso.com" -SSLOffloaded -EditingEnabled

Additional parameters that configure translation services, proxy servers, clipart support, and Online Viewers are described in New-OfficeWebAppsFarm. You can find additional information about how to obtain licenses that allow users to edit files by using Office Web Apps Server in Plan Office Web Apps (Used with SharePoint 2013). To learn about how these licenses are used in SharePoint Server 2013, see Configure licensing in SharePoint Server 2013.

noteNote:
If components of the .NET Framework 3.5 were installed and then removed, you might see “500 Web Service Exceptions” or “500.21 – Internal Server Error” messages when you run OfficeWebApps cmdlets. To fix this, run the following sample commands from an elevated command prompt to clean up settings that could prevent Office Web Apps Server from functioning correctly:

For Windows Server 2008 R2

%systemroot%\Microsoft.NET\Framework64\v4.0.30319\aspnet_regiis.exe -iru
iisreset /restart /noforce

For Windows Server 2012

dism /online /enable-feature /featurename:IIS-ASPNET45

Step 2: Add more servers to the farm

After the first server is running Office Web Apps Server, run the following command on each server that you want to add to the Office Web Apps Server farm. The –MachineToJoin parameter adds the current server to an existing Office Web Apps Server farm, so use the computer name of one of the servers that’s already in the Office Web Apps Server farm.

New-OfficeWebAppsMachine –MachineToJoin "server1.contoso.com"

Want more information about these parameters? You can find them in New-OfficeWebAppsMachine.

Step 3: Verify that the Office Web Apps Server farm was created successfully

After the farm is created, details about the farm are displayed in the Windows PowerShell prompt. To verify that Office Web Apps Server is installed and configured correctly, use a web browser to access the Office Web Apps Server discovery URL, as shown in the following example. The discovery URL is composed of the value that you assigned to the InternalUrl parameter when you configured your Office Web Apps Server farm, and it is followed by /hosting/discovery.

https://server.contoso.com/hosting/discovery

If Office Web Apps Server works as expected, you should see a Web app Open Platform Interface (WOPI)-discovery XML file in your web browser. The first few lines of that file should resemble the following example:

<?xml version="1.0" encoding="UTF-8"?>
<wopi-discovery><net-zone name="internal-https"><app name="Excel" checkLicense="true" favIconUrl="https://officewebapps.contoso.com/x/_layouts/images/FavIcon_Excel.ico"><action name="view" urlsrc="https://officewebapps.contoso.com/x/_layouts/xlviewerinternal.aspx?<ui=UI_LLCC&><rs=DC_LLCC&>" default="true" ext="ods"/><action name="view" urlsrc="https://officewebapps.contoso.com/x/_layouts/xlviewerinternal.aspx?<ui=UI_LLCC&><rs=DC_LLCC&>" default="true" ext="xls"/><action name="view" urlsrc="https://officewebapps.contoso.com/x/_layouts/xlviewerinternal.aspx?<ui=UI_LLCC&><rs=DC_LLCC&>" default="true" ext="xlsb"/>
noteNote:
Depending on the security settings of your web browser, you might see a message that prompts you to select Show all content before the contents of the discovery XML file are displayed.

Office Web Apps Server Integration

Outlook Web App in Microsoft Exchange Server 2013 provides rich attachment preview functionality. All attachments in an email message are displayed in a filmstrip that includes a thumbnail of each attachment. Users are able to preview attachments online in full fidelity. For Office attachments, this means users can use a rich user interface to preview and modify the attachment online. This functionality is made possible by the integration of Microsoft Office Web Apps Server.

By default, the following file types are displayed using Office Web Apps Server:

  • Word documents (doc, docx, dotx, dot, dotm extensions)
  • Excel documents (xls, xlsx, xlsm, xlm, xlsb extensions)
  • PowerPoint documents (ppt, pptx, pps, ppsx, potx, pot, pptm, potm, ppsm extensions)
noteNote:
Office Web Apps Server won’t be used to render attachments in IRM protected messages.

In Exchange 2010, the attachment previews were displayed using the web-ready document viewing technology, which is built in to Exchange. With Office Web Apps Server integration in Exchange Server 2013, when the user wants to preview an Office attachment, Exchange makes a call to the Office Web Apps Server which renders the document instead. This provides a richer preview experience for the user.

Office Web Apps Server integration for attachment previews is available to all Exchange Online customers. Exchange on-premises customers need to deploy an Office Web Apps Server to enable the functionality.

Configure Office Web Apps Server integration


This section provides detailed steps for configuring Office Web Apps Server integration with Exchange Server 2013 for on-premises customers. This procedure doesn’t apply to Exchange Online customers because the functionality is already enabled in Exchange Online.

What do you need to know before you begin?


  • Estimated time to complete each procedure: 5 minutes.
  • Procedures in this topic require specific permissions. See each procedure for its permissions information.
  • You have Office Web Apps Server deployed in your organization. For more information, see Deploy the infrastructure: Office Web Apps Server
  • Your Office Web Apps Server is accessible from the Internet. If it isn’t accessible from the Internet, Office Web Apps Server integration will work only when users access Outlook Web App within your corporate network.
  • You can’t use the Exchange Administration Center (EAC) to perform these procedures. You must use the Shell.
  • For information about keyboard shortcuts that may apply to the procedures in this topic, see Keyboard Shortcuts in the Exchange Admin Center.
tipTip:
Having problems? Ask for help in the Exchange forums. Visit the forums at: Exchange Server, Exchange Online, or Exchange Online Protection

To use Office Web Apps Server to render attachments in Outlook Web App, you must specify the URL of your Office Web Apps Server. Use the Set-OrganizationConfig cmdlet to configure the URL.

You need to be assigned permissions before you can perform this procedure or procedures. To see what permissions you need, see the “Exchange server configuration settings” entry in the Exchange and Shell Infrastructure Permissions topic.

This example sets the Office Web Apps Server URL to https://Server1/hosting/discovery.

Set-OrganizationConfig -WACDiscoveryEndPoint https://Server1/hosting/discovery

For detailed syntax and parameter information, see Set-OrganizationConfig.

How do you know this worked?

To verify that you have configured the Office Web App Server URL correctly, do the following:

  1. Run the following Shell command:
    Get-OrganizationConfig | Format-List WACDiscoveryEndPoint
    
  2. Verify that the correct URL is listed for the WACDiscoveryEndPoint attribute.

You can enable rendering of attachments using Office Web Apps Server for both public and private computers. Use the Set-OwaVirtualDirectory cmdlet for both options.

You need to be assigned permissions before you can perform this procedure or procedures. To see what permissions you need, see the “Outlook Web App virtual directories” entry in the Clients and Mobile Devices Permissions topic.

This example enables Office Web Apps Server rendering on the default Outlook Web App virtual directory on server Server01 for users who logged on to Outlook Web App using the Private option:

Set-OwaVirtualDirectory "Server01\owa (Default Web Site)" -WacViewingOnPrivateComputersEnabled $true

This example disables Office Web Apps Server rendering on the default Outlook Web App virtual directory on server Server01 for users who logged on to Outlook Web App using the Public option.

Set-OwaVirtualDirectory "Server01\owa (Default Web Site)" -WacViewingOnPublicComputersEnabled $true

For detailed syntax and parameter information, see Set-OwaVirtualDirectory.

How do you know this worked?

To verify that you have configured Office Web Apps server rendering correctly, do the following:

  1. Run the following Shell command:
    Get-OwaVirtualDirectory "Server01\owa (Default Web Site)" | Format-List Name,WacViewing*
    
  2. Verify that the WacViewingOnPrivateComputersEnabled attribute is set to True and that WacViewingOnPublicComputersEnabled is set to False.

You can force users to render attachments using the Office Web Apps Server first before they can open them directly.

You need to be assigned permissions before you can perform this procedure or procedures. To see what permissions you need, see the “Outlook Web App virtual directories” entry in the Clients and Mobile Devices Permissions topic.

This example configures the Outlook Web App virtual directory on Server01 so that users always first view supported attachments using Office Web Apps Server before they can open them, regardless of the option they chose when logging on to Outlook Web App.

Set-OwaVirtualDirectory "Server01\owa (Default Web Site)" -ForceWacViewingFirstOnPublicComputers $true -ForceWacViewingFirstOnPrivateComputers $true

For detailed syntax and parameter information, see Set-OwaVirtualDirectory.

How do you know this worked?

To verify that you have configured Office Web Apps server rendering correctly, do the following:

  1. Run the following Shell command:
    Get-OwaVirtualDirectory "Server01\owa (Default Web Site)" | Format-List Name,ForceWacViewing*
    
  2. Verify that the ForceWacViewingFirstOnPrivateComputers and ForceWacViewingFirstOnPublicComputers attributes are both set to True.

Site Mailboxes in SharePoint & Exchange 2013 – Part1

In this multi-part post, I will be exploring and configuring a new and very promising feature that comes with the Wave15 release of the 2013 suite of collaboration products which are Site Mailboxes. Site Mailboxes bring together email and SharePoint document libraries / team sites to enhance collaboration of documents and communications in the enterprise. Traditionally, users in the enterprise collaborate via two mediums, documents and email.  While both SharePoint and Exchange/Outlook are great products on their own, this approach requires the user to leverage multiple client connectivity methods such as the browser and/or Outlook/OWA, or even a combination of the two. Site Mailboxes attempt to change how users collaborate by bringing these two back end systems together in the same client interface, Outlook.  For more information on how Site Mailboxes are used in the new Office, please see an excellent overview here.

In this post we’ll explore the requirements to bring this new feature to use for users and the requirements associated with both Exchange and SharePoint 2013. To start, lets take a look at the requirements on the SharePoint side of things. I will be following the official documentation on TechNet which can be found here.  We will step through each one of the requirements in more detail as we progress through the series of posts.

SharePoint 2013 Requirements Overview:

  1. Must be a member of the SharePoint administrators group.
  2. Site Mailboxes require Exchange 2013.
  3. EWS API installed on SharePoint WFE should be version 15.0.516.25 or above. More information on how to confirm is located here.
  4. User Profile Synchronization must be configured in the SharePoint 2013 farm.
  5. App Management Service Application be configured in the SharePoint 2013 farm.
  6. SSL configured for the Default Zone in web applications that are setup in a server to server authentication scenario.

Site Mailboxes require Exchange 2013

This should be a very obvious prerequisite and does not require any more detail. Exchange 2013 is required for this integration to work.

Install EWS API on SharePoint 2013 WFE server(s)

The first step in configuring integration between SharePoint 2013 and Exchange 2013 is to install Exchange Web Services API on the SharePoint 2013 web front end server. To do this, navigate to the following url and download the EWSManagedAPI.msi.

http://www.microsoft.com/en-us/download/details.aspx?id=35371

Once downloaded, open a command prompt with elevated privileges and execute the following command after navigating to the directory where the EWSManagedAPI.msi file was saved. In my example, it is saved to C:installs

msiexec /i EwsManagedApi.msi addlocal=”ExchangeWebServicesApi_Feature,ExchangeWebServicesApi_Gac”

install_ews

The installer will launch and present the below welcome screen, click “Next” to proceed.

ews_welcome

Select the “I Accept the terms in the License Agreement” radio button and click next to continue.

ews_eula

Modify the installation folder if necessary and click “Next” to proceed.

ews_install_folder

Finally, click “Next” to confirm the installation and to begin the install process.

ews_confirm

After the installation is complete (should be very quick), click “Close” to complete the installation process.

ews_complete

In Part 2. We will take a look at how to configure the User Profile Synchronization service in SharePoint 2013 to synchronize with Active Directory Domain Services as its source directory.


PowerShell restore delete site command Restore-SPDeletedSite

Applies to:  SharePoint Foundation 2013 | SharePoint Server 2013 Enterprise 

Restores a deleted site collection.

Restore-SPDeletedSite [-Identity] <SPDeletedSitePipeBind> [-AssignmentCollection <SPAssignmentCollection>] [-Confirm [<SwitchParameter>]] [-ContentDatabase <SPContentDatabasePipeBind>] [-WebApplication <SPWebApplicationPipeBind>] [-WhatIf [<SwitchParameter>]]

Parameters

Parameter Required Type Description
Identity Required Microsoft.SharePoint.PowerShell.SPDeletedSitePipeBind Specifies the identity of the deleted site collection to be restored. The identity can be either a valid server-relative URL in the form /sites/site_name; a valid GUID in the form 12345678-90ab-cdef-1234-567890bcdefgh; or an SPDeletedSite object

A site collection must not already exist at the URL location to perform a restore.

AssignmentCollection Optional Microsoft.SharePoint.PowerShell.SPAssignmentCollection Manages objects for the purpose of proper disposal. Use of objects, such as SPWeb or SPSite, can use large amounts of memory and use of these objects in Windows PowerShell scripts requires proper memory management. Using the SPAssignment object, you can assign objects to a variable and dispose of the objects after they are needed to free up memory. When SPWeb, SPSite, or SPSiteAdministration objects are used, the objects are automatically disposed of if an assignment collection or the Global parameter is not used.

noteNote:
When the Global parameter is used, all objects are contained in the global store. If objects are not immediately used, or disposed of by using the Stop-SPAssignment command, an out-of-memory scenario can occur.
Confirm Optional System.Management.Automation.SwitchParameter Prompts you for confirmation before executing the command. For more information, type the following command: get-help about_commonparameters
ContentDatabase Optional Microsoft.SharePoint.PowerShell.SPContentDatabasePipeBind Specifies the SQL Server content database where the site collection data will be stored. If no content database is specified, the content database with the greatest unused site collection capacity and whose database status is ready will be used.
WebApplication Optional Microsoft.SharePoint.PowerShell.SPWebApplicationPipeBind Specifies the URL, GUID, or name of the Web application from which to list sites.

The type must be a valid URL in the form http://server_name; a valid GUID, for example, 12345678-90ab-cdef-1234-567890bcdefgh; or the Web application name, for example, WebApplication1212.

WhatIf Optional System.Management.Automation.SwitchParameter Displays a message that describes the effect of the command instead of executing the command. For more information, type the following command: get-help about_commonparameters

Detailed Description

This cmdlet was introduced in SharePoint Server 2010 with Service Pack 1 (SP1) and SharePoint Foundation 2010 with Service Pack 1 (SP1).

Use the Restore-SPDeletedSite cmdlet to restore a previously deleted site collection.

Unlike the Restore-SPSite cmdlet that uses the host name and scheme for the Identity parameter (that is, http://server_name), the value of the identity parameter for all SPDeletedSite cmdlets use a server-relative URL. Typically, the forward slash character (/) begins the relative URL and also denotes the root site.

For additional information about a server-relative URL or understanding general concepts about absolute and relative URLs, see Server-relative URL Property or Understanding Absolute and Relative URL Addresses.

Restore-SPDeletedSite -Identity 610857cb-8414-4a89-8bf3-ad3628f6c86c

This example restores a specific deleted site collection by using the site ID.

Released: Exchange Server 2013 RTM Cumulative Update 1

We know a lot of you have been waiting for this, and so it is with great excitement that we announce that Exchange Server 2013 RTM Cumulative Update 1 (CU1) has been released to the web and is available for immediate download! This is the first release using the new servicing model for Exchange Server 2013. In addition to this article, the Exchange 2013 RTM CU1 release notes are also available.

Note: Article links that may not have been available at the time of this post’s publishing are now available. Updated Exchange 2013 documentation, including Release Notes, is now available on TechNet.

CU1 is the minimum version of Exchange 2013 required for on-premises coexistence with supported legacy Exchange Server versions. The final build number for CU1 is 15.0.620.29. For more information on coexistence, check out the Planning and Deployment documentation, and this Ignite webcast covering deployment of and coexistence with Exchange Server 2013.

Upgrading/Deploying Cumulative Update 1

Unlike previous versions, cumulative updates do not use the rollup infrastructure; cumulative updates are actually full builds of the product, meaning that when you want to deploy a new server, you simply use the latest cumulative update build available and do not necessarily need to apply additional Exchange Server updates.

Active Directory Preparation

Prior to upgrading or deploying the new build onto a server, you will need to update Active Directory. For those of you with a diverse Active Directory permissions model you will want to perform the following steps:

  1. Exchange 2013 RTM CU1 includes schema changes. Therefore, you will need to execute setup.exe /PrepareSchema /IAcceptExchangeServerLicenseTerms.
  2. Exchange 2013 RTM CU1 includes enterprise Active Directory changes (e.g., RBAC roles have been updated to support new cmdlets and/or properties). Therefore, you will need to execute setup.exe /PrepareAD /IAcceptExchangeServerLicenseTerms.
  3. Exchange 2013 RTM CU1 includes changes to the permissions within the domain partition (e.g., Exchange Servers have been granted the ability to modify msExchActiveSyncDevices class on inetOrgPerson objects). Therefore, you will need to execute setup.exe /PrepareDomain /IAcceptExchangeServerLicenseTerms in each domain containing Exchange servers or mailboxes.
Note: If your environment contains only Exchange 2007, and you upgrade to Exchange 2013, keep in mind you cannot deploy Exchange 2010 in that environment at a later time. If you foresee a need to deploy Exchange 2010 servers into your environment, deploy an Exchange 2010 multi-role server (with all four servers roles) prior to executing Exchange 2013 setup.exe /PrepareAD. As long as you retain at least one role of each legacy server, you will continue to be able to install additional servers of that version into your coexistence environment. Once you remove the last server role of a legacy version, you will no longer be able to reintroduce that version into the environment.

Coexistence Pre-Deployment Step: OAB Verification

As mentioned in the Exchange Server 2013 CU1 release notes, when you deploy the first Exchange 2013 Mailbox server in an existing Exchange organization, a new default Offline Address Book is created.

7607.CU1-1_thumb_2702C41BFigure 1: The new OAB as shown in an Exchange Server 2010 SP3 & 2013 CU1 environment

All existing clients that rely on an OAB will see this new default OAB the next time they look for an OAB update. This will cause these clients to perform a full OAB download. To prevent this from happening, you can configure your existing mailbox databases to explicitly point to the current default OAB prior to introducing the first Exchange 2013 server. You can do this one of two ways:

Within the Exchange Management Console (EMC), navigate to Organization Configuration –> Mailbox –> Database Management –> Mailbox Database Properties –> Client Settings.

6567.CU1-2_thumb_1280054E
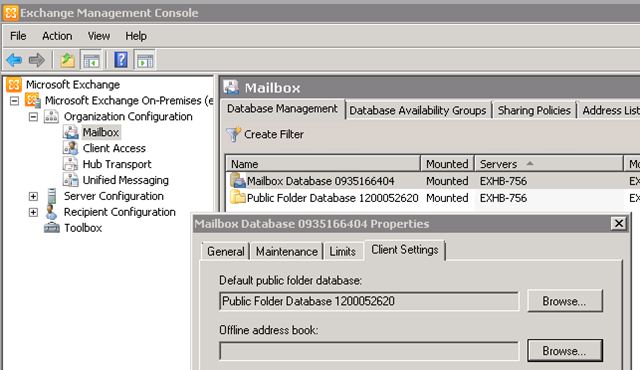
Figure 2: Modifying the default Offline Address Book at the database level in the EMC

Alternatively, if you have many mailbox databases to update, the following Exchange Management Shell command can be used to view all mailbox databases without a default OAB explicitly set on them. If you have both Exchange 2007 and Exchange 2010 deployed on-premises then you will have to run the following commands using the respective Exchange Management Shell version as the Get/Set-MailboxDatabase commands are version specific.

Get-MailboxDatabase | Where {$_.OfflineAddressBook -eq $Null} | FT Name,OfflineAddressBook -AutoSize

If no values are returned then you are already prepared. However, if you need to configure some databases, then this next command will find all mailbox databases in an Exchange 2007 or Exchange 2010 environment with no default OAB defined at the database level, and it will set it to the current default OAB in the org.

Get-MailboxDatabase | Where {$_.OfflineAddressBook -eq $Null} | Set-MailboxDatabase -OfflineAddressBook (Get-OfflineAddressBook | Where {$_.IsDefault -eq $True})

To confirm all Exchange 2007/2010 mailbox databases now have a defined default OAB, re-run the first command. This time it should return no entries.

Server Deployment

Once the preparatory steps are completed, you can then deploy CU1 and start your coexistence journey. If this is your first Exchange 2013 server deployment, you will need to deploy both an Exchange 2013 Client Access Server and an Exchange 2013 Mailbox Server into the organization. As explained in Exchange 2013 Client Access Server Role, CAS 2013 is simply an authentication and proxy/redirection server; all data processing (including the execution of remote PowerShell cmdlets) occurs on the Mailbox server. You can either deploy a multi-role server or each role separately (just remember if you deploy them separately, you cannot manage the Exchange 2013 environment until you install both roles).

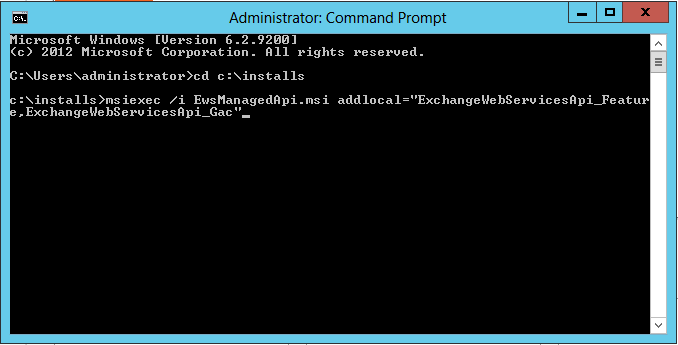
If you already deployed Exchange 2013 RTM code and want to upgrade to CU1, you will run setup.exe /m:upgrade /IAcceptExchangeServerLicenseTerms from a command line after completing the Active Directory preparatory steps or run through the GUI installer. Deploying future cumulative updates will operate in the same manner.

Note: Unlike previous versions, in Exchange 2013, you cannot uninstall a single role from a multi-role server. For example, if you deploy the CAS and MBX roles on a single machine, you cannot later execute setup to remove the CAS role; you can only uninstall all server roles.

Mailbox Sizes in Exchange Server 2013

As you start migrating your mailboxes to Exchange 2013, one thing you may notice is that your mailboxes appear to be larger post move.

As you can imagine, with hosting millions of mailboxes in Office 365, accurate storage reporting is essential, just like in your on-premises deployments. One of the learnings that we accrued into the on-premises product is ensuring that the mailbox usage statistics are more closely aligned with the capacity usage within the Mailbox database. The impact of reporting space more accurately means that mailbox quota limits may need to be adjusted prior to the mailbox move so that users are not locked out of their mailbox during the migration process.

Our improved space calculations may result in a mailbox’s reported size increasing on average of 30% when the mailbox is moved from a legacy version of Exchange to Exchange 2013. For example, if a mailbox is reported as 10GB in size on Exchange Server 2010, then when the mailbox is moved to Exchange 2013, it may be reported as 13GB. This does not mean that migrating to Exchange 2013 will increase your capacity footprint by 30% per mailbox; it only means that the statistics are including more data about the space the mailbox consumes. 30% is an average value, based on what we have experienced in Exchange Online. Customers with pilot mailboxes should determine what their own average increase value may be as some environments may see higher or lower values depending on the most prevalent type of email within their mailboxes. Again, this does not mean there will be an increase in the size of the database file on disk; only the attribution of space to each mailbox will increase.

New Functionality Included in Cumulative Update 1

Exchange 2013 RTM CU1 includes a number of bug fixes and enhancements over the RTM release of Exchange 2013. Some of the more notable enhancements are identified below.

Address Book Policies

As discussed recently, an Address Book Policy Routing Agent has been included in Exchange 2013 RTM CU1. For all the juicy details, see Address Book Policies, Jamba Jokes and Secret Agents.

Groups can once again manage groups!

In Exchange 2010 you could not use a group as an owner for another group for membership management. Instead you had to deploy explicit permissions on groups or use a script as a workaround.

Since Exchange 2010’s release both Microsoft Support and the Exchange Product Group received resounding feedback on the need for this capability. The good news is that with Exchange 2013 RTM CU1 groups can once again be owners of groups for membership management.

Public Folder Favorites Access through Outlook Web App

In Exchange Server 2013 RTM there was no way to access Public Folder content through Outlook Web App. In CU1 you will now have access to Public Folders you have added as favorites via your favorites menu either in Outlook or Outlook Web App. However, this access is limited to Public Folders stored on Exchange Server 2013.

6011.OWA_PFs_thumb_0FD9DA4EFigure 3: Adding a Public Folder as a favorite in Outlook Web App in Exchange Server 2013 RTM CU1

Remember, you cannot start creating Public Folders on Exchange Server 2013 until all users have been migrated to Exchange Server 2013. For how to migrate from legacy Public Folders to Exchange Server 2013 Public Folders, see Migrate Public Folders to Exchange 2013 From Previous Versions.

Exchange Admin Center Enhancements

The Exchange Admin Center (EAC) has been enhanced and now includes Unified Messaging management, improvements in the migration UI allowing more migration options reducing the gap between PowerShell and the UI, and general overall improvements in the user experience for consistency and simplification based on customer feedback.

High Availability and Monitoring Enhancements

There are have been several enhancements in the high availability and Managed Availability space. In particular:

  • The Best Copy Selection algorithm now honors MaximumActiveDatabases.
  • Auto-reseed now supports disks that have Bitlocker encryption.
  • Many probes, monitors, and responders have been updated and improved over the RTM release.
  • Get-HealthReport cmdlet has been streamlined and its performance has been optimized.
  • Exchange 2013 RTM CU1 will support the Exchange Server 2013 Management Pack for System Center Operations Manager (SCOM); this management pack will be available at a later date. This management pack is supported on SCOM 2007 R2 and SCOM 2012.

High Availability Changes in Exchange Server 2013 Cumulative Update 1

Exchange Server 2013 Cumulative Update 1 (CU1) has been released and is now available for download!  CU1 is the first release to use the servicing model introduced with Exchange 2013.  CU1 includes new features, new functionality and bug fixes, including in the area of high availability.  The announcement post on the Exchange Team Blog already has some great information on what’s new in CU1, but I wanted to augment that announcement with some additional details.  Below is a list of some of the high availability-related changes in CU1.  This is by no means an exhaustive list; just a list of some of the changes that we have made.


Witness Server Warning Message When Using Certain Database Availability Group Tasks

I first wrote about this issue back in June 2011.  This is where the system displays an incorrect warning message when you are using a non-Exchange server as your witness server, even when you have configured things correctly.  This issue was eventually fixed in Exchange 2010 Service Pack 2 RU5, but it didn’t make it’s way into Exchange 2013 RTM.  Fortunately, the fix did make its way into CU1.


Self-recovery Behaviors

Exchange 2013 continues the innovation introduced in Exchange 2010 by including functionality that allows the system to self-recover from failures that affect resiliency or redundancy. In addition to the Exchange 2010 self-recovery behaviors, Exchange 2013 RTM includes additional behaviors for long I/O times, excessive memory consumption by the Microsoft Exchange Replication service (MSExchangeRepl.exe), and severe cases where threads can’t be scheduled. For example, every 30 seconds, the Exchange Replication service heartbeats the crimson channel, as it is a required component for normal operations. If this heartbeat fails, an indication that the crimson channel is inaccessible for some reason, the Exchange Replication service self-recovers the server by forcibly rebooting the server, thereby triggering a server failover.

In addition to the behaviors in Exchange 2013 RTM, CU1 includes new behaviors:

  • Bus Resets – Event 129 is logged in the System event log when a bus reset occurs.  Bus resets, particularly the rare but possible bus reset storm, can often result in storage issues, such as hung IO. When these events occur, it typically requires administrator intervention to resolve the issue. To obviate the need for administrator intervention, CU1 includes new functionality that triggers a forcible reboot of the server when event 129 is detected in the System event log.
  • Replication service endpoints not responding – Exchange periodically verifies that the TCPListener component in the Exchange Replication service is responding to connection requests by periodically heart beating the local instance of the Exchange Replication service.  If the TCPListener does not respond, the system will automatically self-recover by forcibly rebooting the server.

Autoreseed

Automatic reseed, or AutoReseed, is a feature that’s the replacement for what is normally administrator-driven action in response to a disk failure, database corruption event, or other issue that necessitates a reseed of a database copy. When properly configured, AutoReseed is designed to automatically restore database redundancy after a disk failure by using spare disks that have been provisioned on the system.

CU1 includes numerous fixes to AutoReseed, including fixes for issues around AutoReseed not detecting spare disks correctly and AutoReseed not using detected spare disks.  In addition, the following enhancements have been made to AutoReseed:

  • GetCopyStatus now has a new field ‘ExchangeVolumeMountPoint’, which shows the mount point of the database volume under C:\ExchangeVolumes (or a custom folder if you are not using the default setting of C:\ExchangeVolumes).  This is useful information to know because in a configuration that uses multiple disks per volume, the LogicalDisk performance counters show up as the first mount point (which would be the one under C:\ExchangeVolumes) instead of as the database path like they used to in Exchange 2010 with a single disk per volume.
  • We now have better internal tracking around mount paths and the ExchangeVolume path.
  • The limits for AutoReseed have been increased from 4 databases per volume in Exchange 2013 RTM to 8 databases per volume in CU1.
  • AutoReseed properties have been added to Active Directory that allow you to enable and disable automatic reseeding and the DiskReclaimer function (which formats Exchange volumes). The two new properties are:
    • AutoDagAutoReseedEnabled – Setting AutoDagAutoReseedEnabled to false turns off AutoReseed (including automatic resume, sparing, and in-place reseeds).
    • AutoDagDiskReclaimerEnabled – Setting AutoDagDiskReclaimerEnabled to false turns off the DiskReclaimer, which formats exchange volumes. The default setting is true, and it only tries to format volumes mounted under C:\ExchangeVolumes.
  • The unused AutoDagFailedVolumesRootFolderPath property was also removed from the DAG object.

As a result of these and other changes, the workflow for AutoReseed in CU1 has changed.  The primary input condition for the AutoReseed workflow is still a database copy that is in an Failed and Suspended (F&S) state for 15 consecutive minutes.  When that condition is detected, the following AutoReseed workflow is initiated:

  1. The system will first try to resume the database copy up to 3 times, with 5 minute sleeps in between each try.  Sometimes, after an F&S database copy is resumed, the copy remains in a Failed state. This can happen for a variety of reasons, so this first step is designed to handle all such cases; AutoReseed will automatically suspend a database copy that has been Failed for 10 consecutive minutes to keep the workflow running. If the suspend and resume actions don’t result in a healthy database copy, the workflow continues.
  2. Next, AutoReseed will perform a variety of pre-requisite checks. For example, it will verify that a spare disk is available, that the database and its log files are configured on the same volume, and in the appropriate locations that match the required naming conventions. In a configuration that uses multiple databases per volume, AutoReseed will also verify that all database copies on the volume are in an F&S state.
  3. Next, AutoReseed will attempt to assign a spare volume up to 5 times, with 1 hour sleeps in between each try.
  4. Once a spare has been assigned, AutoReseed will perform an InPlaceSeed operation using the SafeDeleteExistingFiles seeding switch.  If one or more database files exists, AutoReseed will wait for 2 days before in-place reseeding (based on the LastWriteTime of the database file).  This provides an administrator with an opportunity to preserve data, if needed.  AutoReseed will attempt a seeding operation up to 5 times, with 1 hour sleeps in between each try.

Once all retries are exhausted, the workflow stops.  If, after 3 days, the database copy is still F&S, the workflow state is reset and it starts again from Step 1.  This reset/resume behavior is useful (and intentional) since it can take a few days to replace a failed disk, controller, etc..


Update-MailboxDatabaseCopy

The Update-MailboxDatabaseCopy cmdlet includes some new parameters in CU1 that are designed to aid with automation of seeding operations.  These parameters include:

  • BeginSeed – This is useful for scripting reseeds, because with this parameter, the task asynchronously starts the seeding operation and then exits the cmdlet.
  • MaximumSeedsInParallel – This is used with the Server parameter to specify the maximum number of parallel seeding operations that should occur across the specified server during a full server reseed operation. The default value is 10.
  • SafeDeleteExistingFiles – This is used to perform a seeding operation with a single copy redundancy pre-check prior to the seed. Because this parameter includes the redundancy safety check, it requires a lower level of permissions than the DeleteExistingFiles parameter, enabling a limited permission administrator to perform the seeding operation.
  • Server – This is used as part of a full server reseed operation to reseed all database copies in a Failed and Suspended state. It can be used with the MaximumSeedsInParallel parameter to start reseeds of database copies in parallel across the specified server in batches of up to the value of the MaximumSeedsInParallel parameter copies at a time.

Set-DatabaseAvailabilityGroup

The Set-DatabaseAvailabilityGroup cmdlet includes a new parameter named SkipDagValidation.  It is used to bypass the validation of the DAG’s quorum model and the health check on the DAG’s witness during certain DAG configuration operations.  While this parameter has some usefulness for us in Exchange Online (and that is why it was introduced), and while it is enabled for on-premises use, it won’t be of much use to on-premises environments. I’m only pointing it out because, as I said, it is enabled for on-premises use.


Managed Availability: Get-ServerHealth and Get-HealthReport

The Get-ServerHealth and Get-HealthReport cmdlets are used to get and process raw health set data from Managed Availability, the new monitoring and recovery framework used by the various components within Exchange. Get-ServerHealth can be used to view the various health sets and their current status.  In Exchange 2013 RTM, the Get-HealthReport cmdlet consumed results from Get-ServerHealth to produce a summary rollup of health.  But the way in which it was implemented made it very slow and inefficient.

With CU1, instead of piping Get-ServerHealth to Get-HealthReport, Get-HealthReport is now capable of reporting the consolidated results on its own, and it now takes an Identity parameter that enables you to specify a server instead of InputObject/InputEntries.  Get-HealthReport also includes a new HealthSet parameter, which is used to return the health state for a group of monitors. However, to use a rollup group, a list of names must be pipelined to Get-HealthReport. Unfortunately, Get-HealthReport -Identity does not support an array of names, so our recommended way to do this is to simply get the list of DAG members and pipe that to Get-HealthReport. For example to display a rollup summary of transport health on members of a DAG, you would run:

(Get-DatabaseAvailabilityGroup DAG1).Servers | Get-HealthReport -RollupGroup -HealthSet HubTransport

There are a couple of changes for Get-ServerHealth in CU1; namely, two parameters have also been added:

  • HaImpactingOnly – This is used to display only monitors that have HaImpacting set.
  • HealthSet – This is used to return the health state of a group of monitors.

Best Copy and Server Selection Changes

Best Copy and Server Selection (BCSS) is the algorithm used by Active Manager in Exchange 2013 to select the best database copy to activate in response to a failover or a target-less switchover. In CU1, a change was made so that the Primary Active Manager (PAM) now keeps track of the number of active databases per server, so that during BCSS it can honor the value of MaximumActiveDatabases, if configured.  The server holding the PAM role now keeps an in-memory state that tracks the number of active databases per server. When the PAM role moves or when the Exchange Replication service is restarted on the PAM, this information is rebuilt from the cluster database.

This change allows Active Manager to exclude servers that are already hosting the maximum amount of active databases when determining potential candidates for activation.  Prior to this change, Active Manager would not evaluate whether a potential server candidate for activation was already at its configured active database limit. Thus, if such a server were selected for activation, the activation process would fail during the mount attempt, and a new server would have to be selected (if available). This scenario is now avoided as a result of this change.


Other CU1 Changes

Of course there are other changes in CU1 besides the above, so be sure to read the Release Notes and other appropriate documentation when everything is released.

Description of the standard terminology that is used to describe Microsoft software updates

Microsoft is adopting the following standard terminology to describe software updates:

  • Connector

    Definition: A connector is a software component that is designed to support connections between software.

  • Critical-on-demand (COD)

    Definition: A Critical-on-Demand hotfix is requested by a customer who experiences significant loss or degradation of business services.

    Additional information: These hotfixes can be requested by any customer, regardless of their support level, if the customer meets the criteria for the request. These hotfixes are released on or before a mutually agreed-upon date based on the customer’s need. These hotfix builds can contain one or more fixes.

  • Critical update

    Definition: A critical update is a broadly released fix for a specific problem that addresses a critical, non-security-related bug.

    Additional information: Critical updates are available for customers to download and are accompanied by a Microsoft Knowledge Base article.

  • Cumulative update (CU)

    Definition: A CU is a roll-up update that contains all previous critical on-demand hotfixes to date. Additionally, a CU contains fixes for issues that meet the hotfix acceptance criteria. These criteria may include the availability of a workaround, the effect on the customer, the reproducibility of the problem, the complexity of the code that must be changed, or other reasons.

    Additional Information: This update can be requested by any customer, regardless of their support level. These updates are released on every two months.

  • Development kit

    Definition: A development kit is software that is designed to help developers write new programs. Development kits typically include a visual builder, an editor, and a compiler.

  • Driver

    Definition: A driver is a software component that is designed to support new hardware.

  • Feature pack

    Definition: A feature pack is new product functionality that is first distributed outside the context of a product release and that is typically included in the next full product release.

  • General distribution release (GDR)

    Definition: A GDR fixes an issue that has broad customer impact or that has security implications. A GDR is determined and issued only by Microsoft. Microsoft tries to release as few GDRs as possible.

    Additional information: A GDR cannot be requested by a customer. Microsoft determines whether a specific hotfix is classified and delivered as a GDR through an internal process. A GDR is released through the Microsoft Download Center. A GDR may also be released through Microsoft Update or Windows Update.

    A hotfix package does not replace a service pack. A hotfix package is optional. A hotfix package can be installed or uninstalled at any time. Additionally, hotfix packages are cumulative. Therefore, the latest on-demand hotfix package or cumulative update hotfix package includes all previously released hotfixes.

  • Guidance

    Definition: Guidance includes scripts, sample code, and technical documentation that is designed to help deploy and use a product or a technology.

  • Hotfix

    Definition: A hotfix is a single, cumulative package that includes one or more files that are used to address a problem in a product and are cumulative at the binary and file level. A hotfix addresses a specific customer situation and may not be distributed outside the customer’s organization.

    Additional information: Hotfixes are distributed by Microsoft Customer Service and Support. Customers may not redistribute hotfixes without written, legal consent from Microsoft.

  • On-demand (OD)

    Definition: An on-demand hotfix must meet certain criteria. The customer’s business must be functioning with minor or no impediment of services. These criteria include a lack of an effective workaround, a critical business effect, or other reasons.

    Additional information: These hotfixes can be requested by any customer, regardless of their support level, if the customer meets the criteria for the request. These hotfixes are released on or before a mutually agreed-upon date based on the customer’s need. This hotfix build can contain one or more fixes.

  • Public update (PU)

    Definition: A public update (PU) is an update that contains both security and nonsecurity fixes. Public updates are released each month. All customers can download PUs, regardless of support level. Public updates include all previously released security fixes.
  • Security update

    Definition: A security update is a widely released fix for a product-specific, security-related vulnerability. Security vulnerabilities are rated based on their severity. The severity rating is indicated in the Microsoft security bulletin as critical, important, moderate, or low.

    Additional information: Microsoft security updates are available for customers to download and are accompanied by two documents: a security bulletin and a Microsoft Knowledge Base article. For more information about the format of Microsoft Knowledge Base articles for Microsoft security updates, click the following article number to view the article in the Microsoft Knowledge Base:

    824689 Description of the format of Microsoft Knowledge Base articles for Microsoft Security Updates
  • Service pack

    Definition: A service pack is a tested, cumulative set of all hotfixes, security updates, critical updates, and updates. Service packs may also contain additional fixes for problems that are found internally since the release of the product and a limited number of customer-requested design changes or features.

    Additional information: Microsoft service packs are available for download and are accompanied by a Microsoft Knowledge Base article.

  • Software update

    Definition: A software update is any update, update rollup, service pack, feature pack, critical update, security update, or hotfix that is used to improve or to fix a software product that is released by Microsoft Corporation.

    Additional information: A Microsoft software update is accompanied by a Microsoft Knowledge Base article.

  • Tool

    Definition: A tool is a utility or a feature that helps to complete a task or a set of tasks.

  • Update

    Definition: An update is a widely released fix for a specific problem. An update addresses a noncritical, non-security-related bug.

    Additional information: Microsoft updates are available for customers to download and are accompanied by a Microsoft Knowledge Base article.

  • Update rollup

    Definition: An update rollup is a tested, cumulative set of hotfixes, security updates, critical updates, and updates that are packaged together for easy deployment. A rollup generally targets a specific area, such as security, or a component of a product, such as Internet Information Services (IIS).

    Additional information: Microsoft update rollups are available for customers to download and are accompanied by a Microsoft Knowledge Base article. Customers may not redistribute update rollups without written, legal consent from Microsoft.

  • Upgrade

    Definition: An upgrade is a software package that replaces an installed version of a product with a newer version of the same product. The upgrade process typically leaves existing customer data and preferences intact while replacing the existing software with the newer version.

Office Web Apps running on Server 2012: Can’t upload PowerPoint from Lync client

If you plan to deploy Office Web Apps in support of Lync Server 2013 and decide to run in it on Windows Server 2012, you will run into problems if you do not install .NET 3.5

Technet does not call this specific requirement out http://technet.microsoft.com/en-us/library/jj219455.aspx however if you do not install .NET 3.5 you will see the following issue when attempting to upload PowerPoint presentations.  “Some Presenting Features are unavailable due to server connectivity issues.”

6a00e54f0d9d698834017d42ab2620970c

You will also likely not get Event ID 41034 which say the Web Conferencing Server has successfully discovered the Office Web Apps Server, PowerPoint content is enabled.


The Fix:

On the Office Web App server in question, open a Powershell window and run

Add-WindowsFeature NET-Framework-Features, NET-Framework-Core

Patch the server using Windows Update and reboot.

Re-test Sharing Powerpoints and they rendering and you should be able to upload PowerPoint content!

Hopefully Microsoft updates Technet to include this in the pre-requisites soon so you don’t get burned by this.