Exchange Server 2013 Server Roles

The multi-role server architecture that was introduced with Exchange Server 2007, and then continued with Exchange 2010, has been consolidated in Exchange Server 2013.

Exchange 2013 has just two server roles that can be installed:

  • Client Access server
  • Mailbox server

exchange-2013-server-roles

The two roles can co-exist on the same host, or be installed separately.

  • Installing Exchange Server 2013

Exchange Server 2013 Client Access Server

As the name suggests, the Client Access server role is the server that clients (eg Outlook, Outlook Web App, ActiveSync) connect to for mailbox access. The Client Access server authenticates, and redirects or proxies those requests to the appropriate Mailbox server.

Client Access servers can be made highly available through the use of a load balancer.

There are two main components:

  • Client Access service – this handles the client connections to mailboxes
  • Front End Transport service – this performs various email traffic filtering functions, as well as email routing between the Exchange servers and the outside world

Exchange Server 2013 Mailbox Server

Mailbox servers host the databases that contain mailbox and public folder data. As with Exchange 2010 the Exchange 2013 Mailbox server role can be made highly available by configuring a Database Availability Group.

The Mailbox server also runs two Transport services:

  • Hub Transport service – similar to the Exchange 2007/2010 Hub Transport server role, this service provides email routing within the organization, and connectivity between the Front End transport service and the Mailbox Transport service
  • Mailbox Transport service – this service passes email messages between the Hub Transport service and the mailbox database

Other Server Roles from Exchange 2007/2010

With the reduction in server roles to just two in Exchange Server 2013 you may be wondering what has happened to the remaining server roles that existed in Exchange Server 2007 and 2010:

  • Hub Transport server – this functionality has been divided between the Client Access server (Front End Transport service) and Mailbox server (Hub Transport and Mailbox Transport services) and is no longer a dedicated server role
  • Unified Messaging – this functionality has been divided between the Client Access and Mailbox server and is no longer a dedicated server role
  • Edge Transport – Exchange 2013 Preview does not contain an Edge Transport server role, however it will function with an Exchange 2007 or 2010 Edge Transport. There have been hints that the Edge Transport server role will not be in future versions of Exchange server.

Exchange Server 2013 Database Availability Groups

The high availability feature for Exchange Server 2013 Mailbox servers is the Database Availability Group.

Exchange 2013 Database Availability Groups (DAGs) are very similar to Exchange 2010 DAGs, but also deliver a series of improvements and new features for customers.

In this series of articles we will walk through an overview of Database Availability Group concepts, demonstrate how to deploy a new Database Availability Group, and explore some of the operational tasks associated with running and maintaining a DAG.

Overview of Exchange Server 2013 Database Availability Groups

A Database Availability Group consists of up to 16 Exchange 2013 Mailbox servers, and optionally one or more additional non-Exchange servers that may be required to act as a File Share Witness (more on this shortly).

The Mailbox servers within a DAG are capable of hosting a copy of a mailbox database from another DAG member; up to the Exchange 2013 limit of 50 mailbox databases per server (that includes both active and passive database copies).

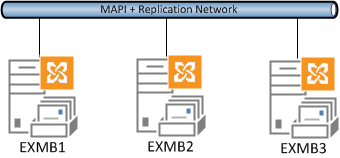
A simple example of a Database Availability Group would be as follows.

exchange-2013-database-availability-group-example-simple

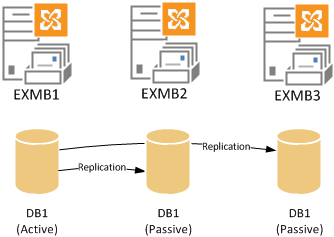
In the example above the server EXMB1 hosts the active copy of database DB1, and the other DAG members EXMB2 and EXMB3 host passive copies of the database.

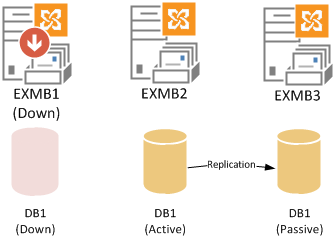
The DAG members work together to maintain the availability of the mailbox database. If the server that hosts the active database copy experiences a problem, for example a hardware failure, one of the remaining DAG members is able (under the right conditions) to make it’s copy of the database active so clients are still able to connect to their mailbox data.

exchange-2013-database-availability-group-example-down

A Mailbox server that is a member of a DAG can host a mixture of active and passive database copies for which it participates in replication. Whether a given database is active or passive on a particular DAG member is independent of the active/passive status of other databases that are also hosted on that DAG member.

exchange-2013-database-availability-group-example-simple-2

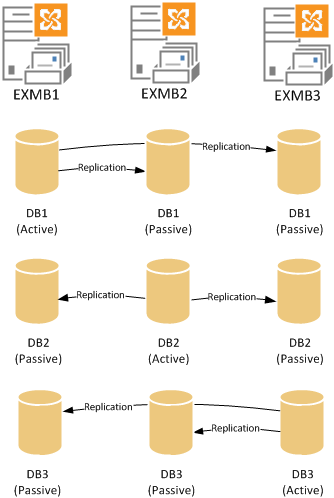
In the above example a DAG with three members and three mailbox databases is shown with the active database copies evenly distributed across the available DAG members.

Continuous Replication in Exchange Server 2013 Database Availability Groups

Each DAG member hosting a copy of a given mailbox database participates in a process of continuous replication to keep the copies consistent.

Database replication occurs between Exchange Server 2013 DAG members using two different methods:

File Mode replication – each transaction log is fully written (a 1MB log file) and then then copied from the DAG member hosting the active database copy to each DAG member that host a passive database copy of that database. The other DAG members then replay the transaction log file into their own passive copy of the database to update it.

File mode replication has an obvious downside in that a transaction log that hasn’t already been copied to the other DAG members may be lost if the DAG member hosting the active database copy becomes unavailable. Although there are other recovery mechanisms to minimise the impact of this scenario, this is a reason why file mode replication is used only during the initial seeding of a database copy.

After seeding is complete the database switches automatically to block mode replication.

Block mode replication – as each database transaction is written to the log buffer on the active server and also sent to the log buffer of DAG members hosting passive copies of the database. As the log buffer becomes full member of the DAG is then able to build their own transaction log file for replay into their passive database copy.

Block mode replication has advantages compared to file mode replication when there is a failure in the DAG, because less transaction log data is likely to be lost.

Quorum for Exchange Server 2013 Database Availability Groups

An Exchange 2013 DAG utilizes Windows Failover Clustering and the quorum model. This underlying cluster is managed automatically for you by Exchange, so you don’t need to worry about it much other than to be aware of how quorum works.

If the concept of quorum is new to you just think of it as a voting process in which a majority of voting members must be present to make a decision. The decision in the case of a DAG is basically whether the DAG should be online of offline.

Because a majority of votes is required for quorum there are two different quorum models used depending on how many DAG members you have.

For a DAG with an odd number of members the Node Majority quorum mode is used.

exchange-2013-dag-quorum-1

In the above example a three member DAG is able to maintain quorum during a single server failure, but quorum is lost when two servers are unavailable.

For a DAG with an even number of members the Node and File Share Majority quorum mode is used. This mode involves an additional server referred to as the File Share Witness. It is typically another Exchange server located in the same site as the DAG members.

exchange-2013-dag-quorum-2

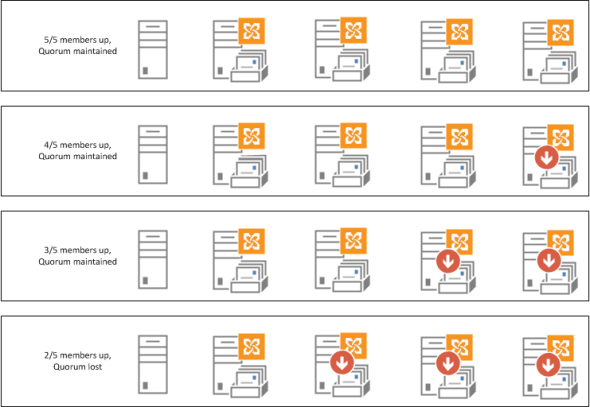
In the above example a four member DAG is using an additional server as the File Share Witness (FSW). The DAG is able to maintain quorum with up to two server failures, but quorum is lost when three servers are down.

Database Availability Networks

A DAG network refers to a collection of one or more IP subnets that the DAG members are connected to and are used for client and replication traffic.

exchange-2013-dag-network

Every DAG has one network for client traffic, and then it can also optionally have a number of networks dedicated to replication traffic.

exchange-2013-dag-network-2

Dedicated replication networks can help reduce bandwidth utilization on the client-facing network which may prevent network-related performance issues for the clients.

High Availability and Site Resilience

Exchange Server 2013 Database Availability Groups can be deployed to provide both high availability and site resilience.

A DAG deployed for high availability will typically exist within a single Active Directory Site, or datacenter.

exchange-2013-database-availability-group-high-availability

A DAG deployed for site resilience will span multiple datacenters. The objectives of a Database Availability Group deployed for site resilience are usually to provide availability of mailbox services after the complete failure of the primary datacenter. In other words, a true disaster.

exchange-2013-database-availability-group-site-resilience

As such there are a lot more technical and business considerations for a site resilient Database Availability Group. There is also less automation and more administrator attention required for a full site failover scenario.

For the purposes of this article series we’ll be focusing on Database Availability Groups deployed within a single datacenter for high availability.

How to disable USB drive,CD-ROM,Floppy Disk use by using Group Policy

USB devices pose security threats. It can upload malicious code or copy confidential information from your computer and take it away. So many corporate companies prefer to block USB drives in network..

Here we will learn how to block USB drive use in a network via Windows Server 8 Group policy.

I am going to block USB,Floppy Drives & CD-ROM at machine level. so let’s get started,

1. Open Group Policy Management from Administrative tools as shown below,

usb-disable

2.  Navigate to Default Domain Policy-Edit

How-to-disable-USB-driveCD-ROMFloppy-Disk-use-in-an-Windows-Server-8-Active-Directory-01

3. Navigate to Computer Configuration-> Administrative template Policy->System->Removable Storage Access

In my case I am going to apply USB drive block policy to the Computers. If you want you can configure it for USER’s & the same process applies..

How-to-disable-USB-driveCD-ROMFloppy-Disk-use-in-an-Windows-Server-8-Active-Directory-02

4.  Here are the all devices such floppy drive,USB drive,CD-ROM & tape drives and even custom devices which you can configure.

How-to-disable-USB-driveCD-ROMFloppy-Disk-use-in-an-Windows-Server-8-Active-Directory-03

5. Here I have “Denied Read Access’ to Removable Disks.

How-to-disable-USB-driveCD-ROMFloppy-Disk-use-in-an-Windows-Server-8-Active-Directory-04

6. After Disabling USB Drives,Floppy Disk & CD-Rom it looks like below. Now run “gpupdate /force” on all machines.

How-to-disable-USB-driveCD-ROMFloppy-Disk-use-in-an-Windows-Server-8-Active-Directory-05

Certificate Requirements for Internal Servers

Internal servers that are running Lync Server and that require certificates include Standard Edition server, Enterprise Edition Front End Server, Mediation Server, and Director. The following table shows the certificate requirements for these servers. You can use the Lync Server certificate wizard to request these certificates.

tipTip: Wildcard certificates are supported for the subject alternative names associated with the simple URLs on the Front End pool, Front End Server, or Director. For details about wildcard certificate support, see Wildcard Certificate Support.

Although an internal enterprise certification authority (CA) is recommended for internal servers, you can also use a public CA. For a list of public CAs that provide certificates that comply with specific requirements for unified communications (UC) certificates and have partnered with Microsoft to ensure they work with the Lync Server Certificate Wizard, see article Microsoft Knowledge Base 929395, “Unified Communications Certificate Partners for Exchange Server and for Communications Server,” at http://go.microsoft.com/fwlink/p/?linkId=202834.

Communication with other applications and servers, such as Exchange 2013, requires a certificate that is supported by the other applications and products. For the 2013 release, Lync Server 2013 and other Microsoft server products, including Exchange 2013 and SharePoint Server, support the Open Authorization (OAuth) protocol for server-to-server authentication and authorization. For details, see Managing Server-to-Server Authentication (Oauth) and Partner Applications in the Deployment documentation or the Operations documentation.

For connections from clients running Windows 7 operating system, Windows Server 2008 operating system, Windows Server 2008 R2 operating system, Windows Vista operating system, and Microsoft Office Communicator 2007 Phone Edition, Lync Server 2013 includes support for (but does not require) certificates signed using the SHA-256 cryptographic hash function. To support external access using SHA-256, the external certificate is issued by a public CA using SHA-256.

The following tables show certificate requirements by server role for Front End pools and Standard Edition servers. All these are standard web server certificates, private key, non-exportable.

Note that server enhanced key usage (EKU) is automatically configured when you use the certificate wizard to request certificates.

Certificates for Standard Edition Server

Certificate Subject name/ Common name Subject alternative name Example Comments
Default Fully qualified domain name (FQDN) of the pool FQDN of the pool and the FQDN of the serverIf you have multiple SIP domains and have enabled automatic client configuration, the certificate wizard detects and adds each supported SIP domain FQDNs.

If this pool is the auto-logon server for clients and strict Domain Name System (DNS) matching is required in group policy, you also need entries for sip.sipdomain (for each SIP domain you have).

SN=se01.contoso.com; SAN=se01.contoso.comIf this pool is the auto-logon server for clients and strict DNS matching is required in group policy, you also need SAN=sip.contoso.com; SAN=sip.fabrikam.com On Standard Edition server, the server FQDN is the same as the pool FQDN.The wizard detects any SIP domains you specified during setup and automatically adds them to the subject alternative name.

You can also use this certificate for Server-to-Server Authentication.

Web internal FQDN of the server Each of the following:

  • Internal web FQDN (which is the same as the FQDN of the server)
  • Meet simple URLs
  • Dial-in simple URL
  • Admin simple URL
  • Or, a wildcard entry for the simple URLs
SN=se01.contoso.com; SAN=se01.contoso.com; SAN=meet.contoso.com; SAN=meet.fabrikam.com; SAN=dialin.contoso.com; SAN=admin.contoso.comUsing a wildcard certificate:

SN=se01.contoso.com; SAN=se01.contoso.com; SAN=*.contoso.com

You cannot override the Internal web FQDN in Topology Builder.If you have multiple Meet simple URLs, you must include all of them as subject alternative names.

Wildcard entries are supported for the simple URL entries.

Web external FQDN of the server Each of the following:

  • External web FQDN
  • Dial-in simple URL
  • Admin simple URL
  • Or, a wildcard entry for the simple URLs
SN=se01.contoso.com; SAN=webcon01.contoso.com; SAN=meet.contoso.com; SAN=meet.fabrikam.com; SAN=dialin.contoso.comUsing a wildcard certificate:

SN=se01.contoso.com; SAN=webcon01.contoso.com; SAN=*.contoso.com

If you have multiple Meet simple URLs, you must include all of them as subject alternative names.Wildcard entries are supported for the simple URL entries.

Certificates for Front End Server in a Front End Pool

Certificate Subject name/ Common name Subject alternative name Example Comments
Default FQDN of the pool FQDN of the pool and FQDN of the server.If you have multiple SIP domains and have enabled automatic client configuration, the certificate wizard detects and adds each supported SIP domain FQDNs.

If this pool is the auto-logon server for clients and strict DNS matching is required in group policy, you also need entries for sip.sipdomain (for each SIP domain you have).

SN=eepool.contoso.com; SAN=eepool.contoso.com; SAN=ee01.contoso.comIf this pool is the auto-logon server for clients and strict DNS matching is required in group policy, you also need SAN=sip.contoso.com; SAN=sip.fabrikam.com The wizard detects any SIP domains you specified during setup and automatically adds them to the subject alternative name.You can also use this certificate for Server-to-Server Authentication.
Web Internal FQDN of the server Each of the following:

  • Internal web FQDN (which is the same as the FQDN of the server)
  • Meet simple URLs
  • Dial-in simple URL
  • Admin simple URL
  • Or, a wildcard entry for the simple URLs
SN=ee01.contoso.com; SAN=ee01.contoso.com; SAN=meet.contoso.com; SAN=meet.fabrikam.com; SAN=dialin.contoso.com; SAN=admin.contoso.comUsing a wildcard certificate:

SN=ee01.contoso.com; SAN=ee01.contoso.com; SAN=*.contoso.com

If you have multiple Meet simple URLs, you must include all of them as subject alternative names.Wildcard entries are supported for the simple URL entries.
Web external FQDN of the server Each of the following:

  • External web FQDN
  • Dial-in simple URL
  • Admin simple URL
  • Or, a wildcard entry for the simple URLs
SN=ee01.contoso.com; SAN=webcon01.contoso.com; SAN=meet.contoso.com; SAN=meet.fabrikam.com; SAN=dialin.contoso.comUsing a wildcard certificate:

SN=ee01.contoso.com; SAN=webcon01.contoso.com; SAN=*.contoso.com

If you have multiple Meet simple URLs, you must include all of them as subject alternative names.Wildcard entries are supported for the simple URL entries.

Certificates for Director

Certificate Subject name/ Common name Subject alternative name Example
Default FQDN of the Director pool FQDN of the Director, FQDN of the Director poolIf this pool is the auto-logon server for clients and strict DNS matching is required in group policy, you also need entries for sip.sipdomain (for each SIP domain you have). SN=dir-pool.contoso.com; SAN=dir-pool.contoso.com; SAN=dir01.contoso.comIf this Director pool is the auto-logon server for clients and strict DNS matching is required in group policy, you also need SAN=sip.contoso.com; SAN=sip.fabrikam.com
Web Internal FQDN of the server Each of the following:

  • Internal web FQDN (which is the same as the FQDN of the server)
  • Meet simple URLs
  • Dial-in simple URL
  • Admin simple URL
  • Or, a wildcard entry for the simple URLs
SN=dir01.contoso.com; SAN=dir01.contoso.com; SAN=meet.contoso.com; SAN=meet.fabrikam.com; SAN=dialin.contoso.com; SAN=admin.contoso.comSN=dir01.contoso.com; SAN=dir01.contoso.com SAN=*.contoso.com
Web external FQDN of the server Each of the following:

  • External web FQDN
  • Dial-in simple URL
  • Admin simple URL
  • Or, a wildcard entry for the simple URLs
The Director external web FQDN must be different from the Front End pool or Front End Server.SN=dir01.contoso.com; SAN=directorwebcon01.contoso.com SAN=meet.contoso.com; SAN=meet.fabrikam.com; SAN=dialin.contoso.com

SN=dir01.contoso.com; SAN=directorwebcon01.contoso.com SAN=*.contoso.com

If you have a stand-alone Mediation Server pool, the Mediation Servers in it each need the certificates listed in the following table. If you collocate Mediation Server with the Front End Servers, the certificates listed in the “Certificates for Front End Server in Front End Pool” table earlier in this topic are sufficient.

Certificates for Stand-alone Mediation Server

Certificate Subject name/ Common name Subject alternative name Example
Default FQDN of the pool FQDN of the poolFQDN of pool member server SN=medsvr-pool.contoso.net; SAN=medsvr-pool.contoso.net; SAN=medsvr01.contoso.net

Certificates for Survivable Branch Appliance

Certificate Subject name/ Common name Subject alternative name Example
Default FQDN of the appliance SIP.<sipdomain> (need one entry per SIP domain) SN=sba01.contoso.net; SAN=sip.contoso.com; SAN=sip.fabrikam.com

How to Create a Windows 8 To Go on USB Drive (Stick and USB HDD)

To begin you will need the following:

  • 32 GB or larger USB 3.0 drive (It can also be an external USB Hard Drive).  Some USB 2.0 drives will work but will be very slow and are not officially supported.
  • A Windows 7 or 8 PC to build the USB drive on.

Depending on the OS and edition you are currently running, follow the relevant instructions below.

Create Windows to Go on any edition of Windows 7:

It is possible to use Windows 7 to create your Windows 8 To Go USB device. You will just need some additional software. Before you get started, download and install the Windows 7 Automated Installation Kit. You will need to use ImageX to deploy the Windows 8 image to the device.

  1. Launch the Deployment Tools Command Prompt with administrative rights from the Start Menu. It can be found under All Programs and then Microsoft Windows AIK.
  2. Make sure that your USB Drive is plugged in and then type in diskpart and hit Enter.
  3. List the available disks by running “list disk” and you should see your usb device.
  4. Select your USB drive by typing “select disk #” and hit Enter.  For example, “select disk 3”.
  5. Clean the partitions on the disk by typing “clean” and hit Enter.
  6. Now create the boot partition by running the following command:create partition primary size=350
  7. Now create the OS partition by running the following command to create a partition taking up all remaining space:create partition primary
  8. The boot partition needs to be formatted, configured and assigned a drive letter, run the following commands:select partition 1
    format fs=fat32 quick
    active
    assign letter=b

    (if the b drive letter is already in use on your PC, substitute a different letter and replace b with your letter throughout the rest of this guide)

  9. The same must be done for the OS partition, run the following different commands:select partition 2
    format fs=ntfs quick
    assign letter=o

    (if the o drive letter is already in use on your PC, substitute a different letter and replace o with your letter throughout the rest of this guide)

  10. Exit Diskpart by typing Exit.
  11. Extract the install.wim file from the \sources\ directory of the Windows 8 install ISO to c:\wim\.  You will need use a tool such as WinRAR or WinISO to extract the file if you don’t have a burned disc.
  12. Use ImageX to deploy the Windows 8 files to the OS partition of the USB device by running:Imagex.exe /apply c:\wim\install.wim 1 o:
  13. The boot manager needs to be installed on the boot partition with the help of the bcdboot utility. Run the following command:o:\windows\system32\bcdboot o:\windows /f ALL /s b:
  14. Reboot your computer and test your new Windows 8 To Go device built on Windows 7. Make sure the PC is configured to boot to USB before your local hard drive.

Create Windows To Go on any edition of Windows 8:

  1. Launch an administrative level command prompt.
  2. Make sure that your USB Drive is plugged in and then type in diskpart and hit Enter.
  3. List the available disks by running “list disk” and you should see your usb device.
  4. Select your USB drive by typing “select disk #” and hit Enter.  For example, “select disk 3”.
  5. Clean the partitions on the disk by typing “clean” and hit Enter.
  6. Now create the boot partition by running the following command:create partition primary size=350
  7. Now create the OS partition by running the following command to create a partition taking up all remaining space:create partition primary
  8. The boot partition needs to be formatted, configured and assigned a drive letter, run the following commands:select partition 1
    format fs=fat32 quick
    active
    assign letter=b

    (if the b drive letter is already in use on your PC, substitute a different letter and replace b with your letter throughout the rest of this guide)

  9. The same must be done for the OS partition, run the following different commands:select partition 2
    format fs=ntfs quick
    assign letter=o

    (if the o drive letter is already in use on your PC, substitute a different letter and replace o with your letter throughout the rest of this guide)

  10. Exit Diskpart by typing Exit.
  11. Extract the install.wim file from the \sources\ directory of the Windows 8 install ISO to c:\wim\.  On Windows 8 you can just double click an ISO to mount and then browse it.
  12. Use DISM to deploy the Windows 8 files to the OS partition of the USB device by running:dism /apply-image /imagefile:c:\wim\install.wim /index:1 /applydir:o:\
  13. The boot manager needs to be installed on the boot partition with the help of the bcdboot utility. Run the following command:o:\windows\system32\bcdboot o:\windows /f ALL /s b:
  14. Reboot your computer and test your new Windows 8 To Go device built on Windows 8. Make sure the PC is configured to boot to USB before your local hard drive.

How to Configure a Relay Connector for Exchange Server 2010

In most Exchange Server 2010 environments there will be the need to allow relaying for certain hosts, devices or applications to send email via the Exchange server.  This is common with multi-function devices such as network attached printer/scanners, or applications such as backup software that send email reports.

SMTP communication is handled by the Hub Transport server in an Exchange organization.  The transport service listens for SMTP connections on it’s default Receive Connector. However, this connector is secured by default to not allow anonymous connections (ie, the type of connection most non-Exchange systems will be making).

You can see this in effect if you telnet to the server on port 25 and try to initiate unauthenticated SMTP communications.


For some Hub Transport servers that are internet-facing, anonymous connections may already be enabled.  In those cases relay would still be denied but will behave differently than the first example.

You’ll note that relay is denied if I try to send from an @hotmail.com address to an @gmail.com address, because neither is a valid domain for the Exchange organization. But with Anonymous Users enabled on the Receive Connector I can send from an @hotmail.com address to a valid local address.

However if I try to relay out to an external recipient, the Exchange server does not allow it.

To permit a non-Exchange server to relay mail we can create a new Receive Connector on the Hub Transport server. Launch the Exchange Management Console and navigate to Server Management, and then Hub Transport. Select the Hub Transport server you wish to create the new Receive Connector on, and from the Actions pane of the console choose New Receive Connector.

Give the new connector a name such as “Relay ” and click Next to continue.

You can leave the local network settings as is, or optionally you can use a dedicated IP address for this connector if one has already been allocated to the server. Using dedicated IP addresses for each connector is sometimes required if you need to create connectors with different authentication settings, but for a general relay connector it is not necessary to change it.

Highlight the default IP range in the remote network settings and click the red X to delete it.

Now click the Add button and enter the IP address of the server you want to allow to relay through the Exchange server. Click OK to add it and then Next to continue.

Click the New button to complete the wizard.

The Receive Connector has now been created but is not yet ready to allow the server to relay through it.  Go back to the Exchange Management Console, right-click the newly created Receive Connector and choose properties.

Select the Permission Groups tab and tick the Exchange Servers box.

Select the Authentication Tab and tick the Externally Secured box.

Apply the changes and the Receive Connector is now ready for the server to relay through.

Because the remote IP range has been secured to that single IP address, any other servers on different IP addresses still won’t be able to relay through the Exchange Server. From any other IP address not included in the remote IP range on the Receive Connector relay will be denied.

You can later add more IP addresses, IP ranges, subnets, or even add multiple IP addresses to the Receive Connector using a script if necessary.

Exchange 2010 “Anonymous Relay” Receive Connector

In almost every environment I have ever seen there are usually some devices and/or systems that need to send email and typically these will require some SMTP server to relay these messages. More often than not these also do not have the ability to authenticate to the relaying host.

How do we deal with these in Exchange? I have seen some pretty silly solutions and the default answer seems to be “Just allow anonymous users on the default connector”. This is not true and is actually quite a dangerous thing to do, so my advice is DON’T. In fact, I would go so far as to say, don’t ever touch the default connector. The correct way is to create a new receive connector and allow relay from only the devices that are required to use this connector.

Allowing anonymous relay is serious and requires thought and planning. If could be exploited by spammers and IMHO should not be configured on internet-facing servers.

So lets say that we have three devices that need to relay anonymously, their IPs are 10.0.0.30, 10.0.0.31 and 10.0.0.32. First we need to create a new receive connector:

New-ReceiveConnector -Name “Anonymous Relay Connector” -Usage Custom -PermissionGroups AnonymousUsers -Bindings 10.0.0.20:25 -RemoteIpRanges 10.0.0.30-10.0.0.32 –Banner “220 Anonymous Relay Connector”

Next we need to to grant relay permission to anonymous connections on the new Receive connector:

Get-ReceiveConnector -Identity “Anonymous Relay Connector” | Add-ADPermission -User “NT AUTHORITY\ANONYMOUS LOGON” -ExtendedRights “Ms-Exch-SMTP-Accept-Any-Recipient”

What happens if you have multiple servers and would like to duplicate your receive connector settings. Say for example you have two Exchange servers and you have a receive connector on a server called EXHUB01 that allows 100 devices to relay. You would now like to create the same connector on EXHUB02. Instead of manually adding each address, you could do this:

New-ReceiveConnector “Anonymous Relay Connector” -Server EXHUB02 -Usage Custom -PermissionGroups AnonymousUsers -Bindings 10.0.0.21:25 -RemoteIPRanges ( Get-ReceiveConnector “EXHUB01\Anonymous Relay Connector” ).RemoteIPRanges -Banner “220 Anonymous Relay Connector”

Don’t forget to grant relay permission to anonymous connections on the new Receive connector:

Get-ReceiveConnector -Identity “EXHUB02\Anonymous Relay Connector” | Add-ADPermission -User “NT AUTHORITY\ANONYMOUS LOGON” -ExtendedRights “Ms-Exch-SMTP-Accept-Any-Recipient”

Enabling the .NET Framework 3.5 in Control Panel

You can also enable the .NET Framework 3.5 yourself through Control Panel. In Control Panel, choose Programs and Features, choose Turn Windows features on or off, and then select the Microsoft .NET Framework 3.5.1 check box. This option requires an Internet connection.

Turning Windows features on or off in Control Panel

If installing the .NET Framework 3.5 on demand or enabling it in Control Panel fails, you may get one of the following error messages:

  • 0x800f0906: “Windows couldn’t connect to the Internet to download necessary files. Make sure that you’re connected to the Internet, and click Retry to try again.”
  • 0x800F081F: “The changes could not be completed. Please reboot your computer and try again.”

These messages may be displayed for the following reasons:

  • Your computer is not connected to the Internet. Please connect, and then retry the operation.If you cannot connect to the Internet, you can enable the .NET Framework 3.5 by using the Deployment Image Servicing and Management (DISM) command-line tool and specifying the installation media (ISO image or DVD) you installed Windows 8 from.
    1. In Windows 8 or Windows Server 2012, open a Command Prompt window with administrative credentials (that is, choose Run as administrator).
    2. To install the .NET Framework 3.5 from installation media located in the D:\sources\sxs directory, use the following command:DISM /Online /Enable-Feature /FeatureName:NetFx3 /All /LimitAccess /Source:d:\sources\sxs
      • Use /All to enable all parent features of the .NET Framework 3.5.
      • Use /LimitAccess to prevent DISM from contacting Windows Update.
      • Use /Source to specify the location of the files needed to restore the feature.

      For more information about DISM parameters and options, see How to Enable or Disable Windows Features

  • You are using a local source, but the network location is inaccessible or doesn’t have the right content. Install the .NET Framework 3.5 from installation media as described in the previous bullet point.
  • Your administrator has configured your computer to use Windows Server Update Services (WSUS) instead of Windows Update for servicing. Ask your administrator to enable the policy to use Windows Update instead of WSUS.

If these instructions do not correct the problem, download the paper Microsoft .NET Framework 3.5 Deployment Considerations from the Windows Dev Center for more extensive troubleshooting information.

Installing the .NET Framework 3.5 on Demand

If an application requires the .NET Framework 3.5, but doesn’t find that version enabled on your computer, it displays the following message box, either during installation, or when you run the application for the first time. In the message box, choose Install this feature to enable the .NET Framework 3.5. This option requires an Internet connection.

Prompt for installing the .NET Framework 3.5 on demand

Installing the .NET Framework 3.5 on Windows 8

The .NET Framework 4.5 is included with Windows 8 and installed on your computer with the operating system. However, the .NET Framework 3.5 is not automatically installed with Windows 8. To run applications that require the .NET Framework 3.5 on Windows 8, you must enable version 3.5 on your computer. There are two ways you can do this: by installing or running an application that requires the .NET Framework 3.5 (that is, by installing the .NET Framework 3.5 on demand), or by enabling the .NET Framework 3.5 in Control Panel. Both options require an Internet connection.

Important notes:

  • Use the .NET Framework 3.5 for applications built for versions 2.0 and 3.0 as well as 3.5.
  • Installing a Windows language pack on Windows 8 before installing the .NET Framework 3.5 will cause the .NET Framework 3.5 installation to fail. Install the .NET Framework 3.5 before installing any Windows language packs.
  • Windows CardSpace is not available with the .NET Framework 3.5 on Windows 8.