Modify the Default SMTP Banner

The SMTP banner is the SMTP connection response that a remote SMTP messaging server receives after it connects to a Receive connector configured on a computer running Microsoft Exchange Server 2010 that has the Hub Transport server role or the Edge Transport server role installed. You may want to modify the default SMTP banner for Internet-facing SMTP Receive connectors on an Edge Transport server so that the server name and messaging server software aren’t disclosed by the SMTP banner.

Looking for other management tasks related to connectors? Check out Managing Connectors.

You need to be assigned permissions before you can perform this procedure. To see what permissions you need, see the “Receive connectors” entry in the Transport Permissions topic.

Bb124740.note(en-us,EXCHG.141).gifNote:
You can’t use the EMC to modify the default SMTP banner. Don’t use the Specify the FQDN this connector will provide in response to EHLO or HELO field in the Receive connector properties page in the EMC.

You control the SMTP banner by using the Banner parameter in the Set-ReceiveConnector cmdlet or the New-ReceiveConnector cmdlet. The default value of the Banner parameter is $null. When the Banner parameter isn’t specified on a Receive connector, or the Banner parameter is specified with the value of $null, a remote SMTP messaging server that connects to that Receive connector receives the following response.

220 <Servername> Microsoft ESMTP MAIL service ready at <RegionalDay-Date-24HourTimeFormat> <RegionalTimeZoneOffset>

When you specify a value for the Banner parameter on a Receive connector, a remote SMTP messaging server that connects to that SMTP Receive connector receives the following response.
220 BannerText
Bb124740.note(en-us,EXCHG.141).gifNote:
The replacement SMTP banner text string must always start with 220. As defined in RFC 2821, the default service ready SMTP response code is 220.

This example modifies the SMTP banner on the existing Receive connector From the Internet so the SMTP banner displays 220 Contoso Corporation.

Set-ReceiveConnector "From the Internet" -Banner "220 Contoso Corporation"
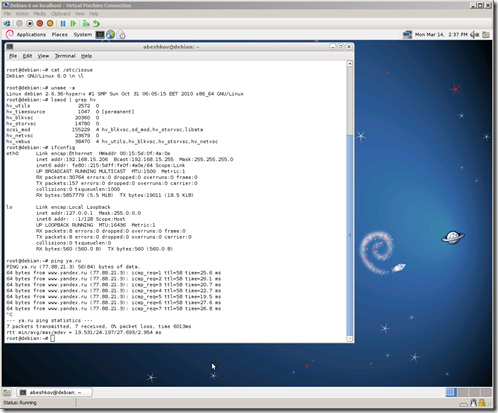
Installing and configuring Debian Linux on Hyper-V

Today we will be installing and configuring Debian 6 under Hyper-V. All that I will write below can be applied not only to Debian 6 but also in Debian 5 and to the rest of the other distributions based on Debian, such as Ubuntu, Kubuntu, Xubuntu, Ebuntu.

Debian is not included in the list of officially supported Microsoft Linux systems running under Hyper-V. Despite this, he works in a virtual environment very well. Due to the fact that the integration components package for Hyper-V, we use Debian no Hyper-V drivers built in to the latest Linux kernel.

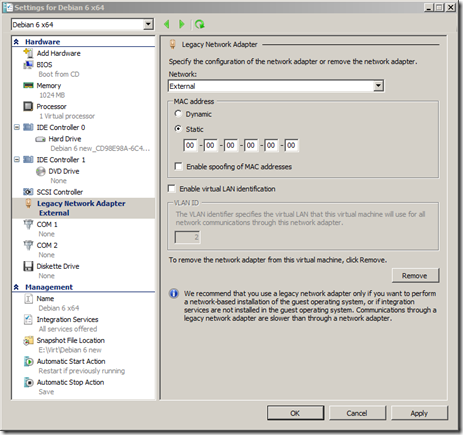
Installing Debian 6 under Hyper-V pretty banal. The only thing to do at the stage of creating a virtual machine is added to the system emulated network interface Legacy. He we will need for the initial installation and updates of the latest Linux kernel.

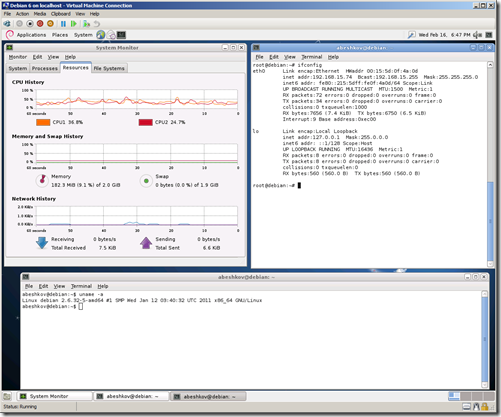
After the installation is complete, we will have 6 Debian kernel 2.6.32, of course it does not shine the novelty, but at the same time is quite normal with multiprocessor virtual machines.

To enable the virtual machine to run faster and take full advantage of the Hyper-V you need to upgrade your kernel to at least 2.6.36. Before building a new kernel update system, install the source code for the current kernel and all the tools necessary to compile a new one.

# apt-get update

# aptitude update

# apt-get install build-essential ncurses-dev kernel-package fakeroot install linux-headers-2.6 linux-source-2.6.32

Now begin to build a new kernel 2.6.36 taken from kernel.org

# cd/usr/src

# wget -c http://www.kernel.org/pub/linux/kernel/v2.6/linux-2.6.36.tar.bz2

# bzip2 -d linux-2.6.36.tar.bz2

# tar xf linux-2.6.36.tar

# cd linux-2.6.36

# cp/boot/config* ./.config

# make menuconfig

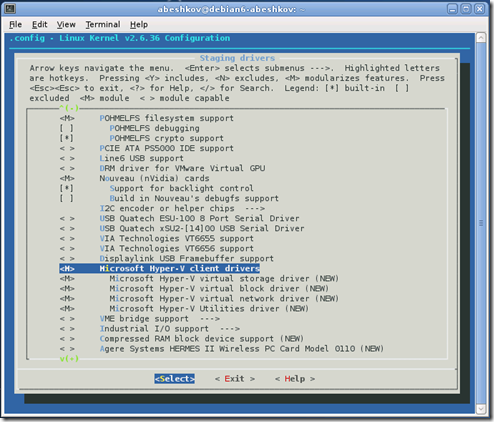
In the menu select Device Drivers-> Drivers-> Stagging Microsoft Hyper-V Client Drivers

At this point, you can remove the extra drivers for devices, which will never be in a virtual machine, such as wi-fi, sound cards, USB, PCI. However, this is not necessary if you do not wish to, can not do.

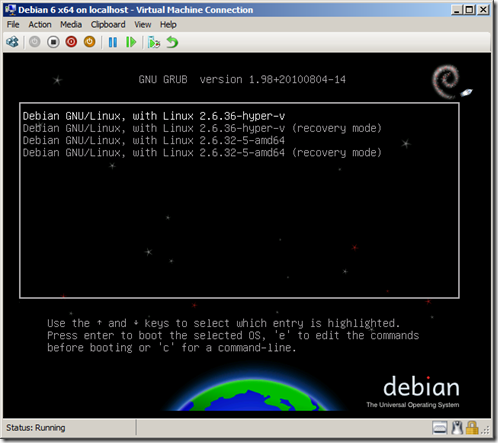
After that we can start to build deb packages. In order to better distinguish the kernel add the title characters of hyper-v.

# make-kpkg clean
# fakeroot make-kpkg --initrd --append-to-version=-hyper-v kernel_image kernel_headers

Kernel compilation takes quite a long time. After this,/usr/src you will see two .deb package that can be installed into the system command dpkg-i.

These packages can be migrated and set other virtual machines with Debian in order not to repeat the compilation process.

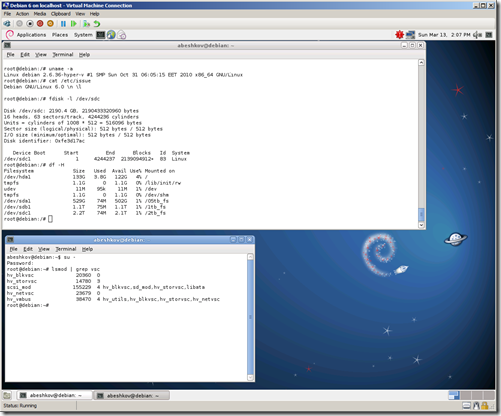
Edit/etc/initramfs-tools/modules and add the following lines to indicate that you want to load modules at startup:

hv_vmbus
hv_storvsc
hv_blkvsc
hv_netvsc
Create initramfs:
# update-initramfs –u –k 2.6.36-hyper-v

Turn off the virtual machine, remove the Legacy network adapter, add the synthetic network adapter and load the machine with the new kernel.

Please note that newer versions of Linux kernels, synthetic network interface for Hyper-V, renamed from seth in the eth. This can be misleading.

iptables port forwarding

Dakle ako zelite napraviti port forwarding s iptablesima, evo kako se to radi..

ppp0 – je WAN strana
192.168.1.54 je odredisno racunalo
TCP 51010 je port

dakle kada netko dolazi na WAN stranu (vanjski IP), na port TCP 51010, onda ce se ti paketi forwardati na lokalno racunalo 192.168.1.54.

evo sto je potrebno napisati u shellu:

iptables -A PREROUTING -t nat -i ppp0 -p tcp --dport 51010 -j DNAT --to 192.168.1.53:51010
iptables -A INPUT -p tcp -m state --state NEW --dport 51010 -i ppp0 -j ACCEPT

Za ispis svih postojecih IPtabels pravila u shellu je potrebno upisati slijedece:

iptabels -vL

Exporting and Importing Mailboxes with Exchange Server 2010

Introduction

This article will describe how to export and import mailboxes with Exchange 2010; based on the Exchange 2010 Release Candidate. Although RC should be finally completed, this may be subject to change in the final release of Exchange 2010.

In the near future, we will take a deep dive into what you will need to prepare/ how to run your tasks with the new release of Exchange. You will realize that preparation-wise, once the prerequisites have been met, it will be as easy to deploy as other versions of Exchange.

 Why Export and Import

First off, we need to define if the task will be exported or imported in the mailboxes. In general, this is quite easy to define. This is what you should do:

  • Migrate from mailboxes completely out of range of your Exchange server environment only when you get the PST file from a user
  • Troubleshoot problems with existing mailboxes due to database errors or anything else
  • Backup all mailbox data manually to a tape without having the backup agent available

Fulfilling the Prerequisites

Before you can start your task you will need to prepare a client system with the following requirements:

  • Installation of 64 Bit Windows Operating System
  • Installation of Powershell 2.0
  • Installation of .NET Framework 3.51
  • Installation of Outlook Office 2010 64 Bit (which is currently in CTP release available)
  • Installation of Exchange Server 2010 management tools
  • Create domain membership for this client
  • Logon with an administrative account with Exchange’s full administrative permissions

Exchange Server 2010 comes with Roll-based Administration; you will need to run the following command first though:

New-ManagementRoleAssignment –Role “Mailbox Import Export” –User “<username>”

This command gives the user permission to import and export mailboxes. Another way of doing this is creating an Active Directory group and adding permissions to this group using the following command:

New-ManagementRoleAssignment –Role “Mailbox Import Export” –Group “<usergroup>”

When you are done, you will only have to add users to this group to allow them to export and import mailboxes.

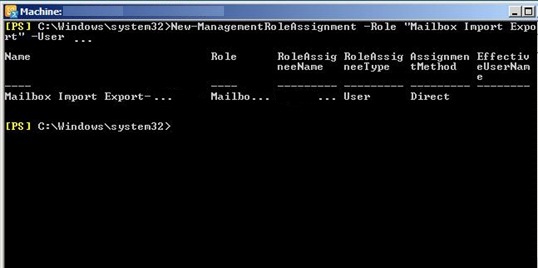
If we take a look at how to import a mailbox, you will see that the powershell command for this task is actually quite simple:

Figure 1: Importing a mailbox

If we now take a look at how to export a mailbox, you will realize how easy this is too! The following are the steps you need to take to carry out this task.

Figure 2: Starting a Mailbox Export

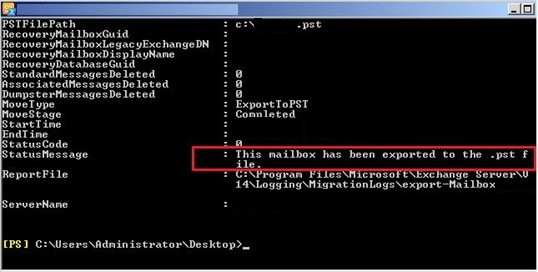
This procedure may take some time because this depends upon how big the personal folder itself is. Do not panic if it takes its time.

Figure 3: Finalizing the Mailbox Export

As you might have realized, all these steps are Powershell commands. In the Release Candidate of Exchange Server 2010 there is no way of doing this in the graphical interface.  With Exchange Server 2010 Beta Release there is a way of doing this there too.

Hopefully this feature will be back in the RTM release of Exchange Server 2010, I will show you now how this will work.

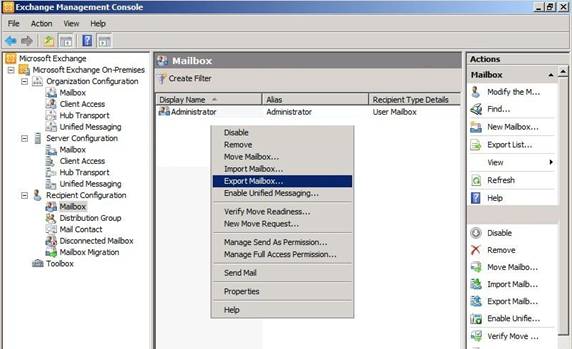
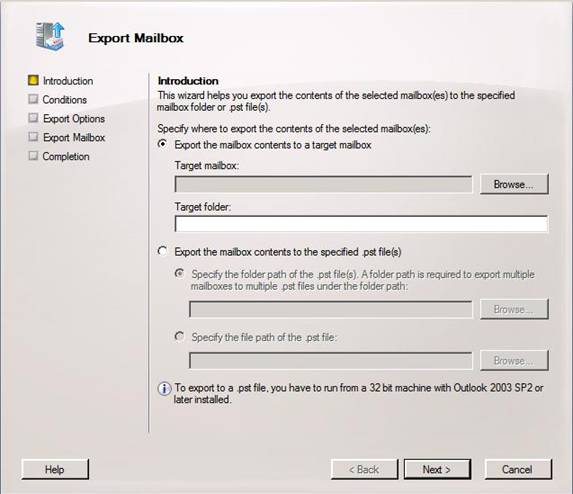
After having installed Outlook 2010 in 64-Bit on the “Ex-/Import-Computer”, you will have two new commands (if you look at the context menu of each mailbox). These are “Export Mailbox” and “Import Mailbox”.

Figure 4: Mailbox Export in Exchange Administrative Console

When this is done, we need to specify the location of the target mailbox and the target server or the location of the personal folder (PST).

Figure 5: Detailed information on Exporting Mailbox

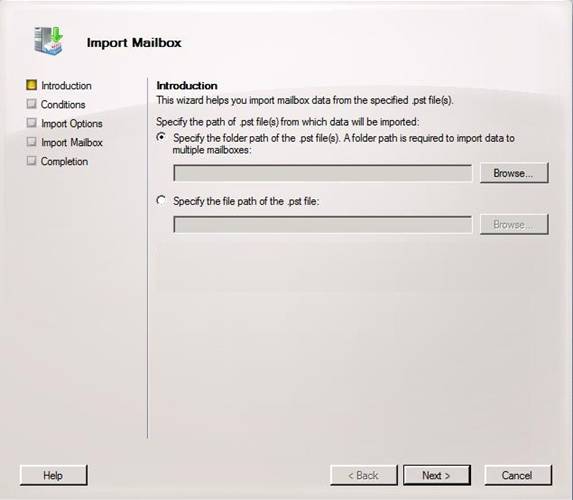
Importing a mailbox is quick and easy. You can see what option to choose from the Figure below.

Figure 6: Importing a mailbox using Exchange Management Console

The reason why Microsoft has disabled this feature may be (apart from the fact that it may come back in the final release or a first Service Pack) this task is especially for a mail server administrator and not for the general administrator.

Olivetti Tablet Olipad 110 (OP110) or Medion Lifetab P9514 FGx driver for adb (Android Debug Bridge) tool on Microsoft Windows 7

Download Google USB Driver, run a text editor (like Notepad) “as Administrator” then open ‘android_winusb.inf’ file inside the USB driver folder. (The Google USB Driver is located in <android-sdk>extras\google\usb_driver\.)
Just add these new lines under [Google.NTx86] or [Google.NTamd64] (depending on whether you are using 32 bit or 64 bit Windows) and save it.

;Olipad 110 or Lifetab P9514 
%SingleAdbInterface% = USB_Install, USB\VID_0408&PID_B009&MI_01 
%CompositeAdbInterface% = USB_Install, USB\VID_0408&PID_B009&REV_9999&MI_01

Note:
USB\VID_0408&PID_B009&REV_9999&MI_01
USB\VID_0408&PID_B009&MI_01

are written in Device Manager, expand Unknow Device, right-click on FGx, Properties, Details tab, Hardware Ids  property.

Open a Command Prompt Window (Start -> Run -> cmd) and execute the following command:
echo 0x408 >> "%USERPROFILE%\.android\adb_usb.ini"

Note: Just add new line with ’0×408′ value the VID (Vendor ID) number (VID_0408) written like hexadecimal format into ‘adb_usb.ini’ file that is located in C:\Users\<username>\.android\

Now Google USB Driver are configured to support FGx hardware.

To be able to use adb and other SDK tools with your device, you can proceed as follows:

  1. On your tablet, go to Menu > Settings > Applications > Development and enable ‘USB Debugging’.
  2. Connect your Android Hardware Device to your computer’s USB port. You will get a notification that some drivers were not installed, which is OK for now.
  3. Right-click on Computer from your desktop or Windows Explorer, and select Manage.
  4. Select Device Manager in the left pane of the Computer Management window.
  5. Locate and expand Unknow Device in the right pane.
  6. Right-click FGx and select Update Driver. This will launch the Hardware Update Wizard.
  7. Select Install from a list or specific location and click Next.
  8. Select Search for the best driver in these locations; un-checkSearch removable media; and check Include this location in the search.
  9. Click Browse and locate the USB driver folder. (The Google USB Driver is located in <android-sdk>\extras\google\usb_driver\.)
  10. If you get any warnings prompts telling you that the driver might not be compatible, just choose to continue installing.
  11. Once the drivers have been installed, you should be able to use adb with your device.
  12. To confirm that your device is recognized, launch a Command Prompt window and enter these commands (adb tool is located in <android-sdk>\platform-tools\.):
    adb kill-server adb start-server adb devices

    If you see your device name or a few numbers as the output under the list of devices, your device is now recognized by adb.

Promjena DNS servera

Na Ubuntu/Debian, standardno se DNS postavke nalaze u resolv.conf datoteci..

evo primjer:

/etc/resolv.conf

Sadrzaj:

search example.com
nameserver 208.67.222.222
nameserver 208.67.220.220

Example.com je defaultna domena u slucaju da se ne napise puno ime (FQDN)..., 

Dakle ako zelite pingati vas lokalni switch1 (oznaka sw1) napisete:

ping sw1

on ce automatski pitati za dns, koji je IP od sw1.example.com
takodjer uvijke mozete pisati puno ime:

ping sw1.example.com

treba napomenuti kako mozete imati samo jednu defaultnu domenu.

Te neki paketi ce mozda zatrebati jos postavki DNS-a unutar interfaces konfiguracijske datoteke, stoga pogledajmo kako to tamo izgleda:

Datoteka:

/etc/network/interfaces

U njoj pronadjite redak gateway i ispod toga dodajte:

        # dns-* options are implemented by the resolvconf package, if installed
        dns-nameservers 208.67.222.222 208.67.220.220
        dns-search example.com

potrebno je restartati mrezni servis:

/etc/init.d/networking restart

Izlist otvorenih priključnih točaka (Portova)

naredba:

lsof -i -r

Ova naredba će izlistati sve otvorene mrežne priključne točke uz ponavljanje (-r). Predefinirano vrijeme ponavljanja je 15 sekundi. Dodavanje parametra, primjerice

lsof -i tcp:80 -r

omogućuje filtriranje izlista po protokolu i portu. Uz korištenje opcije r naredba se izvršava do prekida (CTRL-c).

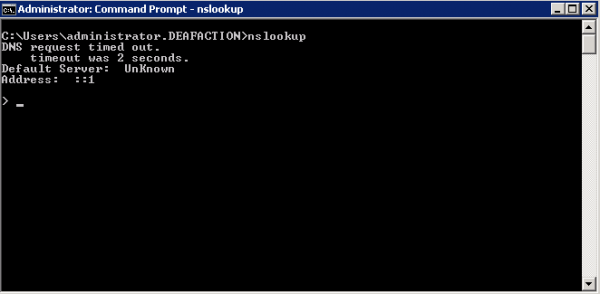
nslookup Default Server: UnKnown Windows 2008 R2

The problem looks like this:

This was really annoying one. I checked my DNS settings maybe 1000 times and everything looked ok.

Then I realised that mysterious ::1 is local host address in IPv6. Now the fix was easy. Just clear the IPv6 DNS settings in the adapter settings and set to automatic.

OK that’s it! Now the DNS name resolution should be working fine!

Importing Data From a PST File to an Online Archive Mailbox

With Exchange 2010 RTM one of the disappointments for organizations that decided to move away from PST files and instead enable the native online archive mailbox for users within the organization, was the fact that they couldn’t import PST files directly to the online archive mailbox. Instead, they first had to import it to the primary mailbox of the user using the Import-Mailbox cmdlet, and then have the user drag and drop the content from there to the online archive mailbox or use retention policies.

The New-MailboxImportRequest cmdlet makes this a thing of the past as it allows Exchange admins to do exactly that. Let’s say I have a PST file that I used as an archive over the years, and I now want the data placed in my online archive. To do so I would use almost the same command as above but just add the “–IsArchive” parameter as shown below:

New-MailboxImportRequest -Mailbox HEW –IsArchive -FilePath \\EX02\PSTFileShare\HEW.pst

Figure 7: Importing a PST file to an Online Archive mailbox

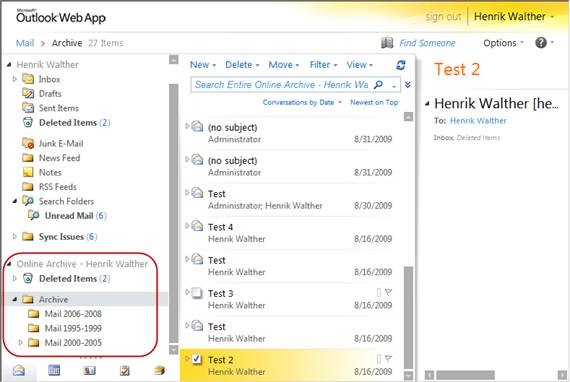
When the import is complete, we can find the data in our Online Archive as shown in Figure 8.

Figure 8: PST content imported to Online Archive mailbox

If you are migrating from a third party archive solution or just want to eliminate all PST files in the environemnt by providing the users with an online archive, you can import all PST files from a share to their equalent mailbox’s online archive using:

Dir \\EX02\PSTFiles\*.pst | %{ New-MailboxImportRequest -Name PSTImport -BatchName Imports -Mailbox $_.BaseName -FilePath $_.FullName –IsArchive }

                  Figure 9: Importing multiple PST files to Online Archive mailboxes

Advanced Import Mailbox Request Commands

If the basic commands we just went through are not sufficient when it comes to what data you want to import from the PST file, you can use the “-IncludeFolders” parameter to specify which folder or folders from the PST files should be imported. For instance, if I only want to import the data in the Inbox folder, I would use the following command:

New-MailboxImportRequest -Mailbox HEW -FilePath \\EX02\PSTFileShare\HEW.pst -IncludeFolders “#Inbox#”

I can also specify that content from the PST files should be placed in a new folder (target folder) in the mailbox. This is a good approach if you don’t want items from the PST file to merge with items in the mailbox. To do so we would use this command:

New-MailboxImportRequest -Mailbox HEW -FilePath \\EX02\PSTFileShare\HEW.pst -TargetRootFolder “Date from PST file”

Note:
If the target root folder does not exist, it will be created automatically.

In addition to the above commands, you could also choose to have the request created but in a suspended mode (using the “-suspend” parameter) until you are ready to start it. In addition, you can use the “-ExcludeFolders” parameter instead of the “-IncludeFolders” if that suits the situation better. Moreover, you can exclude the dumpster using the “-ExcludeDumpster” parameter. Also and as mentioned already, you can perform the import via multiple import requests running against the same mailbox.

If you need to import multiple PST files named after the mailbox alias of the mailbox to which they need to be imported, we can use the following command (will import all PST files in the share “PSTFiles” on server “EX02” based on mailbox alias and PST name):

Dir \\EX02\PSTFiles\*.pst | %{ New-MailboxImportRequest -Name PSTImport -BatchName Imports -Mailbox $_.BaseName -FilePath $_.FullName }                             Figure 6: Importing multiple PST files