Ok, not really an upgrade, but more of “replacement”. 
With the release of Windows Server 2012 R2 to MSDN which was recently announced HERE, it is time for me to upgrade my lab domain controllers to Windows Server 2012 R2.
I started by first “upgrading” my Hyper-V hosts to Windows Server 2012 R2. This would allow me to take full advantage of all the new benefits of 2012 R2 for Hyper-V. That was pretty simple, just shut down the OS, unplug all my additional storage in the machine which contains all my VM’s, and boot from my USB key that contained WS2012R2. Then, once I added the Hyper-V role back, I simply connect my storage back to the system, and import the previous VM’s I was running.
My next step in upgrading my VM’s is targeting the domain controllers. I have two DC’s, each running AD services, certificate services, DHCP, DNS, etc. Since I don’t want to risk messing up the complex configuration of each service, I choose to deploy two NEW VM’s for additional DC’s, and I will migrate these additional roles to the new DC’s later.
My first step is to deploy the two new VM’s. First decision I need to make is whether to use Gen1 or Gen2 VM’s:
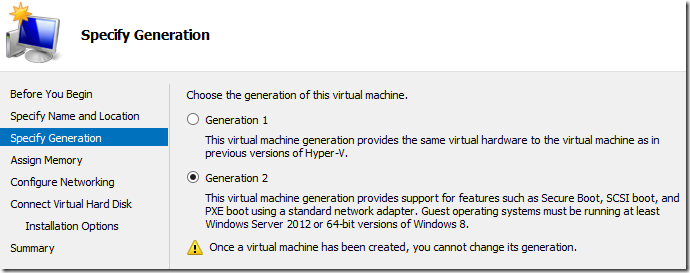 Gen2 VM’s are a new feature of Hyper-V in Windows Server 2012 R2, and offer significant advantages over Gen1 VM’s, such as secure boot, discarding the emulated devices like IDE and using SCSI disks event for the boot volumes, PXE capability on a standard NIC, etc. Read more about Gen2 VM’s here: http://technet.microsoft.com/en-us/library/dn282285.aspx
Installing Windows Server 2012 R2 is just like any other OS install. When it stops on the Activation Key screen, I decided to leverage another new feature for Windows Server 2012 R2 – Automatic VM Activation. You can use these new keys to activate servers when they are running on Windows Server 2012 R2 Hyper-V. Read more about Automatic VM Activation here: http://technet.microsoft.com/en-us/library/dn303421.aspx
I rename the VM’s with the correct server names, and join them to my domain.
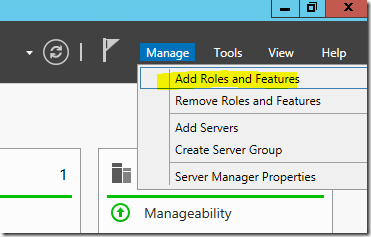
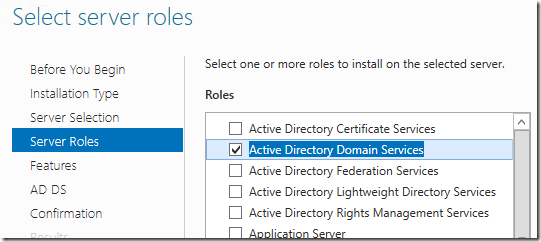
The first step in promoting these new VM’s to Domain Controllers is to add that role, which you can perform from Server Manager. A walkthrough of the process is described here: http://technet.microsoft.com/en-us/library/jj574134.aspx
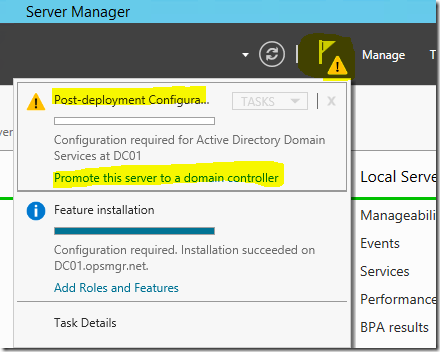
When the role is added – you will see a post-deployment task warning, to run the promotion:
The wizard will run AD forest prep, schema update, and domain prep for 2012 R2 when you promote the first DC on Windows Server 2012 R2.
When it is complete, you will see your new DC’s added to the domain controllers OU in Active Directory.
The next step in the process is to migrate the AD Operations Master roles. The simplest way to move these roles is via PowerShell. On Server 2012 AD PowerShell modules, this can be done from anywhere. Simply run the following command to view you current configuration, and change them:
PS C:\> netdom query FSMO
Schema master               DC1.opsmgr.net
Domain naming master        DC1.opsmgr.net
PDC                         DC1.opsmgr.net
RID pool manager            DC1.opsmgr.net
Infrastructure master       DC1.opsmgr.net
Then use the Move-ADDirectoryServerOperationMasterRole cmdlets to move them. You can do this with a simple one liner!
Move-ADDirectoryServerOperationMasterRole -identity "DC01" -OperationMasterRole 0,1,2,3,4
The identity is the server you want to transfer these roles to, and the 0-4 numeric represents each role to move. Read more about this cmdlets here: http://technet.microsoft.com/en-us/library/ee617229.aspx
When complete, you can run a “netdom query FSMO” again and ensure that your master roles have been moved successfully.
Then, you simply need to migrate any other roles or services running on the DC’s, then demote them when complete. To demote the domain controller on Server 2012, simply begin by removing the Active Directory Services role, which will prompt you to demote first with a task link. Once demoted, you can remove the server from the domain.